
4.1 Introduction
4.1 Introduction.
Success in visual A/A combat depends on the ability of the fighter pilot to maneuver the aircraft into a position from which ordnance can be employed against the adversary. BFM is the efficient application of aircraft handling skills to either attain a position from which weapons may be employed, deny the adversary a position from which weapons may be launched, or defeat weapons employed by the adversary. Note: For the remainder of this chapter, the adversary will be referenced as the “Bandit.”
4.2 BFM Axioms.
There are three basic axioms of BFM that apply to any situation. Whether offensive, defensive, or high aspect (neutral), the following three concepts apply to every situation. They are:
• Lose Sight, Lose the Fight
• Maneuver in Relation to the Bandit
• Energy versus Nose Position
4.2.1 Lose Sight, Lose the Fight.
In a fight where both aircraft are moving faster than 400 miles an hour, it takes only a few seconds for an object with a total apparent surface area of just a few feet (like a T-38C approaching head on or flying away) to disappear completely. Additionally, most of the world’s air forces apply paint schemes to increase the difficulty of keeping sight of their airplanes. Just a couple seconds of not seeing the Bandit can mean the difference between victory and death. It will be necessary to occasionally take eyes off the Bandit during a fight. Learning when to take eyes off is critical. Offensively, you cannot shoot at an enemy you don’t see. It is relatively easy to keep track of a Bandit that is in front of you. However, defensively, an enemy that you cannot see is at liberty to shoot you while you are unable to defend yourself. There will be times in DBFM when the Bandit flies behind your seat; knowing when and where to get the tally back will be paramount. Do everything possible to prevent going no joy, but if a no-joy occurs, strive to get the tally back! In high aspect BFM, the Bandit will be at greater ranges during the fight than offensive and DBFM. Keeping sight will require a visual scan to stay outside of the cockpit for longer periods of time. As a general rule, stay padlocked on the Bandit until: 1) it is predictable, 2) it is easy to see, and 3) it is not threatening you. If in doubt, stay padlocked and don’t look inside the cockpit.
4.2.2 Maneuver in Relation to the Bandit.
Nearly all maneuvering must be in relation to the Bandit. That means every time you do something with your airplane, it must be either a reaction to what the Bandit has done, or preferably, to drive the fight and cause the Bandit to react to you. All the basic BFM concepts apply no matter what the attitude of your airplane is, so maneuvering in relation to the horizon becomes less important in most fighter type aircraft. Exceptions to this rule include utilizing the effect of gravity to your advantage and maneuvering to avoid the floor, or in actual combat, the ground. Offensively, and at high aspect, maneuver in relation to the Bandit to arrive in the WEZ based on your position relative to the Bandit. Defensively, maneuver in relation to the Bandit to keep him from arriving in a WEZ. Regardless of the situation, you must maneuver in relation to the Bandit in order to defeat him. However, due to lack of performance in the T-38, you must maneuver in relation to the horizon as well as the Bandit to achieve the best performance from the jet.
4.2.3 Energy Versus Nose Position.
The last axiom of BFM is knowing when to fight an energy fight and when to fight a nose position fight. This boils down to either sustaining the current total energy state or cashing energy in for nose position to shoot or defend against weapons employment. Although high-performance A/A ordnance and helmet-mounted sights greatly expand WEZs, it is usually true that you cannot shoot someone unless your nose is pointed at them. That is why it is so important to know when to concentrate on the energy state of the jet and when to concentrate on its nose position. During OBFM, you generally maintain energy until you decide to employ ordnance in a controlled manner for a high probability of kill (Pk) shot. You then use nose position to employ ordnance. Defensively, you concentrate on the Bandit’s nose position. When the Bandit threatens you, cash in energy to defeat his ordnance. When his nose no longer threatens you, concentrate on maintaining or regaining energy to keep him from pointing at you. In high aspect, you concentrate on energy when you want to maintain a high turn rate over time, and cash in that energy for nose position when you want a small turn radius or an increased instantaneous turn rate to employ or deny ordnance. No matter what kind of fight you are in, at any given moment you should always know whether energy or nose position is more important.
4.3 BFM Concepts.
BFM is not a set of canned maneuvers; rather, it is a dynamic combination of rolls, turns, and maneuvers to either create or solve a BFM problem. BFM problems can be created in range, angles, and closure. Each BFM selected is based on solving or creating a problem while maneuvering in relation to another aircraft. The time and amount of BFM required depends on ordnance load, threat reaction, and pilot skill. BFM concepts include terms, which provide a common baseline for BFM discussions.
4.3.1 Geometry.
Understanding several key geometric terms and conditions are crucial in understanding one aircraft's position relative to another.
4.3.2 Range.
Range is the distance by which the two aircraft are separated.
4.3.3 Aspect Angle (AA) (Figure 4.1).
AA describes the relative position of the attacker to the target without regard to the attacker's heading. AA is defined as the angle measured from the tail of the target to the position of the attacker. From a defensive point of view, this angle is commonly regarded as the AOT.
4.3.4 Heading Crossing Angle (HCA) (Figure 4.2).
HCA is the heading difference between two aircraft. With converging vectors HCA can be measured up to a maximum of 180° for a head-on pass. HCA is also referred to as “angle-off.”
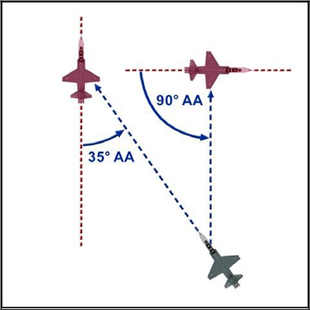
Figure 4.1. Aspect Angle.
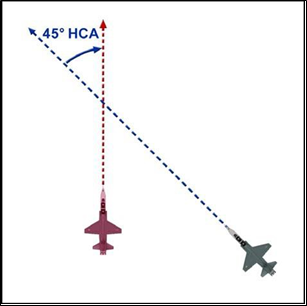
Figure 4.2. HCA.
4.3.5 Antenna Train Angle (ATA) (Figure 4.3).
ATA is the angle measured from the nose of one aircraft to the position of the other aircraft. Like AA, ATA is independent of the heading/longitudinal axis of the other aircraft, and commonly referred to as “angle off nose (AON).”
4.3.6 Angle Off Tail. (Figure 4.3).
AOT is the angle from the longitudinal axis of your airplane to the Bandit, as measured from your tail. Note: When the fighter is defensive, AOT and the AA you are showing the Bandit are the same. IFF instructors will use these terms interchangeably when discussing assessment in the DBFM phase.
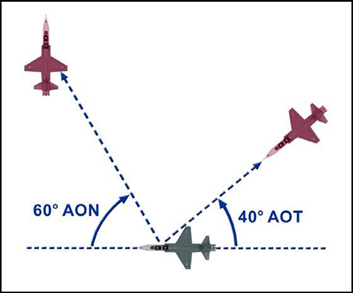
Figure 4.3. ATA (AON) and AOT.
4.3.7 Pursuit Curves (Figure 4.4).
The three pursuit curves are lead, pure, and lag. The attacker's nose position and LV placement determine the pursuit curve being flown in relation to the defender's plane of motion (POM) (see paragraph 4.3.11). If the attacker is in the defender's POM, the position of the attacker's nose determines the pursuit curve. When the attacker is out of the defender's POM, the pursuit curve is determined by where the present LV will position the aircraft's nose once entering the defender's POM.

Figure 4.4. Pursuit Curves.
4.3.7.1 Lead Pursuit.
(Nose in Front of the Bandit) All else equal, lead pursuit increases closure, increases AA, and decreases range. This pursuit curve is typically used offensively during gun employment and, from a defender’s perspective; it helps to generate closure and/or angular problems.
4.3.7.2 Pure Pursuit. (Nose on the Bandit)
Pure pursuit is useful from an offensive perspective when attempting to achieve a radar lock (boresight) and/or shoot certain missiles. Pure pursuit outside the Bandit’s turn circle (TC) increases closure (but at a more moderate rate than lead pursuit), aspect, and AOT. Maintaining pure pursuit inside the Bandit’s TC will continue to increase closure, AA and AOT until less than a turn radius from the Bandit. When less than a turn radius from the Bandit, closure and angles will increase until the offender either runs out of energy to maintain pure pursuit, or must flow to lag to avoid hitting the defender.”
4.3.7.3 Lag Pursuit (Nose Behind the Bandit).
Normally, lag pursuit decreases closure, decreases AA, and increases range. Lag pursuit is often used in BFM to build turning room (TR) and control overtake. Excessive lag does, however, remove pressure from the Bandit. From an offensive perspective, lag pursuit can help control closure, range, and angular problems. Defensively, a Bandit in lag pursuit may offer opportunities to gain energy.
4.3.8 Turn.
Turning allows the pilot to solve range, angle, and closure problems offensively, and to present the same problems defensively. For best turn performance, use available G to solve the problem with an acceptable specific power (Ps) bleed off. How well the aircraft can turn (turn rate and radius) is a function of TAS and available G. See paragraph 4.4 for a detailed discussion of power and energymanagement.
4.3.8.1 Rate.
Turn rate is defined in terms of the number of degrees per second (deg/sec) of heading change on a given TC. All else being equal, the aircraft with the higher turn rate travels around the circle quicker and either generates or solves BFM problems better than the aircraft with the slower turn rate.
4.3.8.2 Radius.
Radius is one-half the size of an aircraft's TC. All else being equal, the aircraft with the smaller turn radius is capable of creating/solving problems in range, closure, and angles better than the aircraft with the larger turn radius. Offensively, a smaller turn radius permits a turn inside the defender’s TC to achieve a weapons solution while maintaining an offensive advantage. Defensively, a smaller turn radius will deny a weapons solution and force the offender to fly outside the TC (assuming both aircraft remain in the same POM).
4.3.9 LOSR.
LOSR is the speed with which the LOS is changing. Fighter pilots also use LOSR for assessment during BFM. LOSR describes the Bandit’s apparent motion across the canopy as observed by the pilot sitting in the cockpit. For example, an airplane that is flying perpendicular to your flightpath and in front of you may have an LOS from left to right.
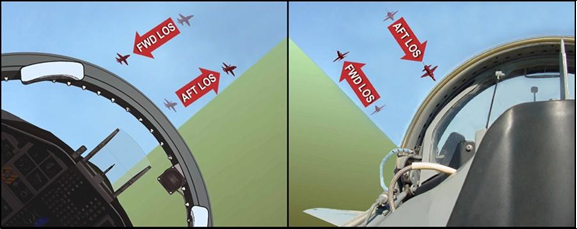
Figure 4.5. LOSR.
During BFM, we describe the LOS with regard to direction and rate. It is important to remember that LOSR is relative to your aircraft. LOS is also described with respect to rate. A Bandit that moves aft very quickly has a high LOSR aft, while a Bandit that moves slowly toward the front of your jet has a low forward LOSR. The actual motion of the airplane may be different than the LOSR (Figure 4.5). Use LOS direction and rate to determine where you are in relation to the TC, and also to determine what the Bandit is doing for the purposes of predicting what he will do next. It is very important to keep track of the LOSR of the Bandit during the fight. LOSR is generally described as either forward or aft. Forward LOSR means the Bandit’s apparent motion is from the back of your jet to the front. That is to say, from the tail to the nose. Aft LOSR is just the opposite. The Bandit’s apparent motion is from your nose to your tail. LOSR is not dependent on the Bandit’s heading, pursuit curve, or AA.
4.3.10 Control Zone (CZ) (Figures 4.6 and 4.7).
The CZ is defined as having 2,500 to 4,500 feet of slant range and within a 25° to 45° cone.
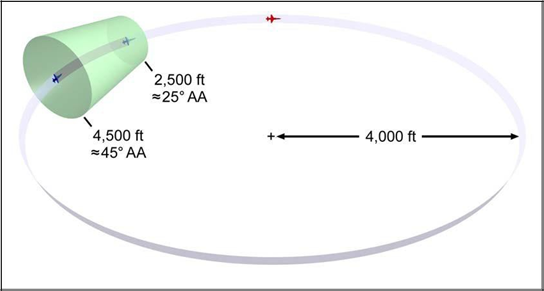
Figure 4.6. The Control Zone.
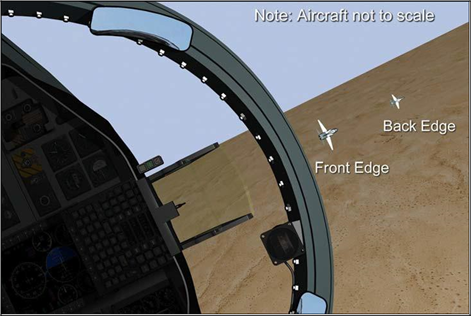
Figure 4.7. Control Zone Canopy Bow References.
4.3.11 LV (Figure 4.8).
Roll and yaw allows the pilot to position the LV (a line perpendicular to the wings out the top of the canopy to infinity), thus determining the POM in which the aircraft will turn. POM is the plane the aircraft is traveling through and will vary with the given LV placement, amount of yaw present, angle of attack (AOA), G, and airspeed.
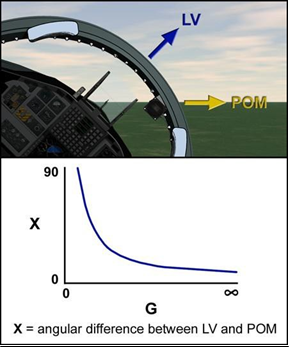
Figure 4.8. LV versus POM
4.3.12 Turning Room.
Turning room is any displacement from the Bandit's flightpath in any plane. The goal is to take advantage of available TR to either gain a position of advantage against a defender or create problems for the offender. An important point to remember is that TR for the attacker is also TR for the defender in most cases. Exclusive TR, however, exists when one aircraft can take advantage of TR but the other cannot (for example, in a high-aspect, low-altitude pass where the high fighter is less than one TC above the ground and the low fighter is executing a pure low-to-high conversion. In this case, a majority of the TR is usable only by the low fighter since the high fighter would strike the ground if attempting to use it).
4.3.12.1 Offensive.
The goal of the offender is to take full advantage of TR that cannot be denied by the Bandit, which when inside the TC, is in the Bandit’s POM. If needed, the offender can build TR in the Bandit’s POM by using lag pursuit. Whenever the Bandit’s POM changes, it may provide the offender with additional TR the Bandit cannot use due to relative energy states.
4.3.12.2 Defensive.
With the Bandit outside the defender’s TC, the defender can deny the attacker TR by turning with the LV on or near the Bandit. Once the attacker is inside the TC, the defender can only deny TR if the Bandit is out of the defender’s established POM, energy allowing (for example, the offender enters the TC 500 feet above the defender’s POM. The defender can only deny TR by changing the POM upward toward the offender).
4.3.12.3 High Aspect.
Premerge, high-aspect TR may be in the vertical, horizontal, or a combination of both. Turning room is not always equally usable by both fighters, as discussed previously. The goal of each fighter approaching a high-aspect merge is to use TR to reduce HCA prior to the merge (for example, take lead turn).
4.4 Power and Energy Management.
Power affects airspeed and therefore turn radius and rate. Power is also used to control energy. Energy provides the potential to maneuver. Nonoptimal energy levels (usually expressed in airspeed) can result in degraded turn performance, reduced time in weapons parameters, or greater exposure to threat weapons. Expend available energy only as required for offensive advantage (that is, kill the Bandit), defensive necessity (that is, deny Bandit WEZ/CZ), or merge preparation. Otherwise, strive to maintain or gain energy as the situation allows.
4.4.1 Energy Maneuverability (EM) Diagram (Figure 4.9).
In BFM with all other variables equal, the more maneuverable aircraft usually has a better chance of winning. All BFM involves turning, and generally the tighter turning aircraft (radius) that can turn the greatest number of degrees over a specified time period (rate) has the advantage. Engineers have translated the data for use in EM diagrams which depict an aircraft’s rate of turn, turn radius, and energy bleed rate at a given weight, throttle setting, altitude, airspeed and G- loading. By comparing the EM diagrams, it can be determined who has the advantage, and where that advantage lies in terms of altitude and velocity. Figure 4.9 shows the diagram for a T-38 at gross weight = 10,155 pounds and ALT = 15,000 feet and MAX afterburner. There are some important points on the EM diagram to be familiar with. Along the bottom axis is the airspeed. G is depicted by the blue lines. The placard G limit is 7.0 Gs. The curved line (labeled MAX LIFT) that runs down the left side of the diagram is the lift limit line. The area bounded by the max lift limit, placard G limit, and placard airspeed limit is the flight envelope. To read the diagram, enter from the bottom with airspeed and follow it up to one of the G-load lines that run from the upper left to the lower right. At the intersection of G and airspeed, reference the rate, shown on the left, and parallel to the radius lines up and to the right for turn radius.
4.4.1.1 Ps.
Inside the flight envelope, every point defined by an airspeed and G loading has an associated energy gain or loss. They are measured by negative or positive feet per second, are numerated in hundreds of feet per second, and represent a measure of the energy bleed or gain rate. If the energy bleed rate is negative, it means that to sustain the current G load and airspeed, the aircraft must descend (change potential to kinetic energy) at the depicted rate. These lines are often referred to as excess power or Ps lines.
4.4.1.2 Turn Rate.
Along the left, vertical axis is the turn rate. Rate is measured in degrees per second and graduated every 2. A turn rate of 12 per second means the nose will transit through 12 of turn in 1 second at the G load and airspeed depicted. If in a horizontal turn, this would mean 12 of heading change. If pulling in the pure vertical it would mean 12 of vertical attitude change. Note that, up to approximately 380 knots, the rate increases with airspeed.
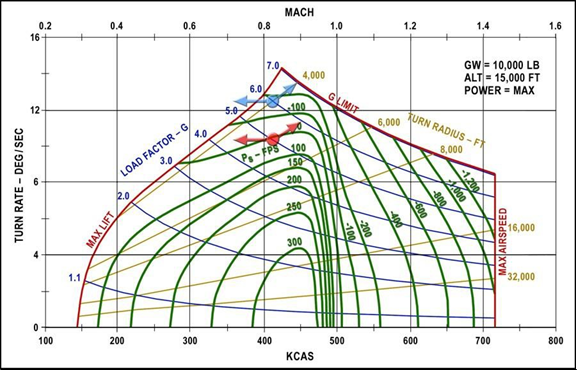
Figure 4.9. T-38 EM Diagram.
4.4.1.3 Radius.
Turn radius is depicted by the straight lines that run from the lower left to the upper right of the diagram. They are measured in thousands of feet and graduated every 1,000 feet. Note that, assuming a constant airspeed, the radius decreases as G is applied until the aircraft reaches either the maximum lift or the maximum G available.
4.4.1.4 Corner Velocity (Figure 4.10).
The very peak of the diagram is the instantaneous corner velocity. This is where maximum allowable G intersects with the lift limit line and depicts the slowest airspeed at maximum G can be applied. Instantaneous corner velocity can be approximated by referencing the G line and finding the intersection with the lift limit line. (Reference the red-dashed circle in Figure 4.10). Instantaneous turn capability comes at a cost, however, in the form of negative Ps.
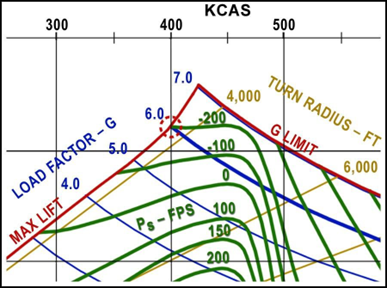
Figure 4.10. Corner Velocity.
4.4.1.5 Comparing EM Diagrams.
When comparing fighter performance, overlaying the EM diagrams will determine areas of strength and weakness for both aircraft. This provides a good idea of the flight regime to engage the adversary. For instance, if one aircraft is superior at higher altitudes, that pilot should try to keep the fight high. If the other aircraft has a superior sustained rate, the pilot would strive to fight a rate fight. At IFF, the adversary is also flying the T-38C, but by restricting use of throttle and/or G, advantages are available to the unrestricted aircraft in the form of increased rate and decreased radius and less bleed rate during the turn (reference Figure 4.9 to see the red and blue circles). A typical advantage enjoyed during an IFF engagement is approximately 2°/second and about 800 feet in radius. 2°/second over 360° of turn (about 28 seconds) equals 56° of advantage.
4.5 BFM Cross-Check.
During a BFM engagement, we need to keep track of two things in order to be successful. First, we need to monitor our own aircraft performance to execute our game plan. Second, we need to monitor the Bandit’s position relative to us and their actions to successfully fight them. Just as we use an instrument cross-check to monitor several parameters at once while flying instruments, we use a BFM cross-check to monitor our performance and the Bandit’s actions during BFM. Depending on the phase and the nature of the fight (defensive, offensive, or high aspect), our cross-check will emphasize different items. Each will be discussed later relative to specific engagement circumstances.
4.5.1 Fighter Cross-Check. During an engagement, we are usually trying to max perform our jet to create the highest turn rate and the smallest turn radius. G, LV, and airspeed all affect the rate and radius of our turn in a T-38. Therefore, these three things form the foundation of the fighter cross-check. While fighting, we also need to monitor our own fuel state and the floor.
4.5.2 Bandit Cross-Check. The Bandit cross-check consists of range, AA, AOT (plan form), HCA, LOSR, and closure. These parameters will telegraph the Bandit’s game plan.
4.6 Offensive BFM (OBFM).
OBFM trains the fighter pilot to maneuver from a position of advantage to a controllable WEZ and kill the Bandit. OBFM is a sequential set of problems solved by the offender to arrive at a controllable WEZ and employ valid ordnance to kill the Bandit in the minimum amount of time. Offensive BFM requires a well thought-out and executed game plan based on fighter and Bandit capabilities, training, and proficiency. The primary objective of OBFM is to kill the Bandit. Subobjectives further define the overall objective of KILL. Standard OBFM objectives are:
• KILL
- Maneuver to the CZ.
- Transition to a WEZ.
- 100 percent valid weapons employment.
• Maintain the offensive.
4.6.1 OBFM Perch Setups.
The current IFF syllabus requires two basic perch setups for OBFM: 6,000-foot perch setups and 3,000-foot perch setups. The primary difference is the fighter starts outside the Bandit’s TC on the 6,000 setup and inside the Bandit’s TC on the 3,000 setup.
4.6.1.1 6K Perch Setup.
Per the standard setup, the fighter starts 6,000 OBFM from 6,000 feet behind the Bandit at 30° to 40° of AA. Squadron standards dictate how to arrive at this position, but the flight lead normally directs the wingman to 9,000 feet LAB at the planned “FIGHT’S ON” airspeed. The flight lead checks both aircraft to the right or left so the fighter turns toward the Bandit. As the fighter reaches pure pursuit, the Bandit reverses the turn and sets the appropriate aspect angle. The fighter monitors the range and calls the fight’s on at 6,000 feet. The fighter holds the Bandit under the gun cross until he reaches 6,000 feet and continues to modulate power to maintain the briefed “FIGHT’S ON” airspeed. For a T-38C, the wingspan is 4 mils at 6,000 feet. This is one mil larger than the inside gap of the gun cross and one mil smaller than each side of the horizontal arms of the gun cross. The AAT will display
1.1 nautical miles (NM) due to system lag.
4.6.1.2 3K Perch Setup.
This setup is applicable to short-range BFM and the quarter plane exercise. Initial position before the check turn is 350 knots, 6,000-foot lateral spacing, stacked level with the Bandit. At the check call, the offender checks towards the Bandit to achieve pure pursuit. The offender maintains pure pursuit on the Bandit, modulating power to maintain 350 knots until 3,000-foot range is achieved. At 3,000 feet, the Bandit’s wingspan will be 8 mils. The AAT will display 0.6 nm due to system lag. The offender calls out “EASE” or “TIGHTEN” as appropriate for aspect outside the 30° to 40° window.
4.6.2 OBFM Exercises:
4.6.2.1 Offensive Ranging Exercise.
Begin the offensive ranging exercise from a 6,000-foot setup. Pure pursuit the Bandit until reaching the 6,000-foot HUD reference. Roll out to view lag pursuit for 1 to 2 seconds, select MIL power, and place the Bandit back under the boresight cross. Continue to pure pursuit until reaching the 3,000-foot HUD reference. Note the details on the Bandit’s jet at 3,000 feet as these references are important for OBFM. At 3,000 feet, the Bandit has a clearly visible canopy and canopy bows, distinct lines where the wings and tail meet the fuselage, and clear lines where the colors on the paint scheme change. At 3,000 feet, continue to pull the Bandit down the HUD until the Bandit’s wingspan fills the gunsight. Modulate power for steady, controllable overtake until reaching reposition cues. Reposition to avoid the 1,000-foot bubble and, as the Bandit reverses, maneuver to remain at 1,000 feet to view the Bandit references at the bubble.
4.6.2.2 Heat-to-Guns Exercise (Figure 4.11).
The objective of the heat-to-guns exercise is 100 percent valid weapons employment. Units will determine specific setup parameters and special instructions (SPINS) for the heat-to-gunsexercise.
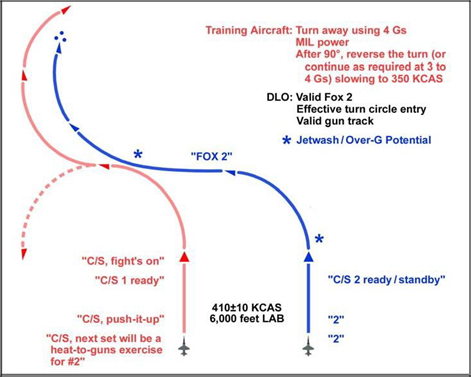
Figure 4.11. Heat-to-Guns Exercise.
4.6.2.2.1 Communication. Reference specific communications guidance in unit standards.
4.6.2.2.2 Bandit. At the “FIGHT’S ON” call, the Bandit will initiate a MIL power, 4- to 5-G level turn away from the maneuvering aircraft. At 90° of turn, roll out, and modulate power. As soon as a Fox 2 is called by the maneuvering aircraft, the Bandit will either immediately reverse the turn (if still checking away) or continue in the same direction and maintain 3 to 4 Gs while slowing to 350 KCAS and MIL power.
4.6.2.2.3 Maneuvering Aircraft. At the “FIGHT’S ON” call, select MAX afterburner, set the LV on the Bandit, start the AGSM, and perform best break turn. As the Bandit enters the HUD field of view (FOV), simultaneously relax the G, and attempt a valid AIM-9 shot. Call “FOX 2.” Then prepare to enter the Bandit's TC.
4.6.2.2.4 AIM-9 Employment. When pulling the Bandit into the HUD, consider a slight relax of G as required to slow the Bandit’s LOSR to the missile seeker FOV.
With the target’s heat source in the missile FOV, uncage the missile by depressing the NWS button. Attempting to hold or freeze the Bandit in the center of the seeker FOV for too long can result in a significant closure problem and decrease the time available to prepare for follow-on maneuvers. Firmly depress the pickle button to fire the AIM- 9 and confirm missile launch by witnessing the removal of the reticle (evidence of employment can also be checked by referencing the missile count in the bottom left corner of the HUD). After employing the AIM-9, call “FOX 2,” roll out, and begin a slight climb (normally flightpath marker [FPM] 3° to 5° above the horizon) to avoid the Bandit's jetwash. Modulate power to accelerate or maintain airspeed while approaching the Bandit’s TC.
4.6.2.2.5 TC Entry Recognition Cues. Recognizing the proper TC entry cues proves vital to successfully entering the CZ. The maneuvering aircraft is on the TC when AN INCREASE IN THE AFT LOSR of the Bandit occurs. Another recognizable cue occurs when the rotational motion of the Bandit turns into aft translational motion (AA stops increasing). Due to the low turn rates of the T-38, this increase in LOSR is relatively subtle.
4.6.2.2.6 Maneuver to the CZ. At the TC entry, select G and power as appropriate (usually MIL) to maneuver to the Bandit's CZ. Begin the AGSM, set the LV near the Bandit, and start a light to moderate buffet pull. As the Bandit approaches the canopy bow, begin to assess range and aspect. The area within two fists of the canopy bow is the “assessment window.” Range and aspect should look appropriate for transition to the gun WEZ. Avoid the potential of flying through jetwash by maneuvering either above or below the Bandit’s POM while flushing towards the Bandit’s tail.
4.6.2.2.7 Assessing for a WEZ. When the Bandit reaches the canopy bow, assess range, aspect, and closure. The canopy bow assessment should occur approximately one to two fists above the canopy bow. Commonly briefed cues to search for during this assessment include 3,000 feet of range, 30° of aspect, and steady, controllable closure (referred to sometimes as the “rule of threes”). Details on the Bandit's jet provide the most accurate method to determine range. At 3,000 feet the Bandit has a clearly visible canopy and canopy bows, distinct lines where the wings and tail meet the fuselage, and clear lines where the colors on the paint scheme change. To determine 30° to 45° of aspect, refer to the wingspan-versus-length relationship. (See Figure 4.11.) To determine acceptable closure, the Bandit's jet should slowly grow larger. If his jet is rapidly growing larger or smaller, improper closure exists. If all three cues from the Bandit exist at the canopy bow assessment window, continue to pull the Bandit into the HUD and employ ordnance.
4.6.2.2.8 Ease Reposition (Repo). If the range, aspect, and closure cues are not met at the canopy bow assessment window, execute an ease repo to drive the range and aspect lower. An ease repo drives the maneuvering aircraft back toward the Bandit's TC, reducing range and aspect in the process. Execute an ease repo by relaxing back- stick pressure to reduce G. Modulate power as required to maintain the desired rate fight airspeed. When reducing G, the fighter will see aft LOS from the Bandit (away from the canopy bow) as well as a reduction in aspect. Expect LOS to be immediate, although the amount of time required during the ease will vary based on the range, angles, and closure presented by the Bandit at the time of the ease. Select MAX
afterburner, reset the LV for best rate, and blend the G back in. Maintain the best rate until the Bandit again enters the canopy bow assessment window. Assess and either execute another ease repo or pull G as required to enter the AIM-9/gun WEZ.
4.6.2.2.9 Gun Employment. A valid gun track opportunity requires proper POM, lead, and range during bullet time of flight. After deciding the attack cues are met, smoothly pull the Bandit into the HUD between the boresight cross and the AIM-9 FOV circle. Placing the Bandit in this position solves for POM. Next, establish the proper lead by matching the Bandit’s wingspan to the width of the funnel. Finally, assess the range by comparing the Bandit’s location in the funnel with the 2,500-foot pipper. While pulling the Bandit to the proper lead, range, and POM, the Bandit may pass through the AIM-9 FOV circle; if so, take a shot of opportunity as required. Prior to opening fire with the gun, ensure your feet are on the floor or exerting symmetric pressure on the rudder pedals. Unintentional yaw inputs will cause POM errors. Using fine muscle movements, stabilize your aiming reference on the center of the target aircraft. Adjust power as required based on closure, aircraft buffet cues, and LOSR. To open fire, use one smooth, continuous trigger squeeze per gun attempt. Intermittent pulsing of the trigger will minimize the Pk and will jam the 20mm cannon. Small adjustments in back-stick pressure and lateral stick displacement will be required to refine aiming based on continuously changing range and POM. Adjust for POM error using lateral stick pressure by attempting to adjust for one-half the distance of firing evaluation display system (FEDS) or lead computing optical sight (LCOS) pipper displacement. A controlled gunshot should be held for a 2-to-3 second lethal burst. This time may be shortened based on range, closure, and significant aiming errors. To terminate the gun attempt, RELEASE the TRIGGER prior to commencing a repo. Marksmanship is critical: at 60 rounds per second, your 450 rounds of simulated bullets will be depleted in approximately 7 seconds.
4.6.2.2.10 Repo Mechanics. While employing the gun, the maneuvering aircraft may encounter the need to repo. The maneuvering aircraft should repo for frag from a valid gun kill, or range and closure problems created during the gun attempt. Range and closure problems are the most common reason for the maneuvering aircraft to repo. The repo is a calculated bid to lag, using the vertical and induced drag to solve range, aspect, and closure problems. The goal of the repo is to transition back to the CZ.
4.6.2.2.10.1 Initial Move. Rotate the LV away from the Bandit; power placement, degree of LV change, and G/AOA used will depend on the severity of the closure problem the maneuvering aircraft is trying to solve. If unsure, a good default is to use idle, set the LV 60° to 90° above the Bandit (typically, perpendicular to the horizon) and use a smooth but deliberate pull to the moderate buffet.
4.6.2.2.10.2 Transition Back to the CZ. The repo is not finished after the initial move. Once arriving on or near the Bandit’s TC, begin pullback towards the Bandit to reduce HCA and begin the reassessment. Throttle position will depend on LOS and range cues from the Bandit.
4.6.2.2.10.3 Recommit from the CZ. Once established in the CZ with valid assessment cues, recommit for an AIM-9 opportunity on the way back to the gun
WEZ. Use power as required, to include MAX afterburner, and place LV as required to position the nose for valid weapons employment. Where the LV is placed will depend on how much vertical the Bandit is using. The fight will go downhill in pursuit of the WEZ and a low yo-yo may be required to increase/maintain energy for nose rate. Be aware of position relative to the training floor during the recommit. Based on the assessment, if valid attack cues are not met, remain in or maneuver back into the CZ before attempting another WEZ.
4.6.2.3 High-Angle Guns-to-Separation (HAGS) Exercise. Begin the HAGS exercise from a 6,000-foot setup. Call “FIGHT’S ON” at 6,000 feet. Begin an AGSM while selecting MAX afterburner and setting the LV in plane with the Bandit. Smoothly pull to 5Gs and blend to single-rate beeper (SRB. The Bandit will disappear beneath the nose of the aircraft. Continue to pull for 4 to 5 seconds. Roll out and modulate power for the briefed airspeed while reacquiring the Bandit. The Bandit should be level on the horizon and outside the canopy bow. As the Bandit approaches the canopy bow, squeeze the trigger and hold until the Bandit reaches the edge of the HUD. Select MAX afterburner; reset the LV to the Bandit’s deep 6 o’clock; and smoothly pull to either moderate buffet or SRB. Approximately 90° of heading change is required for a ballpark separation heading with a dive angle of 20°. Upon reaching this heading, look over the opposite shoulder to acquire the Bandit and update heading as required to place the Bandit at 6 o’clock. Modulate power to stay below the Mach while executing a floor transition.
4.6.2.4 Quarter Plane Exercise. This exercise starts from a 3,000-foot setup. The objectives are to maintain 3/9 line advantage. At the “FIGHT’S ON,” maneuver the aircraft as to maintain pipper on the Bandit until the quarter plane picture is achieved shortly before reaching the bubble. At the quarter plane picture, set LV away from the Bandit (“feet on the Bandit”), select idle power, and execute a MAX performed pull to stop forward closure.
4.6.3 OBFM Sets:
4.6.3.1 Medium-Range OBFM (6,000-Foot Perch Setup). The 6,000-foot OBFM setup begins outside the Bandit’s TC and CZ.
4.6.3.1.1 Objective. The objective is to kill the Bandit. A commonly desired learning objective is to accomplish the kill within 720° of turn.
4.6.3.1.2 Game Plan. The initial game plan is to fly towards the Bandit’s TC, execute an on-time TC entry, and assess for the ability to enter the Bandit's WEZ.
4.6.3.1.3 Initial Move. When the Bandit begins his break turn at the “FIGHT’S ON,” the fighter is outside of the Bandit’s TC. The fighter must drive to the Bandit’s TC in order to fly CZ BFM. Rolling out and pointing to the Bandit’s location at the “FIGHT’S ON” is the easiest way to drive to his TC. While rolled out and in level flight, the fighter must begin power modulation to arrive at the Bandit’s TC with the briefed airspeed. Typically, standing up the throttles maintains this airspeed, but additional power modulation will be required if the “FIGHT’S ON” airspeed was slightly fast or slow. Finally, the fighter must recognize and enter the Bandit’s TC.
4.6.3.1.4 TC Entry Recognition Cues. Recognizing the proper TC entry cues proves vital to flying effective BFM. In any fighter, fighting any Bandit, from any range setup, the fighter is at the TC when AN INCREASE IN THE AFT LOS RATE OCCURS AND THE AA OF THE BANDIT STOPS INCREASING. Due to the low
turn rates of the T-38C, the initial increase in LOSR and the AA increase is relatively subtle compared with more maneuverable aircraft. Rapid increase in Bandit LOS is the primary TC entry cue, but a few crutches exist to help see this sight picture. The most common crutch uses the Bandit reaching the inside edge of the rearview mirrors on the canopy bow. Other crutches include counting 2 to 3 seconds after rolling out at the “FIGHT’S ON,” or starting the turn when the Bandit reaches 11 or 1 o’clock. These crutches only work under the specific conditions of a T-38C fighting a T-38C from a 6,000-foot setup with 30° to 40° of AA where the Bandit executes a 5G break turn.
4.6.3.1.5 TC Entry Mechanics. Upon seeing the TC entry cues, begin the AGSM, select MAX afterburner, and use 1G roll to set the LV. An LV setting to slightly below the Bandit brings the fighter’s nose below the horizon and sets up for an effective rate right. After setting the LV, return the stick to neutral and smoothly apply aft stick until reaching 5Gs. Physical cues for 5Gs include the G-awareness feeling and inflation of the G-suit. Once reaching 5Gs, smoothly blend the aft stick pressure to obtain light buffet, airspeed sustaining feel. Cross-check the HUD to ensure airspeed is remaining steady. Continue to hold the POM on the Bandit (LV slightly above the Bandit) and maintain the airspeed while watching for LOSR cues from the Bandit. A quick laundry list of the actions that need to occur at the TC entry follows:
• AGSM.
• Power – MAX.
• LV - On to slightly below the Bandit.
• Pull to 5Gs and blend to light buffet feel.
4.6.3.1.6 Maneuvering to the CZ. After entering the Bandit’s TC, the next step is to maneuver to the Bandit’s CZ. To do this, use the concept of the assessment window. This is the point on the canopy bow approximately one to two fists above the canopy bow where the Bandit’s range, AA, and closure can be assessed. Ultimately, continuous assessment of the Bandit is the goal, but the assessment window provides a defined snapshot point on the canopy bow. Until the Bandit reaches the assessment window, the majority of the BFM cross-check should split between the Bandit and own ship parameters of power, LV, G, and airspeed. Bandit LOSR is another effective tool to judge rate fight success. Bandit LOS toward the canopy bow indicates one of two things. In an aligned TC rate fight, it indicates a winning rate fight as long as it is not occurring as a result of bleeding own ship knots. In the misaligned TC rate fight, this indicates apexing outside the TC and starting to point back inside the Bandit TC (See Figure 4.12). Bandit LOSR away indicates the exact opposite—a losing rate fight with an aligned TC or flushing outside the Bandit TC in a misaligned TC rate fight. The assessment window occurs as the Bandit is pulled down to one to two fists above the fighter’s canopy bow. This position allows the fighter to determine whether or not they are established in the heart of the
Bandit’s CZ (30 AA and 3,000 to 3,500 feet). From the assessment window the fighter can determine which BFM steps to take next.
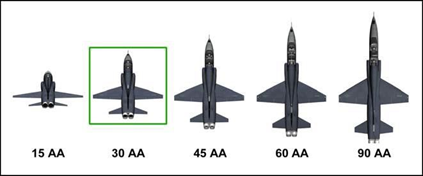
Figure 4.12. Estimating AA.
4.6.3.1.7 Assessing the Bandit. When the Bandit reaches the assessment window, analyze his range, aspect, and closure. Commonly briefed cues to search for include 3,000 feet of range, 30° to 45° of aspect, and steady, controllable closure (referred to sometimes as the “rule of threes”( Figure 4.13). Details on the Bandit’s jet provide the most accurate method to determine range. At 3,000 feet, the Bandit has a clearly visible canopy and canopy bows, distinct lines where the wings and tail meet the fuselage, and clear lines where the colors on the paint scheme change. As a crutch,
~0.5 to 0.6 on the AAT is a good cross-check of ~3,000 feet. To determine 30° of aspect, refer to the wingspan-versus-length relationship discussed in paragraph 4.2. To determine acceptable closure, the Bandit’s jet should slowly grow larger. If his jet is rapidly growing larger or smaller, improper closure exists. If all three cues from the Bandit’s jet are seen in the assessment window, continue to pull the Bandit into the HUD and kill. If one or more of the cues are not met, execute an ease repo as described in paragraph 4.6.3.1.8. An ease repo will help solve range and aspect problems by realigning TCs.
4.6.3.1.8 Ease Repo. If the range, aspect, and closure cues are not met at the assessment window, execute an ease repo to drive the range and aspect lower. An ease repo drives the fighter’s jet back toward the Bandit’s TC, reducing aspect in the process. Execute an ease repo by relaxing back-stick pressure to reduce G, freezing or reversing the Bandit's LOS. Closure and AA will decrease. Hold the ease repo until aft LOSR increases. (TC entry cue). Select MAX afterburner, reset the LV on the Bandit, and blend the G back in. Maintain the airspeed sustaining feel until the Bandit again enters the assessment window. Assess the Bandit again, and either execute another ease repo or trade energy for nose position in order to employ ordnance.
4.6.3.1.9 Transition to a WEZ. This series of MAX performance turns, assessments, and repos establishes the fighter in the heart of the Bandit’s CZ. From this position, the fighter can employ high Pk weapons. Though the gun is the weapon of choice for killing the Bandit during OBFM, take advantage of any AIM-9 opportunities when the Bandit is in the HUD.
4.6.3.1.9.1 POM. Additionally, due to own ship maneuvering, the Bandit may actually be in a POM that requires a climb to position the Bandit in the HUD. In order
to maintain the energy and ability to collapse the range while preserving energy, pull to ensure lead before aligning the POM and expect a throttle setting of MAX afterburner to "climb the hill" to the Bandit's POM.
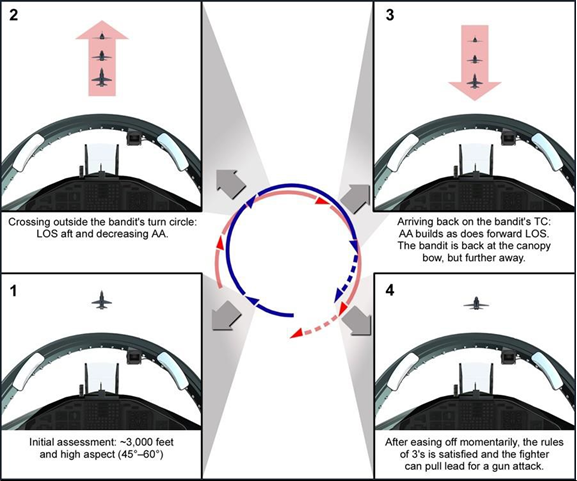
Figure 4.13. Canopy Bow Assessment: High AA at ~3,000 Feet (Offset TCs).
4.6.3.1.9.2 Throttle Techniques. To prevent excessive overtake, reduce power based on the degree of LOSR towards the HUD. At light buffet feel on the jet, if the Bandit is marching quickly towards the HUD, pull the power to IDLE when the Bandit is between the canopy bow and the HUD. If the LOSR is slow with light buffet pull, reduce power commensurate with that LOSR. Once the Bandit is in the HUD, reduce power based on the jet feel required to hold the Bandit in the correct amount of lead for the gunshot; a "smooth" jet-to-light buffet will only require IDLE power; light-to- moderate buffet will normally require throttles "stood up"/MIL power; moderate-to- heavy buffet will normally require MAX afterburner.
4.6.3.1.10 Missile and Gun Mechanics. Reference the detailed discussion on weapons employment in paragraph 4.6.2.2 (heat-to-guns exercise).
4.6.3.1.11 Repositioning From the Gunshot. Four factors drive the need to repo from a gunshot: range, AA, closure, and G. Range includes both maximum and
minimum ranges. The repo must occur in time for the fighter to remain outside the TR bubble. Exact timing depends upon AA and closure but usually occurs between 1,500 feet and 1,800 feet. Training rules permit gunshots well outside comfortable AAs when employing a T-38C. When AA increases above 60 (Bandit’s length twice his width), repo to prevent excessive closure. As aspect increases, angular closure also increases. Additionally, any difference in airspeed between the fighter and Bandit creates closure. If the Bandit’s jet is rapidly growing larger, repo to prevent a Bandit reversal opportunity. Finally, if fighter is in MAX afterburner and moderate buffet with no LOSR towards HUD and not enough lead required for the gunshot, adequate radial G is not available. Repo to regain energy and reestablish a CZ position. To execute the repo, select idle, use 1G roll to set the LV to 90° out of the Bandit’s POM (should be almost straight up),and pull to moderate buffet or SRB. Wait for standard TC cues (LOSR away and AA stops increasing), then select MAX afterburner and set LV on the Bandit. Assess the Bandit’s reaction to the repo. The Bandit either continues the turn or attempts to reverse to a neutral or offensive position. Bandit LOS away from the HUD indicates the Bandit is continuing the turn. Little to no LOS combined with the Bandit resetting his LV toward the fighter indicates a Bandit reversal.
4.6.3.1.11.1 Bandit Continues the Turn. An effective repo at 1,500 feet to 1,800 feet will force a smart Bandit to continue his turn. Continue to pull to 90° out of the Bandit’s POM to force LOS and reverse the turn to arrive back in the heart of the CZ. Ensure MAX afterburner, use 1G roll to set the LV on the Bandit, and smoothly pull to moderate buffet until the Bandit enters the assessment window. During this pull, adjust the LV as required based upon the altitude available to sustain a moderate buffet turn. Cross-check the floor and begin a floor transition as required. As the Bandit enters the assessment window, reassess the attack cues and either pull the Bandit to the HUD for a kill or execute another repo as required to solve the range, aspect, or closure.
4.6.3.1.11.2 Bandit Reverses. A Bandit reverses in an attempt to go neutral or offensive. If the repo occurred early enough for the fighter to return to the CZ, the Bandit’s reversal presents an opportunity for a quick AIM-9 or gun kill. Capitalize on the Bandit’s mistake with valid weapons employment. If the Bandit reverses at a closer range, fight to maintain 3/9. Roll at 1G, reorient the LV to 90° out of the Bandit’s POM and pull to moderate buffet. Select MAX afterburner to maximize nose rate and gain an altitude advantage over the Bandit. A Bandit that reverses within one aircraft turn radius forces the fight into a scissors. Reference the DBFM section for scissors mechanics.
4.6.3.1.12 6K OBFM Contingencies:
4.6.3.1.12.1 Fighter No Joy. Most no-joy situations in OBFM occur from the fighter’s improper BFM cross-check. After recognizing the no-joy situation, simultaneously lag the Bandit’s last known position while calling “No Joy” and clearing flightpaths. Expect a “Continue” call from the Bandit and scan the Bandit’s last known position to reacquire the tally. If at any time safety of flight is in doubt, call “KNOCK IT OFF” IAW the training rules.
4.6.3.1.12.2 Bandit Tighten Down (TD). A Bandit with available energy will TD as the fighter’s nose approaches pure in order to create aspect and closure problems for the fighter. Recognize a TD with the increased aspect and closure created by the Bandit. If the Bandit tightens down while still outside the HUD, execute an ease repo to solve the aspect and closure problems. If the TD isn’t recognized until the Bandit is inside the HUD, execute a larger repo to fly back to the Bandit’s CZ. The Bandit will be at a lower energy state post TD and less likely to create significant problems through subsequent TDs.
4.6.3.1.12.3 Bandit Jinks. Jinking Bandits are discussed in more detail in the 3K OBFM section (paragraph 4.6.3.2.11.3). Use the same techniques in 6K OBFM to defeat a jinking Bandit as in 3K OBFM. In general, assess the Bandit’s jinks for effectiveness and either employ weapons if ineffective or repo if effective.
4.6.3.1.12.4 Floor Transition. A smooth floor transition sustains energy for a fighter’s floor fight while a floor save depletes energy in order to remain above the floor. Recognize an approaching floor through a proper BFM cross-check of altitude and not avionics warnings. One technique for beginning a floor transition is the 10° rule. Begin the floor transition 1,000 feet above the floor for every 10° of dive angle. For example, at 20° nose low, begin the floor transition 2,000 feet above the floor.
4.6.3.1.13 Floor Fight. Hold airspeed instead of G during a floor fight for best rate. Use any TR above the floor to maximize rate. Be patient as the maximum nose rate for a floor fight will be less than a normal fight, but the Bandit’s turn performance is affected by the floor as well.
4.6.3.2 Short-Range OBFM (3,000-Foot Perch Setup). The 3,000-foot OBFM setup begins inside the Bandit’s CZ.
4.6.3.2.1 Objective. The objective is to kill the Bandit. A common desired learning objective is to accomplish the kill within 540° of turn.
4.6.3.2.2 Game Plan. The initial game plan is to attempt a gun shot while assessing the Bandit’s initial reaction.
4.6.3.2.3 Initial Move. At the start of the 3,000-foot BFM engagement, simultaneously roll to place the LV on the Bandit while evaluating the Bandit’s defensive response. With the LV on or slightly below the Bandit, aggressively increase G to pull lead to solve the gun solution (POM, range, and lead). Power settings are based on aircraft feel, relative LOSR, and closure.
4.6.3.2.4 The Bandit Who Breaks Level or Jinks Up. If the Bandit fails to maneuver out of plane and/or does not jink effectively to create closure problems, the offender should be in a position to continue the gun attack. In the 3,000-foot OBFM setup, gun range is nearly solved requiring a momentary pause to get to 2,500 feet. Refine POM by maneuvering the aircraft as to place the gun cross “+” on the HUD along the Bandit’s extended flightpath and establish the requisite amount of lead to take the shot. Continue to assess for cues to repo.
4.6.3.2.5 The Bandit Who Jinks Downhill. The Bandit may jink down and into the offender to spoil the gun solution and create a closure problem. Preserve TR by executing a repo to control closure velocity (Vc). The repo should include
momentarily setting the LV back to the Bandit's CZ, pulling away to help generate LOS away (from the offender), and then aggressively realigning the TCs. Following the TC entry, select MAX afterburner and set the LV initially halfway between the Bandit and the horizon. Execute a moderate buffet turn shy of the wing rock or just short of the stall turn to follow the Bandit’s extended flightpath. Cues of max performing the aircraft during the turn include moderate buffet and airspeed not increasing. Continue to adjust LV and pull while maneuvering back into a position (in the CZ) to assess for a WEZ opportunity.
4.6.3.2.6 CZ Maneuvering. Once established in the CZ, most of the BFM concepts from medium-range BFM apply (paragraph 4.6.3.1.6).
4.6.3.2.7 Follow-on Maneuvering. In addition to the concepts and considerations discussed in the medium-range section (paragraph 4.6.3.1), consider the following:
4.6.3.2.7.1 Repos. The repo is a lag maneuver designed to reduce AA, increase range, and decrease closure. Some reasons for executing a repo include: Bandit blows up, excessive closure, approaching briefed minimum slant range (i.e., bubble), or Bandit changes the POM. If closure is excessive, a high aspect gunshot is attempted, or a BFM error occurs, a flightpath overshoot may be imminent. The first key is to preserve the offensive by recognizing the potential overshoot early, and performing an out-of-plane lag maneuver called a quarter plane.
4.6.3.2.7.2 Quarter Plane Maneuver. After recognizing a potential overshoot, roll to place the LV 90° out of the Bandit’s POM and execute a moderate buffet pull shy of the wing rock/stall in idle power to arrest closure and try to generate LOSR away. Once the overshoot is controlled, visualize the CZ and fly to that point by placing the LV back on the Bandit and turning to align the fuselages.
4.6.3.2.7.3 Bandit Reversals. During the quarter plane, the defender may reverse, placing his LV on or near you and executing a maximum performance turn. In this case, continue to analyze where the defender's CZ is and pull towards it so as to avoid the bubble. Your goal in this situation is to regain the offensive advantage by outperforming the Bandit and minimizing your forward ground track. There are two ways to do this: the tree and the scissors. Both minimize forward ground track in different ways. The tree (both high and low) minimizes the forward ground track with airspeed. In the scissors, minimizing forward ground track is accomplished by turning your jet with a minimized turn radius. To determine which to enter, the HCA at the flightpath overshoot must be assessed. Anything <120° of HCA will result in a tree. Greater than 120° of HCA at the overshoot will result in a scissors.
4.6.3.2.7.3.1 Tree. The fighter should select IDLE power initially and set the LV to level flight. Pull to the moderate buffet shy of the stall/wing rock and reapply MAX afterburner at ~175 to 200 knots in order to catch around 150 to 160 KIAS. The tree is now established. To get back to an offensive position, remain loaded at moderate buffet shy of the wing rock and attempt to fly shallow ‘S’ turns using rudder only (ailerons will drop the wing and result in loss of subsequent lift). Attempt to stay within 2,000 feet vertically of the Bandit as any more vertical is nearly impossible to use in the T-38. The combination of the slow airspeed and the ‘S’ turns will lead to a
minimized forward ground track. Once greater than 3,000 feet of lateral spacing is achieved behind the Bandit, transition to OBFM.
4.6.3.2.7.3.2 Scissors. For HCA greater than 120° at the flightpath overshoot, the best way to minimize forward ground track is by entering a scissors. To enter the scissors at the flightpath overshoot, place the LV just above the Bandit such that the fighter will not encroach on the bubble. If possible, place the LV on the Bandit. Any higher placement of the LV will open the turn radius in relation to the Bandit and increase forward ground track. Once the LV is set, select MAX afterburner and pull to the moderate buffet shy of the wing rock/stall to minimize the turn radius. Ensure bubble deconfliction approaching the following flightpath overshoot and reverse at the TC entry cues (rapid LOSR increase across the ground and AA stops increasing). By better performing the jet in MAX afterburner and moderate buffet shy of the wing rock, the Bandit will have a larger forward ground track. Once ~2,500 feet of lateral spacing behind the Bandit is achieved, transition to OBFM.
4.6.3.2.8 3K OBFM Contingencies:
4.6.3.2.8.1 Fighter No Joy. Offensive maneuvering remains the same as medium- range BFM. The fighter must ensure strict adherence to training rules with respect to communications and fighter maneuvering.
4.6.3.2.8.2 Closing in Lag. If the fighter fails to max perform the aircraft post initial repo, the resulting increased turn radius and airspeed can generate cues of closing in lag where the fighter creates a faster turn rate along a larger circle. This is indicated by AA and range decreasing with the nose still in lag. The end result if allowed to continue will be insufficient weapon separation. Once recognized, the first corrective action is to attempt to max perform the aircraft, specifically more AOA. If closing cues are recognized late, then a repo will be required to maneuver back to the CZ. This lag repo is essentially the same as a one-fourth plane—select IDLE power, roll to 90° out of the Bandit’s POM and pull to the moderate buffet shy of the wing rock while waiting for range to open and LOSR away.
4.6.3.2.8.3 Jinking Bandit. Anytime the Bandit attempts to jink, the Bandit is expending energy to spoil POM. At high energy states, these jinks will be very effective at spoiling POM. Follow-on jinks will start with decreased energy, resulting in less effective changes to POM. If the Bandit’s jinks are assessed to be effective enough to spoil POM, the fighter should repo to preserve TR and seek a quick follow on WEZ for a Bandit with a depleted energy state.
4.7 Defensive BFM (DFBM). The goal of DBFM is to train the fighter pilot to survive while maneuvering from a position of disadvantage. The correct mindset is critical to DBFM, and a will to survive is paramount. Unlike offensive, DBFM requires the pilot to max perform the aircraft, while spending increased time looking backwards. The focus should be on surviving for as long as possible and creating problems for the Bandit based upon your current situation. So long as you are still alive and have a working aircraft around you, you are winning. NEVER GIVE UP! In addition to the proper attitude, you must be able to visually identify (ID) the aircraft behind you ("is that a MIG-25 or an SU-27?"). Likewise, you must know both the threat aircraft and the pilot's capabilities. At what altitudes/airspeeds does your aircraft outperform his? What types and how many missiles does he carry? How far off-boresight can he shoot those
missiles? Is his gun canted up or down (or does he have a gun at all)? The fighter pilot must know this information before the engagement begins. The Bandit WEZ for IFF is depicted in Figure 4.14. Bottom Line: Know the threat before you fight it. In order of priority the objectives in DBFM are:
• SURVIVE.
• Defeat the Initial Attack.
• Deny Subsequent WEZ.
• Defeat Subsequent Weapons.
• Neutralize, Separate, or Go Offensive.
4.7.1 Perch Setups. Perch setups will be executed IAW the squadron standards and/or IFF Playbook. The “push it up” mechanics will be the same as OBFM. Since it is imperative that you see the Bandit during the fight, you need to position your body to obtain the maximum rearward visibility. While on the ground, maneuver in the cockpit to ensure you can visually see the opposite horizontal stab. This will equate to the required body position under G in order to maintain the tally. During the setup, rotate your upper body and adjust body position to ensure the stick and throttles are still accessible for full range of motion. A common technique is to lean forward and look "around" the seat back. Do not attempt to support the weight of the head and helmet by neck muscles alone. The second common error is to look forward under heavy G and then relax the Gs in order to look back at the Bandit. Improper body positioning during G-onset can lead to a loss of tally and possibly even injury.

Figure 4.14. IFF Bandit WEZ.
4.7.1.1 6K Perch Setup. Once “ready,” the flight lead will direct a check turn into the fighter. After turning 45, roll out wings level. Maintain level flight and simultaneously prepare for the defensive body position and begin to assess the Bandit. At this point, it is fundamental to begin a cross-check between the Bandit and one’s own ship parameters. Wait until the Bandit has achieved pure pursuit to reverse the turn. The defensive fighter will be responsible for maintaining the airspeed contract, remaining level, and setting 30 to 40 of AOT. This will require you to start
your DBFM cross-check during the fight setup. While looking backwards, assess and correct AOT (Figure 4.15). At 30 to 40 AOT, the Bandit should be above the wingtip. A common technique is to put the Bandit a fist distance away from the rear canopy bow and two fingers above the horizon. During the setup, occasionally reference the HUD and focus on airspeed (setup dependent) and the FPM to ensure level flight. Initially, your time will be divided equally between looking backwards and glancing at the HUD. However, the closer you get to the “FIGHT’S ON,” the more time you should spend looking at the Bandit, ready for the initial move.
4.7.1.2 3K Perch Setup. Unlike the 6K defensive setup which requires the defender to maintain the same briefed airspeed as the pre “check” airspeed, the 3,000 feet setup requires slowing down. Decelerating from 350 knots and arriving at the “FIGHT’S ON” with less than 320 knots and 30° to 40° of AOT is a challenge. During the initial check turn, modulate power and pull to the buffet to bleed down to 320 to 330 knots; then allow the jet to decelerate the last 5 to 15 knots with throttle modulation after you have reversed your turn and have set the desired AOT.
4.7.2 DBFM Exercises:
4.7.2.1 Defensive Ranging Exercise. Start from a standard 6K perch setup with the following exception: the Bandit will pull pure from 9,000 feet to 6,000 feet and then call “FIGHT’S ON” at 6,000 feet. At this point, the Bandit will roll out momentarily showing a “lag” pursuit curve. Then the Bandit will pull “pure” and then “lead” closing into a valid gun WEZ. The Bandit will continue closing the range and fly behind the fighter to not enter the 1,000-foot bubble.
4.7.2.1.1 Purpose. To familiarize the student with the defensive perch setup and to identify and practice assessing pursuit curves and ranges. The pure pursuit Bandit from 9,000 to 6,000 feet that is approaching the 6,000 feet “FIGHT’S ON” range is designed to calibrate long range estimation. Bandit pursuit course after momentarily driving to lag at 6,000 feet is designed to have primary emphasis on WEZ recognition (Figure 4.14). The Bandit will show “lag, pure, lead,” and drive all the way to the bubble. See Figure 4.16 for defensive assessments of Bandit pursuit curves.
4.7.2.1.2 Mechanics. After the check away, reverse back when offender is pure to maintain tally/altitude/airspeed. Power modulate to slow from 415+10 knots to 350 knots while slightly descending. Hold Bandit at 30° to 40° AOT (approximately 2.5 to 3 Gs). The primary task is Bandit assessment. Assess pure, lag, and the transition from lag to pure to lead as range decreases. In addition, assess the cues indicating the Bandit is in the AIM-9 WEZ (pure) and gun WEZ (lead). As the Bandit approaches the bubble, he will repo to lag. Roll out, wings level and quickly move your visual scan from to the opposite side of the aircraft. You will see the Bandit on the opposite side of the canopy, just outside the bubble (1,000 to 2,000 feet with low HCA). The exercise will end with a Terminate or KIO call.
Figure 4.15. Setting the “FIGHT’S ON” AA.
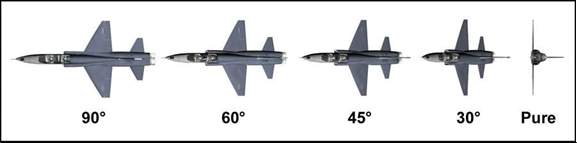
Figure 4.16. Bandit Lag Assessment.
4.7.2.2 Reversal/Scissors Exercise:
4.7.2.2.1 Purpose. The purpose of the reversal/scissors exercise is to recognize and defend against a Bandit that continues to pull lead, identify the reversal picture, and execute a reversal. Following the reversal, the exercise continues with an entry into a scissors fight to gain the 3/9 advantage from the Bandit.
4.7.2.2.2 Initial Move. Execute a defensive break turn and assess the Bandit’s pursuit curve. However, recognize that the Bandit will transition from pure to lead for a high- aspect gun attempt as he approaches a high-angle gun WEZ. Prior to the Bandit achieving pure pursuit, execute an out-of-plane maneuver to defeat the gun attempt. Assess the Bandit’s position for a reversal opportunity.
4.7.2.2.3 The Reversal. As the Bandit overshoots, assess the Bandit's LOSR, range, and HCA. There are several combinations of range and HCA that could present a reversal opportunity; high HCA combined with close range (generally inside of 2,000 feet) and/or high LOS may allow for a successful reversal. Figure 4.17 shows two typical reversal pictures: the lower HCA, repo near the bubble, and the higher HCA,
rangier result of a Bandit attempting a high-angle gunshot. If in doubt, do not reverse and continue to turn while monitoring the overshooting Bandit.
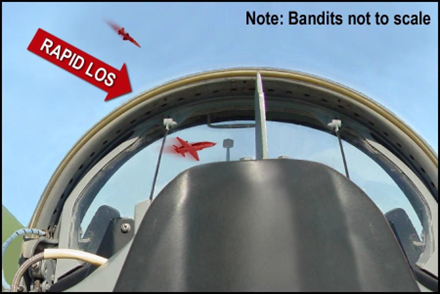
Figure 4.17. Two Common Reversal Pictures.
4.7.2.2.4 Reversal Mechanics. Simultaneously use an unloaded roll to reverse your turn and move your visual scan to the other side of the canopy to regain the tally. LV position will depend on HCA and LOS when the reversal is initiated. The higher the HCA and LOS, the closer to the Bandit you can initially place your POM to use as much of the in-plane TR as possible. With low HCA and LOS, you must ensure POM is not on the Bandit to prevent pressing the bubble. In this case, whether you place your POM above or below the Bandit will depend on his nose position. If the Bandit already has the high ground, go low and vice versa. Reference scissors mechanics in the OBFM section (paragraph 4.6).
4.7.2.3 Jink Exercise:
4.7.2.3.1 Purpose. The purpose of the jink exercise is to identify the Bandit’s gun WEZ and practice guns jinks. Jinks are last-ditch maneuvers to spoil POM and create closure.
4.7.2.3.2 Mechanics. Prior to the “FIGHT’S ON,” maintain setup parameters. Primary emphasis should be on assessing Bandit range for WEZ (Figure 4.14). At the “FIGHT’S ON,” immediately select IDLE power, unload and roll to set LV below the Bandit. Perform an aggressive symmetric, maximum onset rate, two-hand, stick in the lap pull and hold until the aircraft aerodynamically stalls. Assess the Bandit. If the Bandit is still in lead, jink again. You must break the AOA prior to resetting the LV. Be careful not to push forward on the stick as you reset your POM as this may introduce negative Gs. While maintaining IDLE power, reset LV out of plane (OOP) with the Bandit (opposite vertical side of Bandit from the first jink). Perform another aggressive symmetric, maximum onset rate, stick in the lap pull using two hands, and hold until the aircraft aerodynamically stalls. Assess the Bandit. Continue jinking
until the Bandit repos. The Bandit will continue to threaten until forced to repo, presenting a reversal picture. Reverse and maneuver to gain 3/9. Reference reversal and scissors mechanics from OBFM. Power as required when necessary for own ship EM to ensure effective maneuvering. Use caution jinking down within 1,500 to 2,000 feet from the floor.
4.7.3 DBFM Sets:
4.7.3.1. Medium-Range DBFM (6,000-Foot Perch Setup). The Bandit begins slightly inside of your TC and outside the CZ.
4.7.3.1.1 Objective. The objective is to survive.
4.7.3.1.2 Game Plan. The game plan is to execute a break turn and assess the Bandit's reaction.
4.7.3.1.3 Initial Move (The Break Turn). To survive this engagement, the first thing you must do is Defeat the Initial Attack. You do this by rotating your WEZ away from the Bandit's WEZ. Execute a defensive break turn, looking over your shoulder at the Bandit to assess his pursuit curve. Select MAX afterburner, set the LV on or slightly below the Bandit, and pull to target G; 5.0 to 5.5. The G should feel the same as a during G-awareness maneuver. Continue to “squeeze” the G to the SRB and simultaneously assess the Bandit’s pursuit curve. Due to power and G limitations, the Bandit will be forced immediately outside of your TC. For the AIM-9P, more than 45° of AA is needed to defeat the missile, or prevent the Bandit from taking the shot. The break turn should be LV on and at max allowable G to generate as many angles, minimize vertical TR for the Bandit, and maintain airspeed. Figure 4.9 shows an additional advantage of a max performance turn while the Bandit is outside your TC. Each second the Bandit is outside your TC, you will generate 12 to 13 more degrees of turn, which are angles the Bandit will has to make up once he enters your TC. Once the Bandit is on/inside your TC, your rate advantage will decrease to about 2° (assuming a 10.5 to 11 degrees per second (deg/sec) Bandit turn rate). MAX performing your aircraft is essential in maintaining this advantage and achieving the objectives.
4.7.3.1.4 Pure/Lead Bandit. If the Bandit continues in pure pursuit or pulls lead, immediately transition to a TD maneuver. Timely assessment of this pure/lead Bandit is critical as he is only moments away from employing ordnance. In this case, you will not see LOS aft and the Bandit’s AA will not change. To transition from the defensive break turn to a TD maneuver, continue the break turn mechanics while raising the LV to on the Bandit and apply max allowable G. Continue to assess the Bandit. Continue to pull max allowable G to the buffet as you slow down. You will see forward LOS and range decrease as the Bandit approaches a WEZ. Prepare for guns defense. Recognizing the WEZ and honoring the Bandit’s nose with guns defense is paramount. The Bandit who stays pure will have a fleeting snap at the back edge of the WEZ. Your cue to start the OOP will be pure pursuit with range collapsing inside of 3,000’. The Bandit who aggressively pulls lead will have a high- angle snap shot at a closer range. Mechanics for these pictures will be IAW paragraph
4.7.2.2 (Reversal/Scissors Exercise).
4.7.3.1.4.1 OOP Components. There are two components to this OOP: (1) Change POM to defeat the gun attack, and (2) continue to assess the Bandit for follow-on game plan selection (i.e., reverse or continue the turn in a min radius fight).
4.7.3.1.4.2 OOP Mechanics. Quickly reduce G to break AOA and reset the LV to get OOP and smoothly pull back to the moderate buffet. If the Bandit is below you and you’re looking at the top of his jet, consider an OOP uphill. This moderate buffet pull will immediately create problems for the Bandit and will require follow-on maneuvers (i.e., repo or high-aspect GUN attempt). Do not hesitate to transition to your follow-on game plan.
4.7.3.1.4.3 Assess and Select a Game Plan. Assessment must occur during the OOP. If you see high LOS due to high HCA and/or close range, reverse (Figure 4.18). If you don’t, or are in doubt, continue with the turning fight and transition to a min radius game plan.
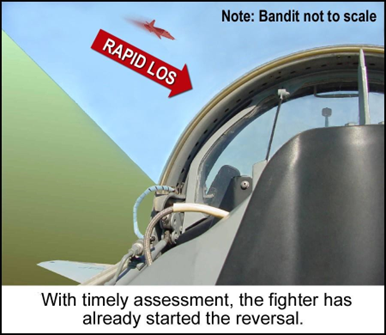
Figure 4.18. Reversal Cue, Lead Bandit.
4.7.3.1.4.4 Reversal. Versus a Bandit that pulls excessive lead for a high-aspect gun attempt, you will see high HCA and can afford to initially roll your LV closer to the Bandit without pressing the bubble. Fight to gain a 3/9 advantage and look for WEZ opportunities. Refer to Reversal discussion beginning with paragraph 4.7.2.2.4.
4.7.3.1.5 Lag Bandit. In order to transition from the defensive break turn to the sustained-rate game plan, you will need to refine your LV. Begin your DBFM cross- check, but don’t look forward for any longer than an occasional cross-check. Alter your LV as required to max perform the aircraft. Subsequently, refine your LV, striving for a sustained-rate fight airspeed and optimum rate fight.
4.7.3.1.6 Bandit Assessment. Continue to assess the Bandit; you will either be winning or losing the rate fight (Figure 4.19). Winning cues include: forward LOSR with range and HCA increasing (as you pull the Bandit into deeper lag). Losing cues include: aft LOSR with range and HCA decreasing.
4.7.3.1.7 DBFM Cross-Check. Cross-check LV, G, and airspeed to refine your optimum rate fight. The following are common errors and their corrective actions:
4.7.3.1.7.1 High Airspeed. Ensure max allowable G, apply a power reduction, and/or raise the LV to reduce airspeed. How much of each depends on the severity of your airspeed error. Take caution readjusting LV to prevent an asymmetric over-G.
4.7.3.1.7.2 Low G. If you are holding 400 knots or less, but sustaining 5 or less Gs, your LV may be too high. Slowly move your LV lower and smoothly increase the G. Additionally, cross-check engine operation and throttle placement.
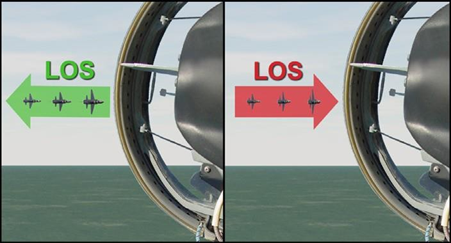
Figure 4.19. Winning and Losing LOS Cues.
4.7.3.1.7.3 Getting Too Slow. The LV is too high, but in this case you have already traded your airspeed for G in an attempt to keep target G or better. Deliberately lower your LV towards the game plan pitch picture, or lower. You must include altitude in your BFM cross-check to build floor awareness. See Floor Transition (paragraph 4.7.3.3.5). Additionally, cross-check engine operation and throttle placement.
4.7.3.1.8 Separation (Figure 4.20). Whether out of ordnance or fuel, or in a multi- bogey environment, the overall tactical circumstances may demand that you leave the fight. Regardless, none of these reasons is worth giving the Bandit an easy AIM-9 opportunity. Make sure your assessment is accurate and, if in doubt, don’t attempt the separation.

Figure 4.20. Separation Cues.
4.7.3.1.8.1 Separation Decision. If the Bandit is trending towards 90 of HCA (approximately 45 AOT and 45 plan form) and greater than 6,000 feet, consider separating. Trend information is important; you should see the Bandit getting smaller over time and lag increasing (Figure 4.20). A good range cue is to ensure the Bandit looks smaller than a T-38 in tactical formation and decreasing in size. Continue to assess the Bandit for winning and losing cues.
4.7.3.1.8.2 Separation Execution. If the cues to separate exist but altitude and airspeed are unknown, take a glance forward and cross-check own ship parameters. If slow and close to the floor, reconsider separating. With awareness of airspeed and altitude, reassess the Bandit and if separation cues exist, leave the fight. Use MAX afterburner and unload to less than 1G to increase airspeed as quickly as possible. A technique is to leave the bank in during the unload to mask the separation longer. Attempt to maintain tally or awareness of the Bandit's nose position while keeping an eye on the pending floor transition. Use of a small check turn during the separation will assist in tracking the Bandit, although do not turn too much. Continue to monitor the Bandit nose position and dispense countermeasures as required to defend against potential weapons employment from the Bandit.
4.7.3.1.9 Mature Fight Guns Defense. During the fight, if the Bandit demonstrates the ability to threaten with nose position, transition from the optimum rate game plan to OOP maneuvers. As soon as the Bandit's nose begins to rotate from lag towards pure at range, transition to the TD, flare, and get ready for guns defense.
4.7.3.1.9.1 OOP Maneuver. The first priority is to recognize the Bandit WEZ and subsequently move the aircraft's POM out of the Bandit’s POM. Whether the first move is up or down will depend on altitude remaining to the floor. Ideally, use gravity to command a downhill maneuver, but if within 1,500 feet of the floor, a level or pullup may be more appropriate. The decision to select an OOP maneuver or a jink will depend on Bandit AA and closure. Assuming you execute an effective TD and
get AA to greater than 45°, expect to force the Bandit’s nose off with one OOP maneuver. If AA is less than 45°, you will likely need a series of jinks before the Bandit is forced to repo. Airspeed will also be a factor in game plan selection; full-up jink mechanics above 320 knots will increase over-G potential. (Reference paragraph 4.7.3.2 for jink mechanics.)
4.7.3.1.9.2 Post OOP/Jink. When the Bandit’s nose is forced to lag, look for reversal cues. If you see rapid LOS with high HCA and a Bandit inside approximately 2,000 feet, reverse. If not, continue the turn. SA on altitude in relation to the floor is a must during a mature fight.
4.7.3.2 Short-Range DBFM (3,000-Foot Perch Setup):
4.7.3.2.1 Game Plan. “Jink and assess.” Initial Move: Set power to IDLE, rotate the LV OOP below and towards the Bandit while applying max allowable G. In order to expedite the OOP maneuver, attempt to use both hands to pull the stick towards the seat pan. The aircraft will aerodynamically stall as the nose of the aircraft digs in. Pay attention to the Bandit's nose during the jink. If it’s still pointed at you, a follow-on jink up is required while the Bandit is attempting to adjust to your newly set POM. Reset the LV approximately 90° back above the horizon and jink again. Continue jinking until the Bandit’s nose repos to lag. Assess for reversal cues.
4.7.3.2.2 Jink Timing. Each jink needs to be held long enough to allow the aircraft to begin moving to a new POM. A delay in transitioning to a follow-on POM allows the Bandit to find a gun solution easily. Break the AOA prior to resetting the LV. Rolling the LV with AOA will not allow the aircraft to pivot around its flightpath axis quickly enough.
4.7.3.2.3 Setting the LV. As the Bandit gets closer, POM adjustments must be further away from the Bandit. Remember that POM will always fall below the LV— as the aircraft slows down in subsequent jinks, the difference between the two will increase. The T-38 does not fly well with the nose buried low due to small horizontal stabilizers and limited thrust. As a technique, aim to place the LV approximately 45° above or below the Bandit to ensure adequate POM changes (Figure 4.21).
4.7.3.2.4 Don’t Give Up. While the number 1 priority is initially getting OOP, emphasis must also include increasing aspect and closure to force the Bandit out of the WEZ. If jinks are weak and don’t generate closure, it may take several jinks before the Bandit is forced to lag.
4.7.3.2.5 Follow-On Maneuvering. Your jink sequence will end with the Bandit in a repo. During the repo, assess for reversal cues.
4.7.3.2.6 The Reversal. See paragraph 4.7.2.2.4 for specifics on cues and reversal mechanics. Be aware if you do reverse, HCA will probably be low, requiring your new LV towards the Bandit’s high CZ. You can quickly update it with a tally on the other side of the canopy if LOS, HCA, and/or range allow.
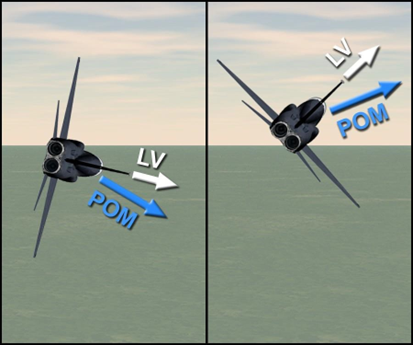
Figure 4.21. 3K DBFM Jink Lift Vector.
4.7.3.2.7 No Reversal Cues. If reversal cues are not present, immediately transition back to a max performing turn. Use MAX afterburner and set the LV as required below the horizon. This may require either a large LV change or none at all depending on if you were jinking above or below the Bandit when he repositioned.
4.7.3.2.8 Pulling to Moderate Buffet. Continue pulling to the moderate buffet in MAX afterburner while maintaining awareness of the Bandit. Airspeed should stay approximately the same throughout the turn. Extreme nose low and high attitudes will affect airspeed. Snapshots to the HUD will be required over time to build SA on attitude and the floor; however, during the first few seconds of the transition to the min radius fight, you should concentrate on the tally.
4.7.3.2.9 Maintain the Tally. Effective jinks followed by a quick transition to the min radius fight will allow you to maintain the tally. You should see plan form and low HCA. Keeping the tally will be extremely difficult unless you start the fight in a good body position and are timely with your game plan selection and execution.
4.7.3.3 Mature 3K Fight. Stay with the turn and keep up with the DBFM cross- check, preparing for a floor transition. Carefully assess the Bandit for a transition to pure/lead and a threatening nose position. As the Bandit approaches an AIM-9 WEZ, flare and immediately transition to guns defense. (Reference mature fight guns defense, paragraph 4.7.3.1.9.)
4.7.3.3.1 Future WEZ Expectations. Given the offset TCs, expect the Bandit to transition to another WEZ. As soon as you see the Bandit’s nose, begin to rotate from lag to pure at range, transition to a TD, flare, and get ready for another OOP and potential reversal opportunity. Despite the high probability of a second WEZ for the Bandit, it is possible that you are able to keep his nose in lag over time. In this case,
there MAY be consideration for transitioning from your min radius fight towards a sustained-rate fight. If LOS is stagnant on the canopy and the Bandit’s nose is stuck in 45° of lag or more, with range opening to >4,000 feet, begin the transition to a rate fight. Relax G as much as Bandit will allow in order to gain energy (i.e., airspeed), but keep the Bandit from reentering a WEZ.
4.7.3.3.2 Keep The Tally. You will have aft LOS towards your 6 o’clock, but it will slow down and stagnate near the tail and/or canopy bow (possibly under it). Reference Figure 4.22. Given the Bandit’s high offensive potential, if you lose the tally at this point, you stand a good chance of allowing the Bandit an unobserved WEZ entry. Regardless, DO NOT ease off the pull. If you momentarily go NO JOY with the Bandit under the canopy bow or behind the seat, sustain the G/AOA. Per AFI 11-214, Air Operations Rules and Procedures, you are allowed to TD with respect to “remain predictable” while “no joy.” The TD maneuver will help to reacquire the tally by pulling the Bandit forward on the canopy.
4.7.3.3.3 No-Sight Defense. The primary goal of no-sight defense is to recover the tally while executing a min radius game plan. Make sure you spend the majority of your time scanning for the Bandit while maintaining a frequent cross-check to the HUD for altitude and attitude SA. MAX performing the aircraft in the min radius fight will provide the best opportunity to pull the Bandit forward on the canopy, and regain tally. Additionally, countermeasures dispenser (CMD) should be considered based on fight pacing SA.

Figure 4.22. Keeping the Tally.
4.7.3.3.4 Tally Recovery. SA on the Bandit’s HCA when he flies behind your seat will help you recover it. If HCA was low, look first and longest in the high Pk WEZ (Figure 4.23). If HCA was higher as the Bandit crossed your 6 o’clock, offset TCs will develop and as time goes on move your scan from the WEZ forward on your canopy, zigzagging both high and low.
4.7.3.3.5 Floor Transition. The fight will be going downhill. Your goal is to slowly adjust your LV during a floor transition to eventually level off before reaching the floor. Without a floor transition, you will be forced to roll wings-level in a floor save, which is energy depleting and will straight-line your TC. This could be the difference between keeping the Bandit’s nose in lag or allowing him to point and employ ordnance. To execute an effective floor transition requires the fighter to incorporate altitude in the BFM cross-check. For every 1,000 feet above the floor, you should be no more than 10° nose low. This is referred to as the “10 percent rule.” As an example, with a 9,000-foot MSL floor, you should not be more than 20° nose low passing 11,000 feet. Additionally, consider using a 1,000-foot BARO setting above the BFM floor. This will allow for small errors in LV control during a floor fight. Remember that once at the floor you must fight Ps=0 BFM. Referencing the T-38 EM diagram, you can still see that at Ps=0 you won’t be able to sustain the same G as during the descending, rate fight. (The jet will feel smoother as you are further away from the lift limit line; reference EM diagram, Figure 4.9.)
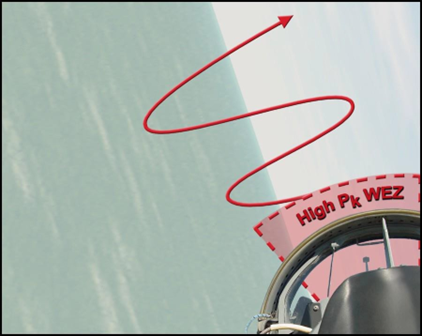
Figure 4.23. Regaining the Tally.
4.8 High-Aspect BFM (HABFM). HABFMs may occur throughout many phases of a tactical engagement. During the transition from the intercept to the BFM phase, the Bandit may have a tally or may be turning into the attacker based on RWR indications, radar contact, or ground controlled intercept (GCI) information. Always attempt to achieve TR prior to a merge. If the Bandit is aware, the Bandit may deny any TR opportunities. Do not continue to try for TR and
lose the opportunity for a lead turn. Remember that TR for you is typically TR for the Bandit. The Bandit may have a tally, and may attempt to achieve TR also.
4.8.1 HABFM Concepts. The BFM concepts already introduced in the offensive and defensive phase will be expanded upon and some new concepts added as they apply to the high aspect arena. Unlike perch BFM which starts at specific parameters, HABFM is much more fluid and unpredictable.
4.8.1.1 Premerge Turning Room. TR is displacement in any plane (vertical, lateral, or a combination) from an adversary’s flightpath (Figure 4.24). Prior to the lead turn, the fighter will seek to gain an advantage by “building” TR prior to the lead turn. The optimum amount of TR is a full turn diameter between you and your adversary’s flightpaths. In the T-38, we strive for at least 6,000 feet. It is important to realize, however, that TR for one fighter is normally TR that can be used by the adversary as well. There are exceptions to this rule. For instance, one fighter may have exclusive use of TR that the other fighter cannot use. An example of this exclusive TR is when two aircraft merge, high-aspect at low altitude, with one aircraft just above the ground and the other less than a turn diameter above the ground. The low fighter can execute a pure vertical lead turn; however, the higher aircraft cannot execute the same maneuver to match the lower aircraft. If he does, he will impact the terrain. Thus, the lower fighter enjoys exclusive use of this TR.
4.8.1.2 Merge Entries. The decision to merge above or below the Bandit is dependent on several considerations to include environmental factors, current energy, and the surrounding tactical situation. Weigh all the factors and execute a decisive game plan.
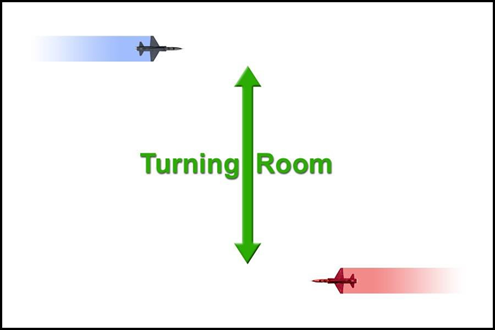
Figure 4.24. Turning Room.
4.8.1.3 Lead Turn (Figure 4.25). The lead turn is an attempt to use TR to decrease HCA prior to passing the opponent’s 3/9 line. In an ideal situation, against an unaware, nonmaneuvering Bandit, the initial lead turn will result in the fighter rolling out in a WEZ at the Bandit’s 6 o’clock. If both aircraft are aware and simultaneously use the TR, the result will be a close aboard, neutral pass. In general, you want to gain TR before the merge or the Bandit becomes aware and begins to turn into you. However, if your adversary begins to take that TR away (they become an aware Bandit and turn into you), you must stop trying to get more TR and use what you have. The figures below are two dimensional, but HABFM will happen in three dimensions. In a pure sense, a lead turn that maximizes use of available TR will have POM on the Bandit regardless of where the LV is in relation to the horizon (specific LV considerations are discussed later).
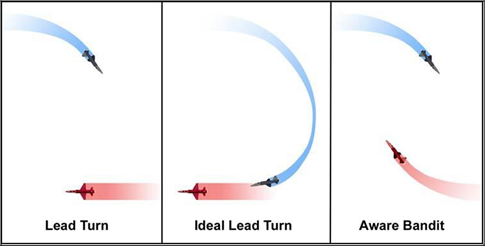
Figure 4.25. Lead Turn.
4.8.1.4 Energy Atom (Figure 4.26). 6K OBFM or DBFM engagements always start with the fighter and Bandit at the same altitude. Since the fighter’s nose position is near the horizon and will predictably lower, it is advantageous to start close to rate airspeeds. After the “check away” in HABFM, however, the fighter will intentionally maneuver to build in an altitude differential to gain vertical TR in addition to lateral TR. Regardless of power setting, the T-38 will quickly slow down maneuvering uphill and likely accelerate when going downhill. As a result the fighter will want to be slower than rate airspeed when maneuvering high to low in the lead turn and faster than rate in the opposite situation.
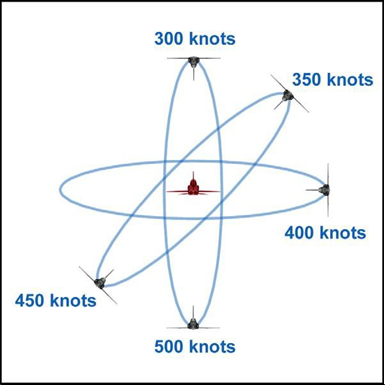
Figure 4.26. Energy Atom.
4.8.1.5 Use of the Vertical. Hypothetically, to execute a pure vertical lead turn from high to low, you would want approximately 300 knots. If you have more than this, it will be difficult for you to control your airspeed. As airspeed builds, so does the over- G potential. Additionally, the turn radius at high speeds may make the floor more of a threat than the Bandit. Conversely, if you are converting from low to high, purely in the vertical, you want closer to 500 knots. Starting at this airspeed, using target G, the fighter will easily be slowing through 400 knots in less than 90° of turn. The more co- altitude you are, the closer to 400 knots you should strive to be.
4.8.2 HABFM Setups. Butterfly setups will be executed IAW the squadron standards and/or IFF Playbook. The goal of “canned” high-aspect setups, especially early in IFF, is to introduce HABFM execution in a more predictable engagement. On subsequent missions, the student will be given the opportunity to evaluate the tactical situation and make a decision prior to the check away regarding planned merge geometry. Flying the proper setup mechanics will allow the fighter to arrive at the merge in a position of advantage. The Bandit will not allow the fighter an ideal lead turn to a stern conversion. Instead, he will allow the student some amount of TR depending on mission and engagement circumstances. Additionally, the Bandit will not typically maneuver until the fighter has reached his 3/9 line. Refer to Figure 4.27. The fighter should strive to cross through the Bandit’s CZ (Fighter 2) with airspeed between instantaneous corner and sustained-rate velocity (380-420 knots). If the fighter crosses inside the Bandit’s turn radius (Fighter 1), he will allow the Bandit the opportunity for a reversal and give up the advantage gained in the lead turn. If the fighter merges too far behind the Bandit (Fighter 3), range will build and
increase the time and fuel required to kill the Bandit. Additionally, this could allow the Bandit to capitalize on a separation opportunity.
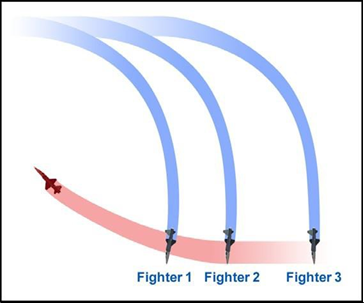
Figure 4.27. Merge Objective.
4.8.2.1 Prior to the Check Away. Determine if you will use vertical TR above or below the Bandit. There are several factors that will affect your HABFM game plan selection of whether to use a high-to-low or low-to-high conversion. However, the most important and therefore overriding factor is ease of tally for the fighter and attempting to deny the Bandit the tally. Use the environment to your advantage. Placing the Bandit between you and a cloud layer will vastly improve your ability to keep the tally. Likewise, placing yourself between the Bandit and the sun will make his job much harder.
4.8.2.2 Check Away. Select military power and begin a 30° turn away from the Bandit. While modulating power as required and maintaining awareness of the Bandit, begin to build vertical TR with a climb or descent and apply a cross-check that favors more attention to the Bandit the further away the two aircraft get. Monitor airspeed in the climb or descent to achieve briefed game plan. If approaching the limits of visual acuity prior to the “FIGHT’S ON ” begin to turn as directed or briefed to maintain the visual and call ‟padlocked.”
4.8.2.3 At the "TURN IN, FIGHT’S ON." The best way to achieve the merge objective is to build in a combination of vertical and lateral TR prior to the lead turn. This combination of vertical and lateral TR will then be used in the lead turn to decrease HCA and fly to the merge objective. This will require a max performance energy depleting turn. The objective is to turn inside the Bandit’s TC to point at his CZ (Figure 4.28). If the fighter floats to the outside, there won’t be enough time or range to gain TR prior to the merge. During the turn, AGSM is a priority to maintain the tally. You will be looking at a T-38 rotating towards pure pursuit more than 2 NM away. If you are not padlocked on the Bandit, you will lose the tally. DO NOT LOOK
IN THE COCKPIT DURING THE TURN IN. The fighter’s second priority is a max performance turn that gains lateral TR and doesn’t use up too much of the vertical TR already gained.
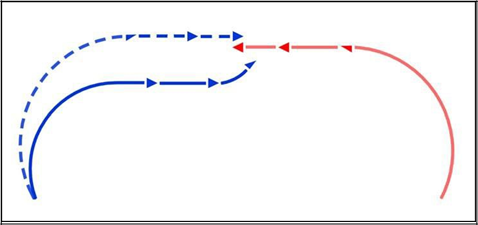
Figure 4.28. Get to the Inside at the Turn In.
4.8.2.4. High-to-Low Turn In Mechanics. Start the AGSM, set throttles to MAX afterburner, stare at the Bandit while overrotating the LV, and begin a max allowable G pull. As the nose drops towards the horizon, reset the LV closer to the horizon to preserve vertical TR. Continue the turn, pulling the Bandit across your nose for approximately 2 seconds (Figure 4.29). You may momentarily lose sight of the Bandit as he passes under your nose. Regardless, continue to pull the Bandit across your nose and aim your gun cross towards the Bandit’s CZ. Consider rolling past wings level into the Bandit to aid in tally maintenance and Bandit assessment. Your goal now is to manage energy and assess LOSR cues for initiating the lead turn. Even after a well-executed turn in, you won’t have longer than 1 to 2 seconds prior to executing the lead turn. Power placement will depend on current airspeed and vertical displacement relative to the Bandit. However, as a default, leaving the power in MAX afterburner is usually warranted. Reference the energy atom discussion (paragraph 4.8.1.4) for desired airspeed based on the ratio of lateral to vertical TR available. Generally, 350 to 400 knots is a good target airspeed for the lead turn. You will have little more than just enough time for one quick BFM cross-check in the HUD prior to starting the lead turn.
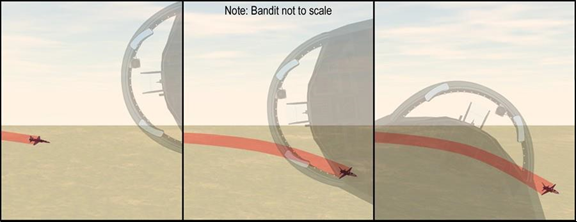
Figure 4.29. High-to-Low Turn In.
4.8.2.5 Low-to-High Turn In Mechanics. Start the AGSM, select power as required, and set the LV to bring the nose up to the Bandit’s low CZ. For the turn in, blend the G into the SRB or moderate buffet, whichever occurs first. As a default, select MAX afterburner during the pull. However, if you encounter the SRB with little to no buffet, sustain the SRB and delay increasing power. Similar to the turn in for a high- to-low conversion, you will pull the Bandit across the nose aiming to put the gun cross in the Bandit’s low CZ. This time the Bandit will be above you and tally maintenance will be easier. Given a max performance turn in, you’ll need to gain airspeed. Leave the throttles in MAX as a default and if circumstances allow, glance at your parameters (with the Bandit against a blue sky background, you won’t be able to). Depending on how quickly you approach your game plan airspeed you may need to reduce power. Attempt to have 420 to 450 knots for a typical low-to-high conversion. Use caution for the floor. Depending on altitude at the check away and your descent rate prior to the turn in, you may have to adjust you LV before or during the turn in to stay above the floor.
4.8.3 Lead Turn. Lead turn keys to success are: continuous Bandit assessment, LV placement, and turn performance.
4.8.3.1 Lead Turn Cues. A rapidly increasing LOSR aft is the cue to start the lead turn. For a right-to-right pass, the Bandit will swing from approximately 1 to 2 o’clock (Figure 4.30). The most common error is a late lead turn. If in doubt, start the lead turn early; however, do not to turn in front of the Bandit.
4.8.3.2 Lead Turn Assessment. If you start your lead turn late, there is nothing you can immediately do; you have built in a BFM problem you will have to solve later. If you start your lead turn early, the LOSR will slow down or freeze on the canopy. In this case, you must ease off the G momentarily to let the LOSR increase again
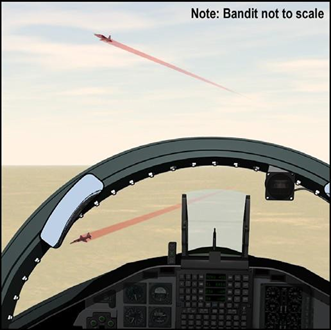
Figure 4.30. Lead Turn Cues.
4.8.3.3 Bandit Turn Direction. During the lead turn, you must also evaluate the Bandit’s game plan in order to develop your own. The Bandit will be the last to turn and therefore will determine whether you initially enter a one or two-circle fight. If, as you cross the Bandit’s 3/9, he turns into you, he has established a two-circle fight. On the other hand, if he turns away from you, you will be in a one-circle fight. Early recognition of the fight the Bandit has set will be critical to achieve the quickest kill. Figure 4.31 illustrates the cues to identify a two-circle and one-circle fight respectively.
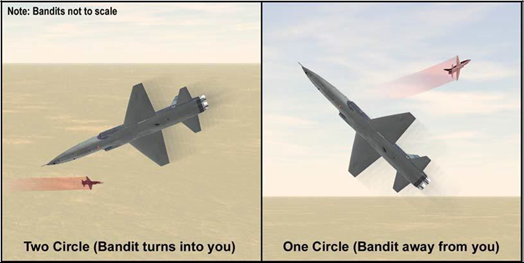
Figure 4.31. Bandit Turn Direction.
4.8.4 HABFM Post-Merge:
4.8.4.1 Two-Circle Fight:
4.8.4.1.1 Game Plan. The game plan in HABFM is to gain TR, execute an effective lead turn, transition to a sustained-rate fight, align TCs, and kill.
4.8.4.1.2 Merge Assessment. A two-circle fight, (when both fighters turn toward each other at the merge and continue) is primarily a rate fight where the fighter with the better rate over time gains an offensive advantage. At the completion of your lead turn, readjust LV slightly below the Bandit and sustain the best rate airspeed the Bandit will allow. Immediately assess your position in relation to the Bandit. A good check point for this assessment is the 180° point in the turn. This point is when the two aircraft are the furthest apart and may present WEZ opportunities.
4.8.4.1.3 Transition to the Rate Fight. Post-merge mechanics will vary depending on the Bandit maneuvering. Regardless of merge geometry, maneuver to gain the sustained-rate airspeed between 380 to 420 knots.
4.8.4.1.3.1 High-to-Low Conversion. Continue the max performance pull of the lead turn and adjust LV and power to achieve sustained-rate airspeed between 380 and
420. If accelerating to or through your target sustained-rate airspeed, reduce power and/or the LV to get closer to the G warmup picture then return to MAX. If the lead turn LV was closer to the horizon, the required LV change will probably be small and power may be left in afterburner (AB).
4.8.4.1.3.2 Low-to-High Conversion. As you cross through the Bandit’s CZ and he turns into you, your airspeed will be decreasing and your nose may be above the horizon. The longer this continues to happen, the more difficult it will be to transition to the rate game plan. Timely assessment of the Bandit’s turn into the fighter and subsequent rapid repo of the LV lower are critical to success. The instant you perceive a two-circle fight developing, quickly move your LV to below the horizon and ensure the throttles are in MAX. How far below the horizon the LV is placed will depend on airspeed and the position of the Bandit. The further above the horizon the nose is and the slower the fighter is, the further below the horizon the LV should be (up to 60 initially). As the nose transitions through the horizon, update the LV. However, you will need to use the vertical to recover airspeed while maintaining G. As the fight matures, capitalize on TC extensions to increase airspeed if required.
4.8.4.1.4 Energy Management. Given the limitation of the T-38 and rear aspect ordnance, the fighter must first realign TCs striving for the CZ to achieve a WEZ and subsequent kill. The fighter should have an angular and a power advantage throughout the fight. The use of TC extensions will help realign TCs. The average two-circle fight will require more than one extension. This will take time compared to offensive perch setups. Patience and a solid BFM cross-check to manage the LV for sustained energy are critical. Additionally, the fighter will hold a significant amount of Gs for an extended period of time, so an effective AGSM will be required to maintain the tally and correctly assess the Bandit.
4.8.4.1.5 Turn Circle Extensions (TCX). Achieving a nose position advantage and extending to the Bandit’s TC becomes the fighter’s next priority. TCX’s will be required to bring the TCs closer together and allow the fighter to establish themselves in the CZ. Some axioms of TCXs include:
• Can only be used if the fighter is winning.
• Must happen at the correct time.
• Should be held long enough to pull the TCs towards each other, but not so long that range and HCA build excessively.
4.8.4.1.5.1 Winning Cues. LOSR towards the canopy bow, with aspect angle usually
<90 is one cue. If AA is building significantly past 90° (the Bandit’s nose is rotating towards you) with LOSR towards the canopy bow, execute another lead turn. The fighter should continue the turn, prioritizing rate parameters to gain a rate advantage. Given typical merge geometry and Bandit cuffs, most of the time the fighter will quickly see winning cues.
4.8.4.1.5.2 When to Execute the TCX (Figures 4.32 and 4.33). The goal is to extend just inside the apex of the Bandit’s TC. (This is the quickest way to move the fighter's TC closer to the Bandit’s. Extend too late (dotted line) and you will cut too far inside the Bandits TC; if too early, then range will build significantly (dashed lines). With forward LOSR towards the canopy bow, the Bandit will appear to rotate (increasing aspect) as the fighter starts to point towards or slightly inside the apex of the Bandit’s TC. A simple rule of thumb of extension direction is to pull the Bandit to the assessment window, assess AA and LOSR and then extend or continue to the second merge.
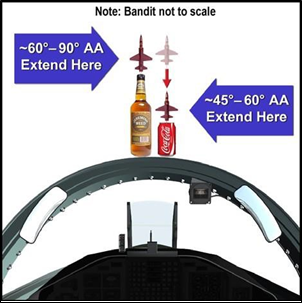
Figure 4.32. When to Extend Part 1.
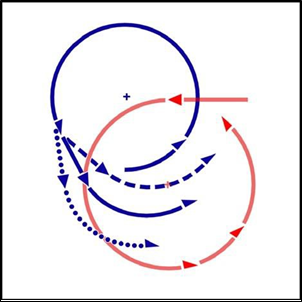
Figure 4.33. When to Extend Part 2.
4.8.4.1.5.3 TCX Mechanics. Pull the Bandit to the assessment window, ease off the G, and freeze the picture. Once LOSR aft develops, reapply G to the sustained turn rate. The ease normally lasts 2 to 3 seconds. Airspeed awareness prior to reapplying the G is essential. If sustaining your target airspeed and G, you will need to reduce power or climb during the extension to prevent getting fast. On the other hand, if slower than desired, leave the power in MAX and deliberately unload to accelerate during the extension. If you don’t extend for long enough and G is applied too soon, you will see immediate LOSR towards the canopy bow; ease off again and let LOSR aft develop before “getting back on the pull.” Remember, the merge objective and requirement to assess Bandit turn direction applies to every merge. At subsequent merges, if you erroneously cross too close behind the Bandit, he may reverse and transition to a one-circle fight.
4.8.4.1.6 Transition to OBFM. Eventually, you will see range and aspect pictures that look similar to canopy bow assessment from the OBFM phase. The amount of TR allowed, lead turn effectiveness, and energy management all factor into how long it will take (and how many TCXs) before the transition to recognizable OBFM “pictures” will happen. Depending on the above factors, the time required can vary from 500 of fighting to over 1,000! It is likely you will be near the floor before transitioning to OBFM. Remember that Ps=0 mechanics at the floor won’t allow the same G as during the descending portion of the fight. To continue with a sustained- rate game plan you will have to let G taper off slightly at the floor; you will feel less buffet as you are further away from the lift limit line (Reference Figure BFM 8). Be patient, and be deliberate with your BFM cross-check and Bandit assessment.
4.8.4.2 One-Circle Fight:
4.8.4.2.1 Game Plan. Once identified as a one-circle fight, the game plan is to transition to a min radius fight and lead turn the Bandit to align fuselages and kill.
4.8.4.2.2 Merge Assessment. A one-circle fight results when the fighters turn in opposite directions at the merge, but both aircraft’s ground track is in the same direction.
4.8.4.2.3 Transitioning to the Min Radius Fight. Post-merge mechanics will vary depending on if the fighter is merging from below or above the Bandit. Regardless of merge geometry, pull to the moderate buffet (or SRB, whichever occurs first).
4.8.4.2.3.1 Low to High. Given you have the desired airspeed relative to merge geometry, leave the power in MAX and pull with POM on the Bandit. As you slow down, SRB will BE replaced by buffet (assuming constant pull); the aircraft is transitioning from the G limit to the lift limit. Approaching 350 knots, radius will decrease as the aircraft slows. From 350 knots to approximately 250 knots the turn radius remains about the same. Below 250 knots, however, the turn radius opens back up again.
4.8.4.2.3.2 High to Low. If airspeed is high, immediately select IDLE power. As your nose will be below the horizon, quickly reset the LV to get POM on to slightly above the Bandit (use caution if you are in the SRB). As the nose tracks to or above
the horizon you should be slowing towards instantaneous corner; put the power back in MAX and continue a moderate buffet pull.
4.8.4.2.4 Bandit Assessment Across the Circle (Figure 4.34). As you and the Bandit are approximately coheading across the circle from each other, start to assess whether you are winning, neutral, or losing the min radius fight (Figure 4.34). At the second merge, expect the fight to transition to a scissors, a two-circle (energy fight), or continue in a min radius fight.
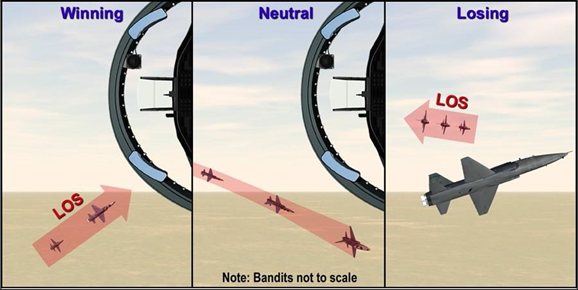
Figure 4.34. One-Circle Assessment.
4.8.4.2.4.1 Winning Cues. With AA stagnant or decreasing, you see LOSR forward begin to develop. With winning cues, execute a lead turn to minimize HCA. Use LOSR towards and then across your nose as the cue to execute the lead turn. At this second merge, you must assess Bandit turn direction just like you did at the initial merge (dashed rectangle in Figure 4.35).
4.8.4.2.4.1.1 Scissors. If the Bandit reverses his turn (the solid red arrow in Figure 4.35), you will transition to a scissors. Your game plan is to lead turn to align fuselages and slow down as required to gain weapons separation.
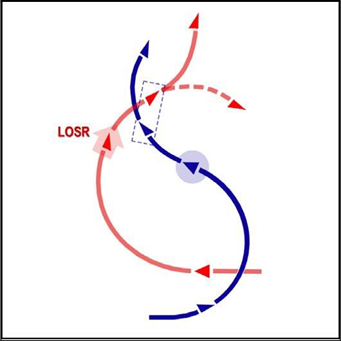
Figure 4.35. One-Circle – Winning.
4.8.4.2.4.1.2 Two-Circle Fight. If the Bandit continues his turn (with his LV and nose dropping below the horizon), he is transitioning to an energy fight (dotted red line in). Use power as required and quickly reset the LV to below the horizon to get on the briefed rate fight game plan.
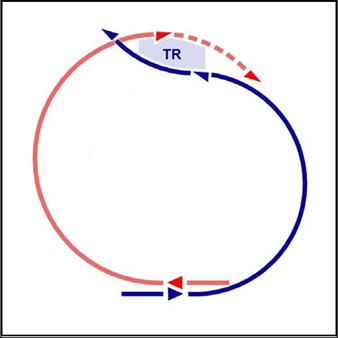
Figure 4.36. Use the Turning Room.
4.8.4.2.4.2 Neutral Cues. LOSR is forward, but Bandit aspect steadily increases towards pure as he approaches the nose. The LV may have to be changed as range decreases to ensure vertical deconfliction in a truly neutral second merge. With neutral cues, you will end up in a second merge where neither the fighter nor Bandit possesses a significant advantage. The engagement could continue one circle or transition into a two-circle fight. The last fighter to turn determines the fight. Do not be indecisive.
4.8.4.2.4.2.1 Approaching the Next Merge. If there is ANY lateral TR between you and the Bandit, use it; don’t let the Bandit lead turn you! In Figure 4.36, if the fighter continues the turn (solid blue line) the TR between him and the Bandit (green hashes) becomes exclusive TR for the Bandit. Instead, the fighter should use the TR (dotted blue line). As you do so, assess Bandit turn direction and continue the min radius fight or transition to the two-circle fight.
4.8.4.2.4.2.2 Neutral Pass. In a completely neutral pass with no lateral TR, the last fighter to turn sets the fight. Again, don’t be indecisive; however, take your energy state and nose position into consideration. At 350 knots or less, consider forcing a one-circle, min radius fight. If >350 knots or with the nose >~15 below the horizon, consider forcing a two-circle fight.
4.8.4.2.4.3 Losing Cues. LOSR is stagnant or aft with the Bandit’s nose rotating towards pure. Typical BFM errors that cause this situation are a light G pull at the initial merge and poor LV control transitioning from a high-to-low conversion to the one-circle, min radius fight. If you find yourself assessing losing cues, make sure you are in a moderate buffet, pull close to the lift limit line, and transition to DBFM if necessary. While executing the appropriate defense mechanics, continue to assess the Bandit for opportunities to reverse, neutralize, or separate. NEVER GIVE UP!!!
4.9 Air Combat Maneuvering (ACM). ACM is a substantial leap from BFM in terms of employment. No longer is it a single-man concept where your only cross-check is the Bandit. You now have to bring your element mate into your cross-check along with the normal Bandit assessment. ACM is the first mission where you employ as a team and attempt to maximize visual mutual support. Task prioritization now becomes an issue because the fighters are attempting to either kill or survive while maintaining element deconfliction. While it is the responsibility of each pilot to clear his own flightpath with all sensors available, the wingman carries the primary responsibility of element deconfliction. There are situations, however, when the wingman is not capable of adhering to his primary responsibility, and that responsibility needs to be transferred to the flight lead until the wingman is in a position to reassume his primary role. If deconfliction responsibility is disregarded or not shared appropriately, there can be disastrous consequences.
4.9.1 ACM Roles:
4.9.1.1 Engaged Fighter Versus Support Fighter. The term “engaged” is used to establish the engaged fighter role in an ACM engagement. Once established, the other fighter by default is the "support" fighter.
4.9.1.2 Establishing the Roles. Establishing the engaged and support roles is important in the visual arena because both fighters are maneuvering in relation to
the Bandit to defensively survive and offensively achieve a quick kill, while deconflicting within the element. The establishment of engaged and support roles can aid in ensuring element deconfliction by shifting the responsibility for deconfliction to the fighter in the best position to deconflict. Initially, before roles are established, it is the wingman's responsibility to deconflict with the flight lead. While both fighters are responsible for clearing their own flightpath, the support fighter has the ultimate responsibility for element deconfliction, allowing the engaged fighter to have the right of way. The bottom line is one Bandit equals one engaged fighter.
4.9.1.3 Engaged Fighter Role and Responsibilities. The engaged fighter executes his best BFM to survive and kill the Bandit, regardless of status (defensive/offensive/neutral). In addition, the engaged fighter should strive to maintain tally and visual, if able.
4.9.1.4 Support Fighter Roles and Responsibilities. The support fighter’s primary responsibility is to deconflict from the engaged fighter. In order to provide element deconfliction, the support fighter must stay visual throughout the fight, even at the expense of good BFM against the Bandit. The support fighter’s secondary responsibility is to take shots of opportunity with a clear field of fire. The support fighter’s tertiary responsibility is to clear the fight for other adversaries that are a factor to the element and to maintain overall element SA to include area orientation, fuel, and separation opportunities.
4.9.1.5 Establishing Roles. The key to positive role establishment is clear, concise, correct, and timely comm. Roles are established by an “ENGAGED” call from one fighter and a “PRESS” call acknowledgement by the other. The roles are not established without the “PRESS” call. It’s important to note that the “ENGAGED” call is a request from number 2, and until the flight lead responds with a “PRESS” call, number 2’s primary responsibility as the support fighter is to continue to deconflict. The hierarchy to determine who should be calling “ENGAGED” is as follows:
• Most defensive fighter.
• Most offensive fighter.
• Flight lead.
4.9.1.5.1 Most Defensive. The fighter upon whom the Bandit has focused the offensive attack should call “ENGAGED,” or a defensive fighter whose immediate priority is focused on survival instead of deconfliction should call “ENGAGED.”
4.9.1.5.2 Most Offensive. With the element being offensive, the most offensive fighter should call “ENGAGED.” The most offensive is:
• The only fighter with a tallyho. If both fighters have a tallyho; then…
• The fighter with the most offensive entry (will have offensive angles). If not clear, whoever has the most offensive entry; then…
• The first to merge with the Bandit.
4.9.1.5.3 Flight Lead. If a maneuvering fight is developing, and no roles have been established, the flight lead should declare “ENGAGED.” If there is any confusion, the wingman continues to deconflict until roles are confirmed.
4.9.1.5.4 Directing the Wingman to Engage. The flight lead can direct the wingman to call “ENGAGED” with a “PRESS” call. In this example, the wingman should be engaged but has not called it. The flight lead calls, “EAGLE TWO, PRESS.” The wingman responds with, “EAGLE TWO'S, ENGAGED.” The role swap has now officially occurred and Eagle 2 is the engaged fighter with Eagle 1 providing deconfliction as the support fighter.
4.9.1.6 Engaged and Support Role Changes. Once roles have been established, the element should strive not to change the engaged/support roles unless absolutely necessary (unnecessary communications and possible confusion). The driving factor to force a role swap is the support fighter's inability to “survive/kill” while continuing to deconflict. The following are examples of when the role exchange would be required.
4.9.1.6.1 Engaged Fighter Is Offensive/Neutral. The support fighter does not require permission to employ ordnance as long as flightpath and weapons deconfliction can be maintained. Shots should always be communicated. If the support fighter cannot employ ordnance and deconflict, call “ENGAGED.” Consideration should be given to not calling the engaged fighter out of an offensive position for a fleeting missile WEZ. If the engaged fighter is neutral or stagnated in an offensive position and the support fighter has a better entry into the CZ and gun WEZ, the support fighter should call “ENGAGED” to initiate and request the role exchange. The support fighter will maintain deconfliction until the role swap has occurred through a “PRESS” call. (See paragraph 4.9.3 for detailed discussion on ACM communication.. The support fighter should call “ENGAGED” prior to maneuvering the aircraft into a position where there is a potential flightpath conflict.
4.9.1.6.2 Support Fighter Becomes Defensive. The Bandit could elect to switch fighters at any time. The roles should swap when the support fighter becomes defensive and can no longer defend and deconflict. This will require communications for the swap to be complete. Until the role swap has occurred, however, the support fighter’s primary job is maintaining element deconfliction, even when defensive.
4.9.1.6.3 Weapons Employment and Deconfliction (Figure 4.37). After the support fighter has maneuvered his aircraft to a position where he can maintain deconfliction, he should start looking for shots of opportunity with a clear field of fire (CFOF). Different A/A weapons have different weapon deconfliction requirements. For the T- 38C AIM-9 (to include the P+) to meet weapons deconfliction, the other blue fighter can’t be within a 10° FOV at pickle for the entire time of flight (TOF) of the missile. A 10° FOV can be simulated by an area inside the airspeed, altitude, and heading bars on the HUD. If the other blue fighter is or will be in that region at pickle through missile impact, CFOF has not been satisfied and the shot should not be taken. Missile TOF can be simulated by the following rule of thumb (ROT): 6 seconds per NM with a tail aspect, 4 seconds per NM in the beam, and 2 seconds per NM with an H aspect. If the engaged fighter calls “DEFENSIVE” at any point in time, or if the support
fighter determines the engaged fighter is defensive, weapons deconfliction may be relaxed but not entirely discarded. The track of the missile is still the responsibility of the shooter, but a much smaller CFOF may be acceptable if the engaged fighter is in danger of being killed in a short period of time. Example: If a fighter is defensive at ground level, out of energy and ideas, with a Bandit stuck at 6 o'clock and 1,000 feet, the situation is a bit more pressing.
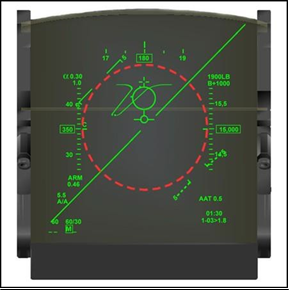
Figure 4.37. Weapons Deconfliction Zone.
4.9.2 ACM Communications:
4.9.2.1 Standard Communication. Pilots must use standard terminology in order to avoid confusion, enhance SA, and minimize excessive radio transmission time. Nonstandard radio terminology, lack of call signs, and excessive communication can cause confusion and misunderstanding at a critical time. Use a separate radio to the maximum extent possible for ACM communication.
4.9.2.2 Categories. There are four categories of communication words that apply to ACM: engaged/support, directive, descriptive, and informative. This discussion is presented in terms of an engaged element.
4.9.2.2.1 Engaged/Support Communication:
4.9.2.2.1.1 “ENGAGED.” The fight member is informing the element of the intent to take the engaged fighter role. From the wingman, it is a request for the engaged fighter role. In either case, a response is required. If it will enhance SA, include a descriptive term: “EAGLE ONE ENGAGED, DEFENSIVE.”
4.9.2.2.1.2 “PRESS.” A response to an “ENGAGED” call that confirms the flight member who called “ENGAGED” is the engaged fighter. The member who called “PRESS” is the support fighter. This is the only acceptable response from a wingman when the flight lead calls “ENGAGED” unless the wingman is blind or will go defensive and die. Roles are established or swapped.
4.9.2.2.1.3 “UNABLE.” A response to an “ENGAGED” call indicating the engaged fighter is unable to disengage or pick up the support role without going defensive or dying. This communication usually includes a descriptive term stating the reason. “EAGLE TWO, UNABLE, DEFENSIVE/BLIND.” Roles are not swapped.
4.9.2.2.1.4 “NEGATIVE.” A flight lead’s only response which simply means “NO.” The flight lead, based on inherent authority, is unwilling to allow the wingman to become the engaged fighter. Roles are not swapped
4.9.2.2.2 Directive Communication. Directive communication tells the other fighter in the element to do something. Used to maneuver the element in the most advantageous manner to survive or engage the threat. When using directive communication, preface the call with the call sign of the flight member to act. For example, a wingman who visually detects a Bandit approaching weapons parameters from the flight lead's right side would say, “EAGLE ONE, BREAK RIGHT.” Examples of directive terms are:
• Break (with direction): a maximum performance, energy depleting turn with flares.
• Hard (with direction): a maximum power sustained performance turn.
• Flare.
• Separate (with direction).
• Jink.
• Reference (with direction).
4.9.2.2.3 Descriptive Communication. Descriptive communication informs the other fighters where to look or what they may see. After initiating a reaction with directive communication, fill in with descriptive commentary, as required to coordinate between involved fighters. Descriptive commentary is normally prefaced with the call sign of the flight member being addressed. For example, Eagle 2 says: “EAGLE ONE, BANDIT RIGHT 3 O'CLOCK 2 MILES, LOW.” The following are additional descriptive items as the situation requires:
• Type aircraft or threat identification
• Left or right (side of aircraft)
• Clock position
• Range
• High/level/low
• Amplifying remarks
4.9.2.2.4 Informative SA Building Communication. Additional examples of descriptive communication that informs the other flight members of intentions include “EAGLE TWO...
• OFFENSIVE/DEFENSIVE”
• ANCHORED”
• IN/OUT”
• Bandit SWITCH”
• SPLIT”
• FOX 2”
4.9.2.2.5 Plain English. While communication discipline is of extremely high importance in the air combat arena, killing the Bandit in minimum time while ensuring blue force deconfliction is paramount. If undecided what to say, revert to plain English to convey intentions to the other fighter.
4.9.3 ACM Execution Based on Attack/Detection Quadrant. The following sections address element ACM execution when committed to a merge. The requirement to enter the ACM environment could occur at the end of an intercept or in the post-merge arena. Execution mechanics will address response based on threat detection from visual detection, traffic collision avoidance system (TCAS), or AWACS/GCI. The principles of ACM are:
• Detect the threat.
• Engage:
- Direct an initial move to defeat any initial attack.
- Maintain element mutual support by establishing roles.
- Best BFM to kill and survive.
• Separate with visual mutual support.
4.9.3.1 Threat Detection. In order to prosecute and defeat a short-range attack, the threat must first be detected. Detecting threats is a continuous effort. Element members must clear the area around their flight for new threats and multiquadrant attacks. The complete attention of both element members cannot be focused on a single threat attacking them. The support fighter, in particular, must be alert for additional threats. Detection can occur from a GCI point out, TCAS, or visually. To successfully prosecute and defeat a short-range attack, visual acquisition by at least one element member early in the initial move sequence is essential.
4.9.3.2 Target Detection. Once the decision to engage has been made, the element needs to effectively communicate, sanitize for other threats, and arrive in the visual arena with an offensive advantage. As a minimum, be in a position to get the tallyho and have immediate weapons opportunity at the merge. If the pilot with the initial detection is expecting to merge with a Bandit, the other fighter needs to quickly know where to visually search as well as where to position the aircraft.
4.9.3.3 Initial Communications at Visual Pickup. The fighter who initially detects the threat needs to base their initial radio transmission on the Bandit's proximity to a WEZ. Communicate with the appropriate AFTTP 3-1.1 brevity terms to state the Bandit's location. If the Bandit appears unaware, depending on the mission, the initial call may just be descriptive to point out the threat: “EAGLE TWO, TALLY ONE, BRA 260, 2, COLD.” If the intent is to get the flight turning toward a Bandit who is not in a WEZ (due to range or nose position) then a hard turn should be called by the flight lead: “EAGLE HARD RIGHT.” If the Bandit is in or approaching a WEZ the
first radio transmission needs to be geared toward ensuring the survival of the flight: “EAGLE ONE, BREAK RIGHT.” The first priority is directive calls to ensure flight survival, followed by descriptive calls to allow the other flight member to get a tallyho. As a general ROT, all visual pickups with an aspect >90° should be assumed to be approaching a WEZ and consideration should be given to “Break” turns versus “Hard” turns to engage.
4.9.3.4 Formation. The element should attempt a bracket with both vertical and lateral offset in order to maximize split-plane maneuvering to deny the Bandit “Tally
2.” The objective is to intercept the Bandit from two distinct sides, force the Bandit to turn, providing one fighter a shot/kill opportunity. Both fighters should maneuver for TR. If the Bandit maneuvers to flank or beam the element, it may be impossible to execute a bracket attack and should transition to a single-side offset (SSO) intercept with vertical offset. If intercepting from a SSO, the non-tally fighter should take spacing and establish a 1- to 1.5-nm lateral and 2000-3,000 feet of vertical separation. Vertical spacing should be in relation to the Bandit. This ensures TR and weapons separation at the merge while preventing the Bandit from visually acquiring both fighters. The element should be in a position that if the Bandit survives to the merge, the ACM roles can then be defined, and visual maneuvering will result in a quick kill of the Bandit.
4.9.3.5 Visual Pickup in the Front Quarter:
4.9.3.5.1 High-Aspect Bracket Game Plan. The element should attempt a bracket with both vertical and lateral offset in order to maximize split-plane maneuvering to deny the Bandit “Tally 2.” The objective is to intercept the Bandit from two distinct sides, denying the ability to defend against both fighters, and giving one fighter a shot opportunity. See Figure 4.38 for an example of the merge flow. Both fighters should maneuver for TR if able and force the Bandit to pass between the element. The engaged fighter, (the flight lead or whoever the Bandit is leaning on) should execute the merge prep checklist and strive to arrive at the merge in an offensive position. The support fighter should float his formation out to visual limits with a vertical stack off the horizon to deny the Bandit “Tally 2” (the desired formation is a 1- to 1.5-nm lateral and 2,000- to 3,000-foot vertical separation) in order to achieve TR and weapons separation. The support fighter should then turn towards the fight and prepare to take a quick shot with weapons deconfliction once the identification (ID) is made. A common description of this event is "filming the merge" because of the opportunity that exists for the wingman to have the Bandit in the HUD at the time of ID (due to the geometry of the intercept) (Figure 4.39). In this case, the fighter without the tally (default to the wingman) should pick up a formation position that will allow shot at the merge.
Figure 4.38. High-Aspect Bracket.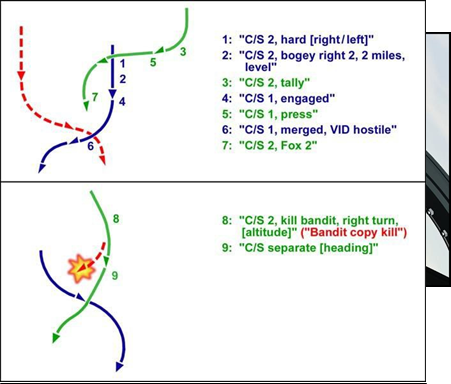
Figure 4.39. Filming the Merge.
4.9.3.5.2 Establishing Engaged and Support Roles. Just prior to the merge (turning is about to begin), the element should establish the engaged and support roles. Since neither fighter is defensive, the most offensive fighter should call “ENGAGED.” This would be the only fighter with the tallyho. If both have tallyho, then the fighter with the most “offensive entry,” will call “ENGAGED,” If neither fighter clearly has an offensive advantage (significant lead turn), then maintain the element deconfliction contract and assess Bandit actions. The Bandit’s choice on whom to turn with should
determine the resulting engaged/support roles. If the wingman is unsure, then lean forward with an “ENGAGED” call, and the flight lead can easily veto with “NEGATIVE, EAGLE ONE ENGAGED.”
4.9.3.5.3 Merge. When merging with a Bandit, the appropriate fighter should always make a “MERGED” call if the flight has visual mutual support (VMS). This should help to get the other fighter's eyes on the Bandit and ensure both fighters see the same Bandit.
4.9.3.5.4 Visual Identification (VID). If a VID is being accomplished and all ROE have been met, make the call in the following format: “EAGLE ONE, VID (ID ROE), (TYPE AIRCRAFT as required)”. The merge and VID call may be combined to reduce excessive comm. Example: “EAGLE 1 MERGED, VID, HOSTILE (VIPER).”
4.9.3.5.5 Quick Kill or No Turn at Merge. With effective communications, formation, intercept, and ID, the fight should be over at the merge with a quick missile kill. The support fighter should have weapons separation prior to the merge and be in a position to shoot once the ROE and weapons deconfliction criteria have been met. If this is not accomplished and/or the flight lead does not want the element to turn at the merge, this should be communicated as soon as possible with a radio call.
4.9.3.5.6 Engaged Fighter Turning at the Merge. The engaged fighter should turn to execute the best BFM to kill the Bandit. This will also make the Bandit somewhat predictable. Typically, single-circle fights put more pressure on an adversary than two-circle fights. Single-circle fights force the Bandit to get anchored and low on energy, allowing for an unobserved rear-hemisphere WEZ entry by the support fighter.
4.9.3.5.7. Status Calls. If unsure of which aircraft is which, the support fighter should query with a radio call: “EAGLE ONE, STATUS HIGH/LOW.” “HIGH/LOW” can be substituted with whatever the support fighter sees or makes sense from his angle. Other acceptable description fill-ins may be “NOSE HIGH/LOW, RIGHT/LEFT SIDE, LEFT/RIGHT TURN”. Cardinal directions and headings should be avoided because it requires head’s down time by both fighters. Eagle 1 at this point should be as descriptive as possible and always tell the status in response to what he was asked, and then any other SA enhancing parameters of Eagle 1’s aircraft. As an example, “EAGLE ONE IS HIGH MAN, OFFENSIVE.”
4.9.3.5.8 Kill Calls. The shooter should use the ROT as mentioned earlier for missile TOF before making a kill call. Kill calls should be as descriptive as possible. Example: “EAGLE TWO, KILL BANDIT, RIGHT HAND TURN, 14K FEET,
NOSE LOW.” The shooter should ensure the Bandit acknowledges the kill, “BANDIT, COPY KILL,” while directing the separation.
4.9.3.5.9 Separations. Once a kill is achieved, execute a separation. The support fighter is primarily responsible for directing the separation since his tertiary responsibility is to gain SA on the battlefield. The support fighter needs to assess the energy states of both fighters in order to give a separate heading that will put them close to LAB. As a general ROT, the separation direction should be limited to less
than 90° from the current flow. This will ensure that both fighters will be banked up for a limited amount of time, thereby decreasing the possibility of another Bandit picking up the tally. It also allows the fighters to get to a VMS formation quickly so that the coordinated sensor ops game plan can be reestablished in a timely fashion. Power should be MAX, and the jet should be unloaded to 0.5G. This gets the formation back to an acceptable energy state and gets the formation low to decrease possible WEZ’s from other Bandits.
4.9.3.6 Visual Pickup in the Beam:
4.9.3.6.1 Shooter-Eye Game Plan. The element should position itself to engage as described in visual pickup in the front quarter. As stated earlier, if it was a visual pickup, assume the Bandit is approaching a WEZ. The fighter who picked up the Tally should direct the formation towards the Bandit with a “Break” turn. If a “tally” from the defensive fighter is not immediately forthcoming, whichever fighter called the break should follow quickly with directive and descriptive communication to prevent the other fighter from breaking so far as to go belly up to the Bandit. If both fighters see the Bandit, the closest fighter to the Bandit should call “ENGAGED” and press an attack on the Bandit since he will be the first to merge. The initial break turn will likely drive the fighters into a trail formation from which the trail and outside fighter should have weapons separation and a shot opportunity if the Bandit engages the lead fighter.
4.9.3.6.2 Merge. As stated above, the inside fighter is best suited to be the engaged fighter (first to merge). Lack of proper ID may force a merge before any T-38Cs can shoot. Whether or not the engaged fighter turns immediately at the merge depends on whether trailers are suspected. Regardless, the first to merge should call the VID. Turning at the merge will immediately put pressure on the Bandit and will facilitate a quick exit of the trailing fighter's field of fire (depending on what the Bandit does). This will present a quicker shot opportunity to the trailing fighter and allow offensive angles by the engaged fighter if the Bandit extends to merge with the support fighter. Regardless of which fighter merges and engages with the Bandit, they should still execute merge prep and be prepared to fight their best 1v1 BFM with the game plan of anchoring the Bandit single-circle if the merge geometry allows.
4.9.3.6.3 Bandit Turns with the Lead Fighter. If the Bandit turns on the first fighter to enter the merge, the trailing fighter should have an easy shot opportunity and an offensive entry. The trailing fighter should ensure weapons deconfliction and shoot if in a WEZ. If required to enter a gun WEZ, the support fighter (the trailing aircraft) can subsequently initiate or request an exchange of roles by calling “ENGAGED.” See Figure 4.40 for an example of the fight flow.
4.9.3.6.4 Bandit Extends to the Trail Fighter. The Bandit also has the option to blow through the first merge and switch to the trail fighter if “Tally 2.” The first to assess this should call out “Bandit Switch” with your call sign, and expect a role swap will logically ensue. This will allow the engaged fighter (first to merge) to rapidly gain an angular advantage on the Bandit. In either case the element should be able to achieve a quick kill. See Figure 4.41 for an example of the fight flow.
4.9.3.7 Visual Pickup in the Stern. Despite tremendous advances in all-aspect weaponry, the stern quadrant is still the flight's most vulnerable cone. First, the fighter will have no shot opportunity until nearly 180° of turn—an expenditure of time and energy. Second, in a stern attack, the Bandit may continue firing ordnance until forced out of 6 o'clock. Unlike a beam or head-on attack, reduced closure will allow the Bandit to remain in firing parameters for a longer period of time. Both fighters can greatly increase their probability of post-merge survival by keeping their speed up, descending to lower altitudes (SA and threat permitting), and maintaining optimal tactical formation. If possible, an altitude stack (1,000 to 3,000 feet, unless on the deck) and wider tactical formation (9,000 feet, plus) should be flown. A Bandit converting on two coaltitude, 6,000-foot spaced T-38s is presented with a much easier tally two (or four) opportunity. This section will cover element maneuvering against a threat that is initially detected in the flight's stern quadrant.
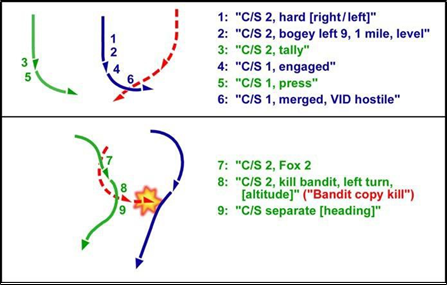
Figure 4.40. Bandit Turns with the Lead Fighter.
Figure 4.41. Bandit Extends to the Trail Fighter.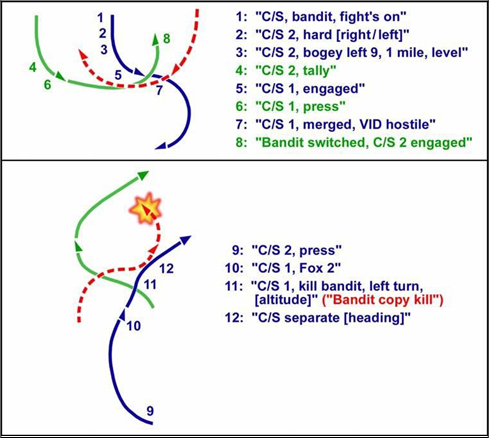
4.9.3.7.1 Initial Move. Bandit is assumed in a WEZ. With a Bandit in a WEZ, the first to gain tallyho should direct a break turn into the attacking Bandit. The break direction should always be called in the direction most advantageous for survival for the person being attacked. Generally speaking, the formation should break in the direction of whomever the Bandit is lined up on. If the Bandit is attacking from significantly above or below the horizon (more than 30°), the fighter directing the break should include the terms “up” or “down” respectively: “EAGLE ONE BREAK LEFT AND UP.” The element should execute their best DBFM and infrared missile defense (IRMD) while continuing to deconflict from each other.
4.9.3.7.2 One Fighter Tally. The fighter with the tally must provide descriptive commentary to get the other pilot's eyes on the Bandit. This requires descriptive calls that isolate the Bandit in a portion of the other fighter's canopy and includes range. For example, if Eagle 2 were pointing out the threat to Eagle 1: “EAGLE ONE, BANDIT LEFT 7 O’CLOCK, 2 MILES, LEVEL.” Communication is required to add SA if the Bandit is clearly attacking one eagle or the other: “EAGLE ONE, BANDIT LEAN ON YOU” OR “EAGLE TWO ENGAGED, DEFENSIVE.” This way, the
engaged and support roles are established even if only one fighter has tallyho.
4.9.3.7.3 Establishing Roles and Execution. Once it is clear who the Bandit is focusing the attack on, the “ENGAGED/PRESS” calls should be made to establish roles. To allow an effective energy state for maneuvering, the support fighter should
immediately select full AB and consider a sustained energy turn as soon as the Bandit's nose is off.
4.9.3.7.3.1 No Switch. Optimal tactical formation discussed previously may limit the Bandit to see only one fighter. In this case, or due to a poor tactical decision, the Bandit may press the attack without regard to the other fighter. The support fighter should have a quick missile shot or transition to a gun WEZ. Since WEZ opportunities are fleeting, the support fighter should anticipate the WEZ and be prepared to shoot while ensuring weapons deconfliction is met. See Figure 4.42 for an example of the fight flow.
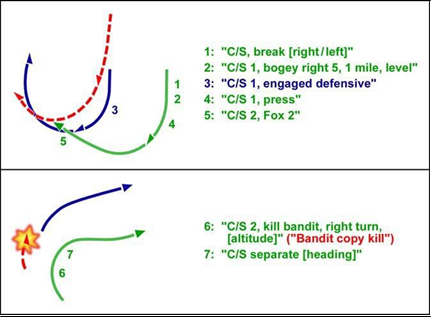
Figure 4.42. Defensive Perch (No Switch).
4.9.3.7.3.2 Bandit Switch. A Bandit who stern converts on two fighters, both of which are seen, will usually attempt to switch to the fighter on the outside of the turn at some point after the fighters initiate their break. This could happen immediately (“Early Switch”) or after the Bandit pursues one fighter for a short time and then switches to the other (“Late Switch”). Typically, the inside fighter will see the Bandit's nose go to lag with LOS towards the outside fighter. Both fighters should be careful not to confuse a Bandit belly check or quarter plane with an actual switch. When the switch occurs, it must be quickly recognized and, if possible, communicated within the element. If it was not clear within the element who the Bandit was on, then use previously discussed calls to make it clear and establish roles. If roles had been established, call the switch and exchange of roles if necessary: “EAGLE TWO, BANDIT SWITCH,” “EAGLE TWO, ENGAGED,” “EAGLE
TWO, PRESS.” As soon as the Bandit’s nose comes off to execute the switch, the defensive fighter must anticipate the three-dimensional (3D) merge geometry to assess whether his element mate will be able to execute the overall game plan and take the Bandit single-circle, or if the merge geometry requires the fighter to take him two-circle. If the Bandit has more than 1,500 feet of TR and/or 30° of lead turn at the
merge, the merging fighter has no choice but to go two-circle with the Bandit to prevent putting himself in an immediate defensive position. If the Bandit has less than 1,500 feet of TR and/or 30° of lead turn at the merge, the merging fighter can execute the overall game plan and force the Bandit into a single-circle fight. Whether the merging fighter forces a single-circle or two-circle fight will determine the support fighter’s follow-on maneuvering.
4.9.3.7.3.2.1 Early Switch. An early switch will almost always allow the Bandit to gain greater than 1,500 feet of TR and/or 30° of lead turn. This forces the merging fighter to go two-circle. Prior to arriving at the merge the fighter should execute merge prep and establish roles. At the merge the now engaged fighter needs to call the VID. This can all be condensed into one comm call. “EAGLE ONE, MERGED, VID HOSTILE, 1’S ENGAGED” followed by “EAGLE ONE, PRESS” from Eagle
2. Eagle 1 as the engaged fighter should execute his best two-circle BFM. As soon as the Bandit executes the early switch from Eagle 2 onto Eagle 1, Eagle 2 needs to start executing his smartest BFM while maintaining deconfliction, IAW the support fighter’s priorities. This scenario is the most difficult for the support fighter to maintain deconfliction because it stretches the formation to visual limits. The best game plan for the support fighter is to keep power in MAX, immediately set LV 45° to the horizon (pitchback picture) in the direction of the merge, and max perform the aircraft into the vertical. This will get the support fighter sufficiently off of the horizon, so that as the Bandit’s nose turns toward him, it will be difficult for the Bandit to see him. If the Bandit does see him, this maneuver ensures that the Bandit will not threaten him with his nose because it will allow the engaged fighter an easy WEZ opportunity if he does. This maneuver will also slow the support fighter’s forward ground track (in the same way scissors do) so that he can maneuver to a more mutually supportive position from the engaged fighter while maintaining WEZ separation for shots of opportunity. Weapons deconfliction, kill calls, and separation execution still apply as the fight matures and reaches those milestones. See Figure
4.43 for an example of the fight flow.

Figure 4.43. Defensive Perch (Early Switch).
4.9.3.7.3.2.2 Late Switch. A late switch will almost always allow the merging fighter to gain some TR and lead turn on the Bandit as he executes his merge prep. At the very least the merging fighter should have a neutral merge and geometry that allows the merging fighter to drive a single-circle fight. Prior to arriving at the merge, the fighter should establish roles. At the merge, the now-engaged fighter needs to call the VID. This can all be condensed into one comm call. “EAGLE ONE, MERGED, VID HOSTILE, 1’S ENGAGED” followed by “EAGLE ONE, PRESS” from Eagle 2. As soon as the Bandit executes the late switch from Eagle 2 onto Eagle 1, Eagle 2 needs to start executing his smartest BFM while maintaining deconfliction IAW the support fighter’s priorities. The best game plan for the support fighter is to keep power in MAX, overrotate LV (G-awareness picture) to use altitude to get nose turned around quickly, and MAX G allowable (SRB). It may be difficult for Eagle 2 to keep sight of Eagle 1 at this point due to the geometry putting Eagle 1 at his dead six. Element deconfliction can still be assured due to SA that they are not in the same piece of sky at this point (nor will they be in the next 15 seconds), thereby negating the requirement to call “EAGLE TWO, BLIND.” It should be rather easy for Eagle 2 to maintain the tally on the Bandit throughout this turn. He should follow the Bandit until he hears Eagle 1 call “MERGED” and then look around the Bandit with a good search pattern to reacquire the visual on Eagle 1. If at this point Eagle 2 still is not visual, it warrants an “EAGLE TWO, BLIND” call. If Eagle 2 sees two aircraft but is
unclear of which aircraft is which, his next job is to figure out which aircraft is friend or foe. Use status comm as depicted earlier and offset the fight at the 11 to 1 o’clock position until tally/visual is regained. Once Eagle 2 is tally/visual (he knows who is who), he can point at the fight while assessing range for a valid AIM-9 opportunity with weapons deconfliction. Eagle 2 needs to be vigilant about assessing closure because the single-circle fight will quickly decay into a 150-knot joust for 3/9 advantage. If Eagle 2 is faster than 250 to 280 knots, he can cause excessive closure, including the possibility of flying out in front of the fight prior to missile impact. See Figure 4.44 for an example of the fight flow.
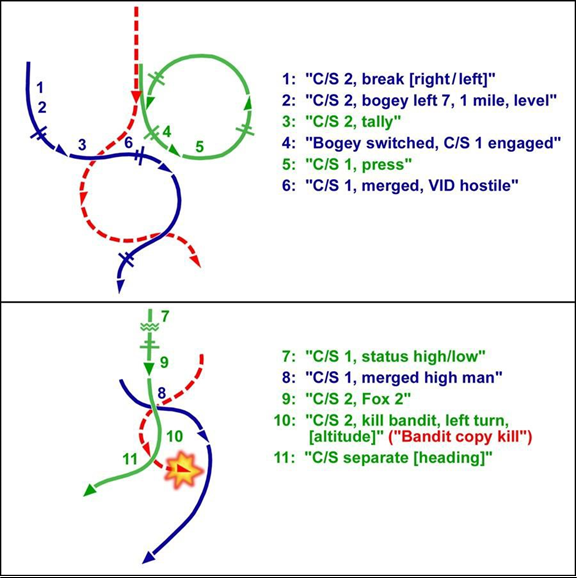
Figure 4.44. Defensive Perch (Late Switch).