
5.11 Tactical Pattern Procedures
5.11 Tactical Pattern Procedures:
5.11.1 Purpose.
Like the conventional pattern, the tactical pattern allows “canned” delivery pattern training. In the tactical pattern you will perform popup attacks. Popup attacks are flown when weather or threats force you to ingress the target at low altitude.
5.11.2 Tactical Pattern Overview.
There are two types of pop patterns that are flown in BSA: direct and indirect. Direct pop patterns involve a run-in directly to the target followed by an "action" where a turn is made a specific distance from the target to create an offset prior to rolling in. An indirect pop pattern is constructed so that the offset heading is flown immediately after rolling off of the base position. Both attacks allow for target acquisition during the pop and subsequent pulldown to a diving attack.
5.11.3 Tactical Pattern Spacing Fixes.
If required, use geometry to correct spacing; do not use airspeed changes. Depending on the pattern and airspace limitations, you may adjust spacing on the turn to downwind or at base. The lead aircraft will turn at the briefed spots. All following aircraft should use the aircraft in front of them for timing the turn to base.
5.11.4 Downwind.
After completion of your SEM, turn to crosswind. Priorities and tasks during this turn remain the same as during the conventional pattern. Once turning on downwind, complete your error analysis. Basic analysis of your position on final relative to the planned wire remains the same as during the conventional patterns.
5.11.5 Base Turn.
Call “BASE” just like in the conventional pattern, select MIL power, and start a descending turn toward the run-in ground track/approach heading. The goal is to roll out pointed at the appropriate target/heading as close to your planned parameters as possible. For a direct popup attack, roll out with the TD container (diamond) centered in the pitch ladders (the FPM should be centered on the CCRP steering line). For an indirect pop up attack, roll out on the appropriate heading. During the turn, keep your attention outside the cockpit as you will be descending under G.
5.11.6 Run-in.
The cross-check during the run-in should start with airspeed and altitude. Accelerate to and maintain the planned airspeed for the action and stay at the briefed altitude above the ground (typically 500 feet above ground level [AGL]). After initial adjustments to airspeed and altitude, bring range to the target (in the NAV block in the bottom right corner of the HUD) and heading into your cross-check. For indirect patterns, flying a wind-corrected ground track is necessary to arrive at the proper pullup point. As the distance measuring equipment (DME) counts down to within 0.2 NM of planned action or pullup range, attention should stay on the range to the target to ensure a timely action.
5.11.7 Action Point.
For direct pops, the check turn at the action point is designed to set the target at a known angular distance off the nose. At the specified range, select MIL power, and execute a 3 to 4 G level turn for the appropriate amount of check angle and roll out. Several ground references may exist in the pattern to confirm the accuracy of the action point, the action heading, and/or the popup point. Attention should be outside with the priority being the ground. For indirect pops, there is no action; fly directly from the base turn to the popup point (Figure 5.4).
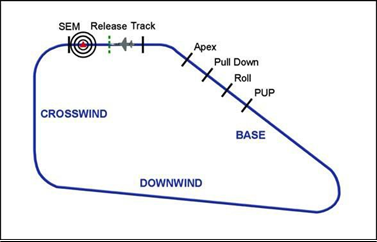
Figure 5.4. Indirect Pop Pattern.
5.11.8 Popup Point.
Select MIL power and execute a 3-G pullup to the appropriate climb angle (15° for a 10 delivery and 30 for a 20 delivery). Call "C/S UP." The goal is to precisely fly the “climb wire,” acquire the target, and be ready for a timely pulldown.
5.11.8.1 Cross-Check Pacing.
Start with the FPM/pitch ladder, transition to the target, look back inside at the FPM, and finally, check altitude. For both the 10 and 20 pop patterns, this pacing will get your eyes through the required items and back to altitude about 2 seconds prior to pulldown altitude.
5.11.8.2 Target Acquisition.
As noted above, after the climb angle is initially set, the next task is to find the target. The target should be just behind the canopy bow, slightly below the mirror. From there it will drift down and aft. For the 10 pop, when pulldown altitude is reached, the target will be in the “pocket” formed by the canopy rail and canopy bow intersection. For the 20 pop, the target will be further aft and on to just under the canopy rail at pulldown (Figure 5.5).
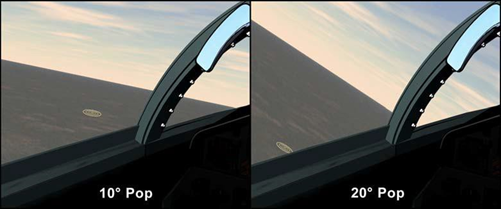
Figure 5.5. Pop Attack Pulldown Canopy Code.
5.11.8.3 Climb Angle.
It is important to double-check the FPM is at the desired climb angle after acquiring the target. It is common for it to drift high or low while you are finding the target. This leads to deviations in the “climb wire,” which in turn make it harder to roll out on final on the planned wire for weapon release. Trim as a technique to combat this effect.
5.11.9 Pulldown Point.
Anticipate the pulldown altitude, but there is no need to lead it. At pulldown altitude, execute an unloaded roll to put POM long of the target on the AOP, and start a 4-G pull.
5.11.9.1 Pulldown LV placement.
Your pulldown LV should be placed to keep your POM on the AOD, just like the conventional pattern. For the 10 pop, initially, this will equate to about 100 to 110° of bank (LV just past the horizon). For the 20 pop, you will have to overrotate further to about 135° of bank.
5.11.9.2 Apex Cross-Check.
Approaching the apex of the pulldown, a quick cross- check in the HUD is warranted to build airspeed SA. If it appears the aircraft will approach or slow below 300 knots, modulate the pulldown G to stay above 300 knots, or abort the pass and go through dry. This problem is more of an issue on 20 popup attacks with the aircraft below briefed airspeed prior to the popuppoint.
5.11.10 Rolling Out on Final.
Just like the conventional pattern, as the target approaches the edge of the pitch ladders, begin a smooth rollout so that once wings level the target is centered in the pitch ladders. On the 20 attack, a rollout of ~135 is required to get back to wings level. It is important that the roll is unloaded; if this roll is loaded, the FPM may run well long of the AOP prior to finishing the rollout. Additionally, be aware that, compared to the conventional pattern, there are more opportunities to induce errors prior to rolling out on final that will put the aircraft somewhere other than on the exact planned wire. Knowing this, strive to be as precise as possible with airspeed, action/pullup range, G, climb angle, and pulldown altitude, as deviations in any of these areas can lead to follow-on problems.
5.11.11 Final.
Once rolled out on final, the 10 and 20 pop pattern finals are identical to those of the conventional pattern. Procedures from this point through the SEM are the same as the conventional pattern roll in through final and are discussed in paragraph 5.13.