
5.14 Error Analysis.
5.14 Error Analysis.
Once established on downwind, with SA on the aircraft in front of you, assess your last pass relative to the plan. Both pilot-induced errors and wind can cause deviations. Many pilot-induced errors can be fixed by returning to and reinforcing the original game plan; common errors include: forgetting the throttles on final, roll in LV on the target, etc. In other cases, you may need to move your base position, either because it was errantly flown or to compensate for wind.
5.14.1 Automatic Scoring Display.
The automatic scoring display can aid in analyzing your delivery (Figure 5.8). Dive angle, altitude, and airspeed at release will be displayed. If you’re confident that your roll in and weapons-delivery mechanics were executed IAW your plan, consider moving your base position closer or further away from the target as required. Remember to account for winds; they may be different on range compared to the forecast for which you built your plan.
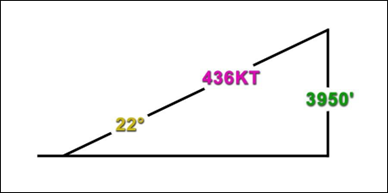
Figure 5.8. Auto Scoring Display.
5.14.2 Wire Analysis.
Wire analysis using the automatic scoring display is based on the dive angle and altitude at release (Figure 5.9).
5.14.2.1 High/Steep (High, Converging Wire).
You rolled out above the wire but likely found the correct wire with an accurate AOP.
5.14.2.2 High/On Planned Dive Angle (High, Parallel Wire).
You rolled out above the wire but did not set the AOP (probably errantly set the planned dive angle).
5.14.2.3 High/Shallow (High, Diverging Wire).
You rolled out above the wire, didn’t set the AOP correctly, and subsequently let the FPM run long.
5.14.2.4 Low/Shallow (Low, Converging Wire).
You rolled out below the wire but likely found the correct wire with an accurate AOP.
5.14.2.5 Low/On Planned Dive Angle (Low, Parallel Wire).
You rolled out below the wire but did not set the AOP. (MRA was probably a factor.)
5.14.2.6 Low/Steep (Low, Diverging Wire).
You rolled out below the wire, did not set the AOP and subsequently “pushed” the FPM even lower. (This scenario is unlikely to happen as MRA will likely be a factor well before the pipper reaches the target.)
5.14.3 Pipper Placement.
Once you have started flying good parameters, you can begin to assess where you pickled. Did you pickle where you intended? If not, then on the next pass, do so while flying an on-parameters pass. If the pipper was on target, work to improve it by changing the spot that you pickle. One technique is to apply 1/2 correction in the opposite direction (a correction for a score of 69/12 would be to pickle 34/6).
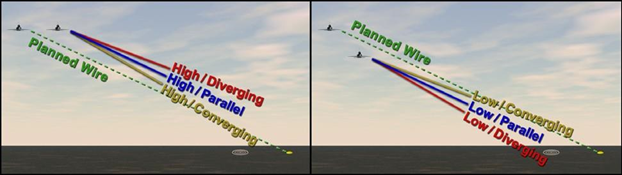
Figure 5.9. Wire Analysis.