
5.15 High-Angle Strafe (HAS).
5.15 High-Angle Strafe (HAS).
HAS is defined as any strafe pass planned with 15° of dive or greater. Currently, each fighter MDS executes HAS slightly differently. For example, F-15Es typically use 20°; F-16s use 25°; and A-10s use 30° or greater. The minimum recovery altitude is 500 feet AGL day time and 1,000 feet AGL for night. HAS attacks are often planned to recover above 1,000 feet AGL to allow the use of one set of numbers for both day and night. Units will incorporate MDS-specific considerations when computing standardized attacks.
5.15.1 Pattern. HAS is flown out of the conventional pattern. During the downwind checks, ensure the correct target steer point is selected.
5.15.2 Base Position. Because the AOP for strafe is the target and not a point beyond the target and the track time is longer than for a typical bombing pass, the base position will be wider than for a bombing pass of similar dive angle. The canopy code for HAS base position will look slightly wider than a bombing pass of the same dive angle as well. For 25° HAS, use the same canopy code as for a 20° bombing pass. For 30° HAS, use approximately two fingers above the canopy rail (no wind).
5.15.3 Roll In. The roll in should be planned so as to roll out on the attack heading, pointed directly at target. This roll in will be very similar to the conventional 30 roll in. Use MIL power and call “C/S, IN DRY” once starting the turn from base. Switch to the strafe mode once starting the roll in. Remember that if switching from CCRP to strafe mode, it will require two clicks of the weapon mode switch. Use the target approaching the gun cross as a reference for when to roll out.
5.15.4 Final. The CCIP gunsight will initially fall below the gun cross and horizontally will be positioned between the FPM and gun cross (if there are no crosswinds, the gun cross, FPM and gunsight will all be lined up vertically). Once tracking towards the target and slant range decreasing, the gunsight will rise closer to the gun cross. Track time will be longer than on a typical bombing pass, approximately 6 to 9 seconds.
5.15.4.1 Initial Aiming References. Initially, pull the gun cross towards the target and set the bottom of the gun cross on the target. If there are crosswinds on final, put the target laterally halfway between the gun cross and FPM. Hold this picture (bottom of the gun cross on the target’s 3/9, with the target between the gun cross and FPM) and start to bring airspeed and slant range into your cross-check (Figure 5.10).
5.15.4.2 Airspeed. Reduce power from MIL to idle as airspeed accelerates through 350 to 370 knots.
5.15.4.3 Slant Range. The T-38C “A-10” gunsight gives slant range in nautical miles immediately below the gun cross. The T-38C gunsight provides slant range in hundreds of feet in the lower right-hand corner of the HUD—a more difficult cross- check. With either pipper, as slant range decreases towards open fire range, refine the firing solution, easing the pipper to the target. Note: Once inside 4,000 feet, the “in- range cue,” or “hat,” is displayed on top of the T-38C pipper. This range is well inside of planned open fire range (and even inside of cease fire range!) for HAS, so it is of little use for HAS attacks.
5.15.5 Open Fire/Cease Fire. Reference Figure 5.10. Use the slant range indicated below the CCIP gunsight (A-10 pipper) or in the bottom right corner of the HUD (T-38C pipper) to determine when to open fire. Different airframes open fire at different ranges. F-16s and F-15Es need to open fire with their 20mm cannon inside of 6500 feet slant range in order to achieve the minimum required bullet impact velocity for weapons effects. The A-10 with its 30mm cannon can effectively open fire well outside of this range, target dependent. All platforms normally fire a 2-second burst. All airframes also attempt to “track – shoot – track” (TST); there should be enough time to be able to get a good 2-second burst before starting the climbing SEM. Thinking “track – shoot – track” will help ensure that the trigger is released prior to the SEM. In any case, cease fire and start the SEM once arriving at the cease fire slant range. The only requirement is to avoid a lazy pulloff; however, because of close proximity to the ground, it is generally briefed to treat the recovery similarly to a climbing SEM.
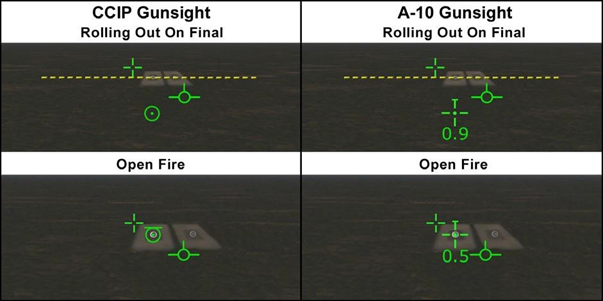
Figure 5.10. Strafe Final.