
FM-1 Basic Formation
Objectives
1.
- Identify the key principles of basic T-38C formation.
2. - From a list of visual signals, select the proper description for its use in the T-38C.
3. - Identify the correct leader and wingman responsibilities during ground operations.
4. - Identify the correct procedures to accomplish a T-38C formation takeoff.
5. - Identify the correct procedures to accomplish a T-38C interval takeoff.
6. - Identify the correct procedures to accomplish a rejoin.
7. - Identify the correct procedures to fly basic formation maneuvers.
8. - Identify the key procedures to accomplish a battle damage check.
9. - Given a specific flight condition, select the correct lost wingman procedure.
10. - Identify the correct procedures to accomplish a T-38C formation landing.
Assignment
1.
- Review FM–1 in the Formation Student Guide, B/F-V5A-K-FM-SG.
2. - Review Interim T-38C Procedures Manual, Chapter 6 through Section 6B, Basic Formation.
3. - Review squadron standards.
Information
Formation Principles
Objective 1 — Identify the key principles of basic T-38C formation.
1. Mutual support
(1) Wingmen must maintain
Visual Signals
Ground Operations
1.
Rejoins
a. A helmet tap is the preparatory command for brake release and MAX A/B. The execution command is a head nod.b. Wingmen ensure proper runway lineup.(1) At execution command, throttles to MAX and ensure good A/B light.(2) Maintain the lineup position throughout the takeoff roll.(3) Request one power increase or decrease.(4) Rotate with lead’s aircraft and maintain a stacked-level position until gear/flap retraction. Confirm the gear and flaps are retracted.3. Overrunning leada. Maintain your side of the runway.b. Select MAX A/B and perform an individual takeoff.c. Do not attempt to fly formation after passing flight lead.d. Fly the briefed departure until instructed otherwise by the flight lead.4. Falling behind leada. Ensure proper engine operation.b. Select MAX A/B.c. Maintain your side of the runway.d. Perform a single ship takeoff and rejoin on lead after retracting the gear and flaps.5. Common errors — Abrupt, improper flight control inputs and improper power modulation which leads to an out of position formation takeoff.Interval TakeoffObjective 5 — Identify the correct procedures to accomplish a T-38C interval takeoff.1. Interval takeoff directives are located in AFI 11-2T-AT-38V3.a. Minimum of 10 second spacing.b. Flight leads will maintain 300 KCAS until the rejoin is complete, unless mission requirements necessitate a different airspeed.2. Executiona. Understand sympathetic abort procedures after brake release.b. Once airborne, delay coming out of A/B until sufficient overtake is achieved.c. Maneuver to the rejoin line.d. Know squadron standards.3. Common errorsa. Failure to adhere to single ship takeoff standards.b. Lost sight.c. Insufficient or too much overtake.4. Instrument trail departuresa. Use these procedures when a VMC join-up can’t be performed based on weather.b. Minimum 20 second takeoff spacing.c. 30 degrees of bank for all turns.
5. Trail departure executiona. The first priority is to fly basic instrument procedures. Strictly adhere to the briefed climb speeds, power settings, altitudes, headings, and turn points.b. Until joinup or level-off, each aircraft will call when passing multiples of 5,000 ft and when initiating turns.c. If IMC at level-off, maintain 1,000 ft of altitude separation. This separation may be reduced to 500 ft to comply with minimum safe altitude.d. Wingmen will call visual on preceding aircraft and rejoin once directed by flight lead.6. Trail departure errors — Failure to adhere to the briefed speeds, power settings, etc. are the primary errors when accomplishing instrument trail departures.Rejoins
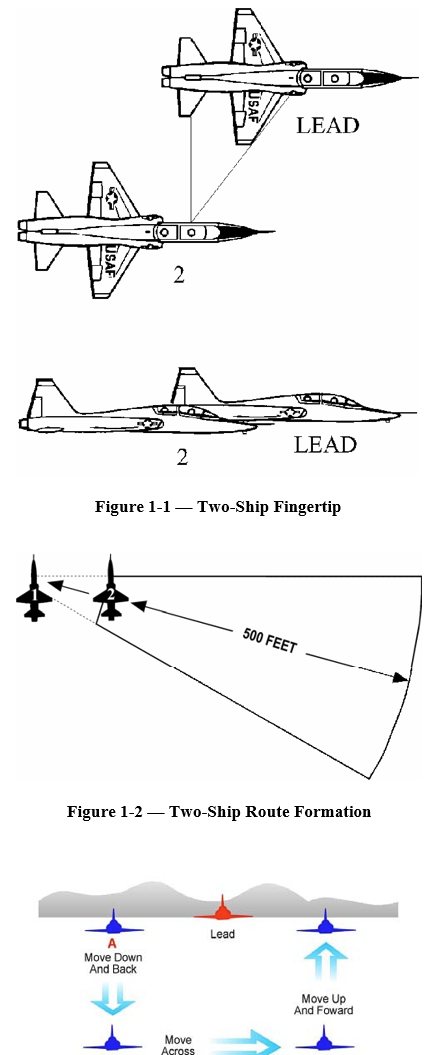
a. Position — The wingman will maintain wingtip clearance while flying a position which looks down the leading edge of the wing. Your head abeam the slab bolt approximates 3-ft wingtip separation (Figure 1-1).b. Four-ship — #2 sets the spacing; #4 lines up #1 and #3’s helmets.2. Route — The position should allow wingmen to comfortably check cockpit instruments, provide visual lookout, and still be close enough to move into close formation if weather or other circumstances dictate (Figure 1-2).a. Position — Extension of fingertip out to approximately 500-ft spacing.b. Four ship — #2 sets the spacing; #4 lines up #1 and #3’s helmets.c. During turns, the element or aircraft turned into stacks down as necessary to keep lead in sight and stay below his plane of maneuvering. A common error is to stack too low.d. When turned away from, the element or wingman remains in the same horizontal plane as lead.3. Echelon — The relative position on the leader or preceding aircraft is the same as fingertip. #2 sets the spacing for the formation.a. Once established in the traffic pattern, turns away from the wingman will normally be in echelon unless directed otherwise.b. Avoid turns into the echelon if at all possible. If making a turn into the echelon, each aircraft maintains the same relative position as for straight- and-level flight.c. On turns away from the echelon, maintain the fuselages of all aircraft in the flight in the same horizontal plane.d. Match the roll rate established by lead. The horizon should split lead’s lower intake. In fingertip, your head should be abeam the pivot point of the stabilator.4. Crossunder — Used to move the wingman or element from one side to the other. Also used to maneuver the formation from fingertip to echelon or echelon to fingertip (Figure 1-3).a. During the crossunder, wingmen should maintain nose-tail clearance and vertical separation from the flight lead.
b. When the #2 aircraft crosses under in a flight of three or more, #3 or the element moves out to allow #2 sufficient spacing to move into position.c. During an element crossunder, as #3 crosses behind the flight lead, #4 crosses to the new position on the other wing of #3.5. Formation errors — Rough flight control inputs and/or power modulation are the primary errors during basic formation maneuvering. Not knowing the correct procedure to perform a maneuver is also a common error.Battle Damage CheckObjective 8 — Identify the key procedures to accomplish a battle damage check.1. Battle damage checka. Accomplished IAW AFI 11-2T-AT-38V3.b. Will be accomplished any time ordnance is expended or damage to the aircraft is suspected.c. Formation spacing will be no closer than fingertip.d. Know squadron standards.2. Check errorsa. Failure to ensure positive lead change.b. Accomplishes the check too fast — fails to identify aircraft problems.c. Accomplishes the check to slow — delays flight lead maneuvering and flight visual lookout.Lost WingmanObjective 9 — Given a specific flight condition, select the correct lost wingman procedure.1. Lost wingman procedures are IAW AFI 11-2T-AT-38V3.2. Always simultaneously transition to instruments, execute the applicable lost wingman procedure, and inform lead.3. While in formation review procedures prior to going lost wingman.4. Know procedures fora. wings-level flight.b. turns.c. precision/nonprecision final.d. missed approach.Formation LandingObjective 10 — Identify the correct procedures to accomplish an T-38C formation landing.1. Formation landing directives are located in AFI 11-2T-AT-38V3 and AETC Supp. Formation landings will not be accomplished when(1) crosswind exceeds 15 knots.(2) runway is reported wet; ice, slush, or snow is on the runway.(3) runway width is less than 150 ft.(4) weather is less than 500 ft and 1½miles or pilot weather category, whichever is higher.b. Maintain a minimum of 10 ft lateral wingtip spacing once stacked level.c. Know squadron standards.2. Execution
a. Wingmen should plan to land on the upwind side of the runway when crosswinds are a factor, (e.g., greater than 5 knots crosswind).b. Maintain the normal fingertip position until starting down the glidepath or reaching VMC, whichever occurs later.c. Then spread laterally and fly the stacked level position, which is level with or slightly higher than lead and the gear doors lined up.d. Lead is the primary reference for the wing landing. Cross-check the runway on short final to ensure proper alignment.e. Fly the proper position off lead throughout the flare and touchdown.f. After landing, maintain lateral spacing. Full aero braking too soon could put you back in the air and in a dangerous situation.g. If you overrun lead, maintain your side of the runway and aircraft control.3. Common errors — Abrupt, improper flight control inputs and/or abrupt, improper power modulation which leads to an out of position formation landing.4. Formation drag proceduresa. These procedures may be used to achieve separation between aircraft in formation when winds, weather, runway conditions, or runway availability preclude accomplishing a wing landing or VFR traffic pattern and landing.b. Know squadron standard drag procedures.
Review Exercise 01
Complete
1.
b.
c.
d. None of the above are correct
2.
3. A_____ is the signal to acknowledge preparatory visual signals.
b.
c. Both a and b are
4.
5. During a two-ship lineup, the wingman should take the center of one half of the runway and lineup lead’s .
6.
when:
b.
c.
d. Both a and c are correct.
e. All the above are correct.
7.
8. Instrument trail departures require a minimum of seconds spacing and if IMC at level-off aircraft must maintain altitude separation. This separation may be reduced to to comply with minimum safe altitude.
9. True or False: During an overshoot the wingman should keep lead in sight at all times.
10. Once established in the traffic pattern, turns away from the wingman will normally be in unless directed otherwise.a. routeb. closec. echelond. All the above are correct
11. True or False: During a battle damage check, formation spacing will be no closer than route.
12. Formation landings will NOT be accomplished whena. crosswind exceeds 15 knots.b. runway is reported wet; ice, slush, or snow is on the runway.c. weather is less than 500 ft and 1½ miles or pilot weather category, whichever is higher.d. Both a and c are correct.e. All the above are correct.