
SA-5 Patterns, Procedures, and Parameters
Objectives
1. Identify characteristics of the different classes of air–to–surface ranges.
2. Identify the pre–flight, enroute, spacer pass, and designation pass procedures.
3. Given a pattern position and situation on the range, identify from a list the appropriate radio call.
4. State proper spacing and how to maintain it with four aircraft in the range pattern.
5. Describe how and where potential mid–air collisions may occur on the range and how to prevent them.
6. Describe procedures for the standard safe escape on a bomb pass.
7. Be able to list pattern and release parameters for conventional deliveries on local air–to–surface ranges.
8. Know the surface attack training rules and restrictions.
9. Know contingency procedures for surface attack sorties.
10. State the actions to be taken by a NORDO aircrew with or without an emergency.
11. Identify characteristics of the local range.
Assignment
1. Review Lesson SA–5, Patterns, Procedures, and Parameters in the Surface Attack student guide,
B/F-V5A-K-SA-SG.
2. Review MCMAN 11-238 Vol 2, Section 4.3, Range Patterns and Procedures.
3. Review AFI 11-214, Chapter 5, Paragraphs 5.3, Air–to–Surface Training Rules, and 5.4, Range Radio Procedures.
4. Review and bring to class local In–Flight Guide, Surface Attack pages.
5. Review squadron standards for Surface Attack, if applicable.
6. Complete SA–5 review exercise.
Information
Range Classes
Objective 1 — Identify characteristics of the different classes of air–to–surface ranges.
1. Class A range
a. Most restrictive category of range.
b. Range Control Officer (RCO) is present with a two–way radio voice communication capability.
2. Class B range
a. A manned or unmanned range with scoring capability, but no RCO.
3. Class C range
a. An unmanned range with no scoring or control capability.
Range Entry
Objective 2 — Identify the pre–flight, enroute, spacer pass, and designation pass procedures.
1. Planning is the key to a successful bombing pattern. All of the various external factors must be taken into account
to get the bomb on the target. The mission briefer must:
a. Get weather and NOTAMs.
b. Call or FAX the range with line–up information:
(1) Call Sign
(2) Range Time
(3) Planned Events including the designation pass
(4) Run–In Direction and Target
c. Call the range for their current weather observation.
2. The briefing will follow the mission format provided by the squadron. If you are the briefer, make sure you are
ready to go well before brief time so you are able to handle last minute changes that always seem to arise.
3. Once you are at the aircraft the pre–flight inspection for the T–38C No Drop Bomb Scoring system is very simple.
Make sure the Master Arm switch is SAFE, the Counter Measures Dispensing switch is OFF, and the UFCP and HUD
are set as required with power OFF.
4. Once airborne, tactical formation is normally used enroute to the range. At IFF, 4–ship flights will normally enter
the range 2 + 2 (or as briefed). Flight lead will obtain range clearance and call for the TRIM check and the FENCE
check. These two checks will makes sure your aircraft systems are working correctly and that you are prepared to
employ the weapons you have. The FENCE check for IFF training makes sure the VTR is set correctly, the appropriate
weapons program is selected, and the Master Arm and Counter Measures Dispensing switches are set to ARM and ON.
5. The first event on the range is to get all the aircraft in the formation with the proper spacing in the range pattern.
This pass is called the spacer pass.
6. The next event is the designation pass, (if accomplished). This pass over the target allows you to make sure the
pre–selected destination point is correct or allows you to select a new steerpoint to use for your bombing passes. The
target designation steps are:
a. Select the A/G Master Mode (CCIP) and insure the target destination point is set in the UFCP.
b. Fly a 10° LALD pass.
c. Prior to roll–in press the Nose Wheel Steering (NWS) button and confirm that DESIG is displayed in the
lower left corner of the HUD, the BFL attaches to the boresight cross, and the designate symbol appears.
d. On final, fly the designate symbol (pipper) to the target and press the NWS button again.
e. Execute a safe escape maneuver and look for the UFCP display to change to the MRK display, the BFL
attaches to the FPM, and the pipper replaces the designate symbol.
f. If you wish to accept the updated steerpoint press the MRK function key within 20 seconds. If you do not
need to update the point, do nothing or press the NWS button a third time.
g. Techniques to accomplish the DESIG pass are to roll–out at 375–400 KCAS with throttles back to hold
airspeed, designate between 1,200 and 1,500 ft MSL, continue down to compare the TD Box and designate
symbol, and then perform a safe escape no later than minimum release altitude for that pass.
Range Procedures
Objective 3 — Given a pattern position and situation on the range, identify from a list the appropriate radio call.
Objective 4 — State proper spacing and how to maintain it with four aircraft in the range pattern.
Objective 5 — Describe how and where potential mid–air collisions may occur on the range and how to prevent them.
Objective 6 — Describe procedures for the standard safe escape on a bomb pass.
Objective 7 — Be able to list pattern and release parameters for conventional deliveries on local air–to–surface ranges.
1. Conventional pattern spacing
a. The conventional pattern is a rectangular
pattern. Aircraft positioning in the pattern is critical.
Correct pattern spacing is achieved when aircraft are
at each of the four corners of the pattern (Figure
5-1). This spacing deconflicts aircraft on final,

decreases the possibility of a mid–air collision, and
reduces jetwash problems on final.
b. Crosswind: During the turn to crosswind,
identify the preceding aircraft and check spacing to
avoid turning downwind inside another aircraft. The
corner of the range pattern between crosswind and
downwind is known as the “coffin corner.” The
classic coffin corner is set up when one aircraft
makes a lazy dive recovery and turn to crosswind
while the following aircraft makes a normal or a
more aggressive turn to crosswind and cuts off the
preceding one on the turn to downwind. However,
conflicts can develop anywhere in the pattern. If
there is any doubt as to aircraft identity as you
complete your dive recovery and begin your turn,
momentarily roll–out and check the outside of your
turn (belly check) and then continue turning. If you
still can’t positively identify or locate the preceding
aircraft, make a radio call asking for his position,
“Three, say position.” Continue with the normal
crosswind ground track, but don’t climb to pattern altitude until certain there is no conflict. One technique is to
level off 1000’ below pattern altitude until you confirm the position of the preceding aircraft. The response to a
“say position” call must come immediately after the request in order to maintain flight integrity and ensure flight
safety. Altitude and the box pattern positions and associated landmarks are the best references to use: “Three’s
downwind, 9 o’clock to the target at 8000.” Once the conflict is resolved, make the radio call “continue” or
“visual, continue.” Any “say position” call is a safety of flight radio call and takes precedence over all others. No
one else should transmit until the position call is answered and a “continue” or “visual, continue” call has been
made. After your recovery, continue climbing to base altitude, maintaining base airspeed.
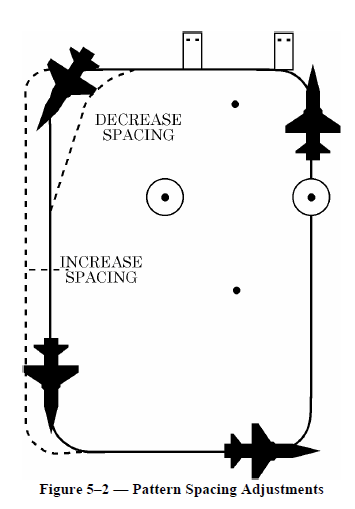
c. Downwind: Adjust spacing on downwind (Figure 5-2), perform error analysis on the just completed pass,
make a quick cockpit/fuel check, and set or confirm the switches for the next pass (mode, weapons program,
master arm, and CMD). The flight lead will establish the downwind ground track, but since this is the leg used to
adjust spacing, it is flexible. In all cases, make the downwind track wide enough to fly a wings–level stabilized
base leg. As the aircraft approaches the lead point to base leg, select military power, and turn the aircraft (3–4 Gs)
to roll-out on the desired base position. Call base (base with fuel if directed by the flight lead) as the turn is
initiated; e.g., “3’s base, 2.5.”
d. Base: It is important to properly plan and execute a good base leg because it is the starting point for
consistent, accurate weapons delivery. The base leg is defined by an altitude and distance out from the target, and
is designed to help establish the proper dive angle on final. Flying to the proper base leg position and using
consistent roll–in techniques will make it easier to achieve the correct delivery parameters. Remember, the T–38C
turn radius is about 5000’ in the box pattern, so lead the turn to base and final. Initially, use ground references to
ensure proper base positioning; however, strive to recognize the proper position by references only to the target
and its relationship to the aircraft. A good reference for a no–wind 10° LAB base leg is to line up the target with
two fists (beer can) on the canopy rail while sitting erect. For 20° LALD, line up the target with one fist (half beer
can) on the canopy rail; for 30° DB, line up the target on the canopy rail, and for 45° HADB, line up the target two
fists (beer can) below the canopy rail. If you are too wide or too close, correct to the proper base leg by angling in
or out, and adjusting your roll–in. If you recognize a base leg is too wide or too low at roll–in, compensate by starting a level roll–in. If you recognize a base
leg is too close or too high, compensate by
overbanking in an effort to fly the aircraft to the
proper position.
2. Roll–in
a. Start your roll–in at the proper lead point.
There are several roll–in techniques but their
goals are all the same: to place the aircraft on a
preplanned dive angle at a precomputed altitude
and airspeed. One technique is to turn toward
the target and pull the HUD boresight cross
toward the AOD which is approximately 1,500
ft past the target. The roll–in can be modified if
you’ve established an incorrect base leg
position. If the base position appears too far
out, the turn should be flown more level toward
the target to intercept the desired dive angle. If
the position appears too close, a nose–low roll–
in will help prevent a steeper than planned dive
angle.
b. To initiate the roll–in, call “In” (listen for
the “Cleared” call), select military power, bank
the aircraft (the actual bank angle will depend
on base position and roll–in technique), and pull
the boresight cross toward the computed AOD.
Check that the AOD is approximately 40% of
the BFL length. Remember, if the delay cue is
present the BFL is not complete.
3. Final/Release
a. Check the dive angle, set the throttles to control the airspeed, and trim as necessary to maintain the FPM on
the AOP. Fly the aircraft left or right to get and keep the BFL over the target.
b. Throttle technique varies with each pilot. After a few missions you’ll develop a technique that’s best for you,
and airspeed will generally cease to be a problem.
c. For a 10° low angle bomb (LAB), pull the throttles back halfway (stand them up) when the airspeed is
approximately 400-410 KCAS. For a 20° low angle low drag (LALD), stand the throttles up (or a little further
back) when the airspeed is approximately 390-400 KCAS. In a 30° dive bomb (DB), pull the throttles to just
above idle at approximately 360-370 KCAS (right after you roll-out on final). In a 45° dive bomb (DB), pull the
throttles to just above idle at approximately 330-340 KCAS (just as you are rolling out on final).
d. If your airspeed was fast on a previous pass, try pulling the throttles back a little quicker (or a few knots
sooner). Or, if the airspeed was slow on a previous pass, try pulling the throttles back a little slower (or a few
knots later).
e. Continue to fly the aircraft to the AOP. The pipper will move up to the target, along the BFL where you will
press the pickle button to release the weapon. As a technique, hold the pickle button until the safe escape is well
underway (nose to the horizon) for all deliveries to avoid quick pickles. In follow–on aircraft this will be required
for a ripple release of weapons and for delayed releases.
f. A delayed release is indicated by the delay cue just above the pipper on the BFL. You will normally see this
for passes with a headwind and on the 20°, 30° and 45° dive passes. In practical application the steer line is
presented on a delayed release but only for a very short duration.
4. Safe Escape
a. Begin recovery no lower than the planned or minimum release altitude. If satisfactory release parameters are
not met, go through dry. Recover the aircraft in a wings level pull using a minimum of four Gs in two seconds.
Advance the throttles to MIL so as to have military power (100 percent RPM) as the aircraft’s nose passes through
the horizon (not before). If your airspeed is higher than it should be, delay advancing the throttles. Maintain a 4-G
pull until the nose (FPM) is 20° above the horizon and then continue to 30° above the horizon. Then make a crisp
climbing turn to crosswind (watch the rolling Gs). Any delay turning to crosswind increases the possibility of a
coffin corner conflict.
5. Safe Escape Common Errors
a. Releasing below planned or minimum release altitude may result in possible ground impact, foul, over–stress
of the aircraft, or departure from controlled flight. There is also an increased exposure to the enemy (4500 ft. AGL
minimum recovery altitude to avoid small arms envelope) and a greater potential for a real bomb to dud (fuse time)
or for aircraft damage due to the fragmentation pattern of live ordnance.
b. Banking the aircraft before the nose is above the horizon may result in an increase in the altitude lost during
recovery, insufficient frag clearance, and/or a possible foul.
c. Selecting military power (100 percent RPM) before the nose of the aircraft reaches the horizon may result in
an increase in the altitude lost during recovery, insufficient frag clearance, and/or a possible foul.
6. Strafe pattern operations.
a. The crosswind, downwind, and base parameters are similar to a 10° LAHD bombing pass. As in T–38C
bombing, the bullets for strafe are simulated as well. Simulated employment and HUD displays for the F–16 20
mm gun or the A–10 30mm gun are selectable.
b. When rolling out on the strafe lane place the boresight cross just above the target and maintain that picture
during the dive.
(1) As the slant range decreases to effective F–16 gun range (in–range cue attached to the pipper) raise the
nose to bring the pipper on target. Nominal effective gun range for the T–38C (F–16) is 4,000 ft.
(2) When approaching effective A–10 gun range raise the nose to bring the gun cross on target. Maximum
effective gun range for the 30mm A–10 gun is 4.9 NM. In–Solution cue is the appearance of a digital range
read out in tenths of NM under the gun cross.
c. When you pull the trigger the system will simulate firing at a rate of 60 rounds per second. Fire with a single
continuous burst until you reach your minimum altitude, minimum slant range, or break–X altitude. Stop firing
before you begin your safe escape maneuver.
d. The safe escape maneuver is the same as flown for the 10° dive bombing pass.
Range Departure
1. Lead will add “last pass” to the “base” and “in” call to alert the range and the others in the formation that they will
be returning to base. After lead’s safe escape lead will call “1’s up for the rejoin”. As each aircraft completes their
safe escape call off and how many aircraft you have in sight. As a wingman, always state what you see not just visual.
Once all the aircraft are visual lead will call “Armament Safety Check Complete”. This will be acknowledged by each
wingman.
2. In the event of a loss of sight know the local no–sight altitudes to go to for your formation position.
3. Normally, the formation will normally return to base as two 2–ships in trail or as briefed.
51
Surface AttackTraining Rules
Objective 8 — Know the surface attack training rules and restrictions.
1. Review Air–to–Surface Training Rules in AFI 11-214, Chapter 5.
a. Range restrictions and tactics permitting, change cockpit switches in wings level flight before final attack
heading.
b. Minimum spacing on final for level deliveries is 15 seconds.
c. Recoveries for weapons deliveries will be executed according to safe escape maneuvers described in the –34
or –25 aircraft specific T.O.'s.
2. Abort the pass and do not release if any of the following situations occur:
a. KIO or TERMINATE
b. If unable to positively identify the target.
c. If the aircraft passes below the minimum recovery altitude for the event being flown.
d. If establishing unsatisfactory entry or release conditions. Abort the pass if the actual dive angle exceeds the
planned dive angle by more than 5°.
e. Pop–up attacks will be aborted if airspeed decreases below 300 KCAS.
3. FTU and MQT restrictions and termination rules:
a. Students will not change targets once initiating roll–in to final.
b. The pop–up will be terminated if the actual pull-up point is inside the planned pull–up point.
c. Element pop–ups will not be performed.
d. The pop–up pass will be terminated if the roll–in will require less than 15° or more than 90° of turn.
4. AFI 11-214 Fouls
a. Violation of flight or range safety.
b. If an aircraft passes below the minimum recovery altitude for the event being flown.
c. Dropping without clearance.
d. Lazy recovery from a strafe pass.
e. Aircrews will not perform further deliveries after receiving a second foul on the range. A single dangerous
foul, as judged by the RCO or flight leader, will also restrict aircrew form performing further deliveries during that
sortie. Flight lead may direct RTB or “hold high and dry.”
Contingencies/Abnormal Procedures
Objective 9 — Know contingency procedures for surface attack sorties.
Objective 10 — State the actions to be taken by a NORDO aircrew with or without an emergency.
Note: Even though the first 4 contingencies do not actually apply to T–38C operations, they are important to know
for follow–on aircraft.
1. Inadvertent Release: An inadvertent release is defined as ordnance release from the aircraft not commanded by
the aircrew; i.e., an aircraft malfunction. Following an inadvertent release, cease all weapons deliveries, note your
switch positions and ensure all switches are in safe. If possible, note the ordnance impact point. Inform the flight lead,
RCO, and supervisor of flying (SOF). RTB to a straight–in via the hung ordnance route avoiding all populated areas.
After landing, taxi to the closest dearm area and await further instructions from the SOF.
2. Unintentional Release: An unintentional release occurs when a pilot accidentally drops a bomb, fires the gun, or
shoots a rocket; e.g., aircrew error. Following an unintentional release, note the impact point and inform both the flight
lead and RCO. If the impact is on range, you may continue with ordnance deliveries if cleared by the flight lead and/or
52
RCO. If the release impacts outside range property, cease all weapons deliveries, safe the aircraft switches, inform the
flight lead, RCO, and SOF/Command Post, and proceed as directed by the flight lead and/or RCO.
3. Hung Ordnance: Hung ordnance is the failure of any ordnance to release from the aircraft. Normal bomb release
can usually be felt in the cockpit. Often the first indication of a hung practice bomb is a “No Spot” call by the RCO,
indicating the bomb spotters didn’t see the bomb impact. On downwind following a “No Spot,” recheck the master and
mode switches. Consider recycling all switches (except for strafe) to ensure the proper positions. After confirming
switchology, attempt to expend on the next pass. Don’t get so engrossed in the problem that you exceed pattern
parameters. Excessive heads–down time in the cockpit can kill you. If hung ordnance is verified, RTB via the hung
ordnance route.
4. Jettison: For jettison procedures follow the regulation for the specific air-to-surface range you are using. All
jettison procedures are controlled by the RCO and IAW command directives.
5. NORDO: Review local NORDO procedures. If NORDO in the bombing pattern and no other emergency exists,
continue in the pattern and maintain normal pattern spacing. Safe all armament switches, fly final rocking wings, and
turn in the direction of traffic. A member of the flight will join for escort home, unless briefed otherwise by the flight
lead. A radio failure accompanied by another emergency presents additional problems. If the nature of the emergency
allows, maintain pattern spacing, safe all armament switches, fly final rocking wings, turn opposite the direction of
traffic and RTB. The RCO will inform the flight lead who will designate an escort for the emergency aircraft. If the
emergency is critical and time doesn’t allow the pass by tower, depart the range from present position and RTB. If
possible, make a radio call in the blind. Someone may hear it.
6. Late Arrivals: Aircraft arriving late to the range will inform the RCO when inbound to the range. The flight will
hold “high and dry” maintaining pattern spacing; continue to call “base” and “in.” The late aircraft will enter 2000’
above the current base altitude as directed/briefed by the flight lead and rejoin as the last aircraft in the flight. The late
aircraft must be visual on all aircraft prior to attempting to join the flight.
Local Range
Objective 11 — Identify characteristics of the local range.
1. Conventional range headings: Review local IFG or other range publications to find crosswind heading, downwind
heading, base heading, and the final heading. Pay particular attention to views/descriptions of prominent visual cues
and landmarks for the local range flight patterns.
2. See your In–Flight Guide and instructor for additional ground track cues to enter the range, fly the conventional
pattern, and return to base from the local range.
Summary
1. Range Classes
2. Mission Preparation
3. Range Entry
4. Range Procedures
5. Range Departure
6. Training Rules
7. Contingencies/Abnormal Procedures
8. Local Range
53
Review Exercise SA–5
Complete the following review exercise by choosing the correct responses. Answers are in Attachment 1.
1. Match to best answer:
a. Class A range __________ 1. Unmanned range with no scoring capability
b. Class B range __________ 2. RCO is present
c. Class C range __________ 3. A manned or unmanned range with scoring capability, but no RCO.
2. Desired spacing is one aircraft at each corner of the conventional pattern. You should turn ________________ as
the preceding aircraft rolls in on final.
3. “____________________________” can occur at any corner, but is most often caused by an aircraft not
recovering properly and delaying the turn to crosswind.
4. Normally, pattern spacing is adjusted on
a. crosswind
b. base
c. downwind
5. Safe escape procedures include ________________ g’s in ________________seconds.
6. Fouls may be assessed by the flight lead or RCO, but do not have to be acknowledged.
a. True
b. False
7. Aircrew must safe up and RTB immediately when a foul has occurred.
a. True
b. False
8. In case of NORDO,
a. go through “high and dry” 1000’ above pattern altitude, rocking wings down final.
b. continue in the pattern, maintain normal pattern spacing, and rock wings on final.
c. do not rock wings on final.
d. slow to 250 KCAS and rock wings.
9. Unintentional release occurs when ordnance is released from aircraft not commanded by the aircrew.
a. True
b. False