
AA-4* Offensive Maneuvering
2.0 Hrs
Objectives
1. Discuss mission preparation.
2. Describe OBFM tools.
3. Describe out–of–plane maneuvers.
4. Describe the quarter plane maneuver.
5. Describe scissors / separation maneuvers.
6. Describe offensive BFM setups.
Assignment
1. Review Lesson AA-4 in the Basic Fighter Maneuvers Student Guide, B/F-V5A-K-AA-SG.
2. Review MCMAN 11-238, Vol 2, Chapter 3, Offensive Maneuvering.
Information
Mission Preparation
Objective 1 — Discuss mission preparation.
1. Chair–fly
a. Five Ps — Prior Preparation Prevents Poor Performance
b. Visualize all aspects of the exercise/engagement, review cockpit recording devices.
2. Cockpit setup
a. Check connections — Oxygen, communication cord, parachute, lap belt, survival kit. Test G–suit and tighten mask.
b. Loose items — Tied down and secure. Map case closed and locked.
c. Seat height — Adjust for mobility and visual lookout.
d. Stretching exercise — Move to check personal connections and restrictions to visual lookout (ability to look over the vertical stab).
e. FENCE check — Find a system that works for you. Example:
(1) Fire Control: Check and arm the system (Master Arm and CMD), VTR on.
(2) Emitters: TACAN/VOR, TCAS, lights, radio altimeter
(3) Navigation aids: Set up NAVAIDs (HSD) before entering the engagement area as briefed.
(4) Communications: UHF/VHF manual and preset frequencies set for rapid change. Know code words for joker/bingo/radio frequencies.
(5) Electronic countermeasures: Test to ensure proper operation.
Offensive BFM Tools
Objective 2 — Describe OBFM tools.
1. Out-of-Plane Maneuvers (OOP)
2. Quarter Plane Maneuvers
3. Scissors Maneuvering
4. Offensive Separation
Out–of–Plane Maneuvers (OOP)
Objective 3 — Describe out–of–plane maneuvers.
1. Out–of–plane maneuver goals — During offensive BFM OOP maneuvers are used to gain closure (lead reposition) or control closure (lag reposition/quarter plane). These maneuvers use various pursuit curves above or below the defender’s plane of motion.
2. Lead reposition execution
a. Predict where the defender’s WEZ will be and point your aircraft there.
b. Pull lead and gain closure.
c. How much lead depends on range, target–G and the attacker’s energy state. Lead pursuit increases aspect while heading crossing angle (HCA) may increase or decrease based on target–G.
3. Lead reposition errors
a. Late recognition to perform
b. Improper lift vector control
c. Improper energy management
4. Lag reposition execution
a. A move to lag above the bandit’s POM to control closure. Power modulation and how much out–of–plane the attacker requires depends on how excessive the closure problem is.
b. Closure is controlled when the bandit develops a forward LOS.
c. Once closure is controlled, select a pursuit curve that will fly you to the WEZ.
(1) The penalty you pay for the lag reposition is HCA. A better turn rate defender may keep you in lag.
5. Lag reposition errors
a. Late recognition to perform
b. Improper lift vector control
c. Improper energy management
6. Out–of–Plane / Repositioning summary
a. Lead and lag reposition maneuvers are just two of the many air–to–air tools available.
b. Many instructor techniques exist concerning OOP maneuvering. Regardless of technique, each engagement will provide a unique set of BFM problems to solve.
Quarter Plane Maneuvers
Objective 4 — Describe the quarter plane maneuver.
1. Quarter plane goals (Figure 4-1)
a. An exaggerated lag reposition used to control closure and preserve nose–tail separation (prevent 3/9 overshoot).
b. Student goals are to assess target aspect with excessive closure, perform an effective quarter plane maneuver and preserve 3/9, and maintain the offensive.
2. Quarter plane errors
a. Fails to assess increase in aspect and HCA, very late quarter plane, loses offense.
b. Improper pull to bandit’s high six, too aggressive or not aggressive enough. Not setting proper LV.
c. Improper G / Over–Gs
d. Improper power / lack of throttle setting awareness
e. Late to assess bandit’s follow-on maneuver / late to roll back into bandit’s direction
Scissors/Separation Maneuvers
Objective 5 — Describe the scissors / separation maneuvers.
1. Loss of 3/9 advantage
a. If an attacker fails to maintain the offensive and a neutral situation develops the defender may execute a series of hard turn reversals in an attempt to achieve the offensive. This is known as a scissors.
b. Scissors goals: survive, maintain neutral position, successful separation, gain offensive, or kill bandit.
c. A flat or side-to-side scissors occurs when the overshoot is in–plane and both fighters are at the same approximate altitude.
(1) Approaching bandit 3/9 line, rotate the LV and perform a max CL pull towards bandit’s six (control zone) to stop your forward motion and to force the bandit to a forward LOS movement.
(2) To slow forward ground track, make the pull as vertical as possible, banking only as necessary to decrease lateral separation. Lead turn to perform a reversal when a forward LOS is observed. Maintain wings level and use rudder for turns. Select afterburner not later than 200 KCAS.
(3) As you slow down, LV must become more perpendicular to the horizon. The key is to achieve a higher pitch rate than the defender during the initial pull to slow your groundtrack and maintain 3/9 advantage.
d. In a flat scissors, one aircraft will typically wind up higher than the other.
(1) The fighter on top should try to get the scissors into a gentle weave in order to generate lateral turning room. Combined vertical and lateral turning room may allow the high fighter to roll, put LV on the lower fighter and pull for a gunshot and/ or separation.
(2) The lower fighter wants to prevent the top fighter from gaining enough lateral separation to execute the maneuver described above. Attempting to stay directly under the top fighter has several advantages. It denies the top fighter lateral turning room and forces the top fighter to drop a wing to maintain tally. Each time the top fighter banks, the airplane loses lift and some altitude separation. The lower fighter may also momentarily unload, gain airspeed, and work its way up to the bandit’s control zone. The high fighter’s blind cone may also help the low fighter’s separation opportunity.
e. A rolling scissors generally occurs when the overshoot is in the vertical or an altitude differential exists at the start of a flat scissors.
(1) Maintain nose/tail separation and maneuvering energy. The fighter with the better maneuverability and nose positioning capability wins.
(2) Separation from a rolling scissors is generally easier than from a flat scissors, if done early and properly.
(3) Best time to separate is during the roll down while the bandit is pulling up.
f. Scissors errors:
(1) Ineffective use of a max CL pull into the vertical toward bandit’s high six control zone.
(2) Allowing too much lateral separation to develop or late in beginning your lead turn.
(3) Not controlling bank angle at slow speed and losing nose position.
(4) Not modulating power to affect 3/9 positioning.
(5) Improper pursuit curve.
(6) Training Rules violations.
2. Offensive Separation
a. Several factors may lead to a decision to separate from an offensive BFM engagement when conditions become unfavorable for a kill on the bandit.
b. A separation depends on several factors
(1) Your fighter’s fuel/ordnance remaining.
(2) Loss of situational awareness
(3) Loss of mutual support from your wingman/flight
(4) More bandits than friendlies in the area.
3. Separation mechanics
a. Plan ahead. Set up your separation, but do not telegraph your intentions.
(1) Threaten bandit.
(2) Generate as much HCA as possible.
(3) Manage your energy.
(4) Consider the environment (sun, clouds, haze).
(5) Consider the location of other friendly and enemy fighters.
b. Once enough HCA has been established (usually by pulling through the bandit’s POM) and other factors considered:
(1) Unload to zero G (You should be light in the seat).
(2) Select full afterburner.
(3) Plan ahead for potential floor transition
(4) Unloaded bank to regain tally–ho (opposite side of jet)
c. Reassess your separation situation, and as appropriate:
(1) Check turn.
(2) Continue to run.
(3) If necessary, perform a break turn.
d. IFF separation requirements
(1) 9,000 feet range (beyond weapons employment range)
(2) An opening relative velocity (-Vc)
(3) Talley on bandit or, at least, situational awareness of bandit position.
4. Separation errors
a. Poor assessment of slant range and/or HCA
b. Not unloading to zero G during initial acceleration
c. Lose sight of bandit / lose situational awareness.
d. Allowing bandit into your WEZ/getting shot.
e. Not accelerating to best separation airspeed
f. Improper LV control in attaining HCA for separation
g. Over G the jet during pull to separate or floor transition.
Offensive BFM Setups
Objective 6 — Describe offensive BFM (OBFM) setups.
1. Offensive BFM:
a. OBFM setup description (See Figure 4-2).
b. Offensive BFM objectives:
(1) Always strive to fly to the bandit’s control zone.
(2) Control your aspect angle and closure.
(3) Attain missile solution or gun tracking on the bandit.
(4) Kill!
2. OBFM errors:
a. At “fights on”, attacker continues to point at bandit versus a drive to bandit turn circle.
b. Most prevalent BFM mistakes are the improperly positioned lift vector (LV); improper application of G forces or poor energy management.
c. Failure to properly analyze aspect angles and closure problems.
d. Fixation on the target (bandit).
e. A slow BFM cross-check (or none).
f. Failure to avoid bandit’s jetwash or busting the bandit’s ROE bubble
OBFM Exercises
Ranging/Bubble Exercise
1. Ranging/bubble exercise (Figure 4-3)
a. Designed to practice range, aspect, HCA (Angle–Off), and closure estimation
b. Useful during offensive and defensive missions
c. Generally initiated from a perch position
d. A controlled look at pursuit curves, ranges, the gun WEZ and 1,000 ft bubble
e. On offense, the student can observe how pursuit curves effect aspect, HCA, closure and line–of–sight. On defense, the student can observe these concepts relative to bandit nose position.
2. Ranging/bubble exercise errors
a. Improper setup
b. Improper energy management, LV control
c. Switch errors
d. Incorrect pursuit curve
e. Attacker bubble/jetwash encroachment
Quarter Plane Exercise
1. Quarter plane exercise (6,000 ft setup) execution
Figure 4-3 — Ranging / Bubble Exercise
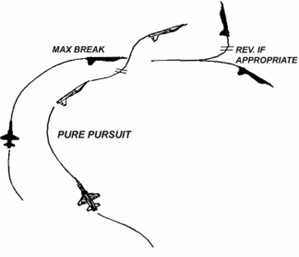
a. Quarter plane maneuvers are essentially a last ditch lag reposition to control closure and preserve 3/9 advantage.
b. Pure pursuit target to approximately 3,000 ft. Assess rapid change in HCA and aspect to 60° or more.
c. Do an unloaded roll to pull to the bandit’s high six. Power as required. High potential for over–G.
d. Once 3/9 is preserved unload and roll back to the bandit’s direction.
e. Assess bandit — If the bandit reversed another quarter plane may be required. If the bandit continued the turn, fly to the turn circle and kill the bandit.
High Angle Gun Shot (HAGS) Exercise
1. HAGS goals
a. Introduce high angle gun WEZ and high angle gun employment.
b. Introduce follow–on separation.
c. Separation depends on several factors
(1) fighter’s fuel/ordnance remaining.
(2) amount of angles generated during the high angle gunshot attempt.
(3) the bandit’s follow–on maneuver.
2. HAGS exercise (Figure 4-4) execution
a. Assume low to medium aspect, fights on approximately 6,000 ft.
(1) Anti-G Straining Maneuver (AGSM) and Max A/B
(2) Max rate turn to put LV on bandit’s POM (gun cross in front of bandit).
(3) Pull for approximately 4 seconds.
(1) Roll out, assess line of sight and range (bandit should be moving toward nose).
(2) Adjust lead, gun on EARLY! Use bandit at camera box as cue to squeeze trigger and top of HUD to release trigger.
(3) Power as necessary to maintain corner velocity.
b. The separation
(1) Avoid jetwash.
(2) Don’t telegraph. Perform AGSM and select MAX A/B.
(3) Roll to 135° bank, perform sliceback for approximately 4 seconds. Time to turn is based on turn rate and heading crossing angle (HCA) at attempted gunshot.
(4) Unload to accelerate and roll to regain “tally–ho” (opposite side of jet).
(5) Assess separation; chaff and flares if bandit threatens.
1. HAGS errors
a. Slow or weak pull to lead
b. Improper energy management before and after gunshot
c. 1,000 ft bubble/jetwash encroachment
d. Late gun employment/insufficient lead.
e. Telegraphs separation and/or late to separate
f. Fails to regain “tally” during separation
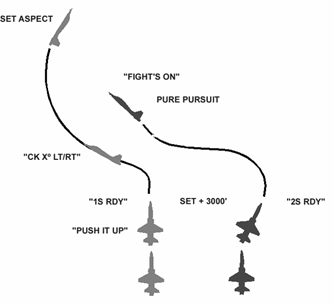
6,000 ft Offensive BFM
1. Initial 6,000 ft and 3,000 ft OBFM perch setups.
a. Parameters are critical.
b. Student perch setup errors:
(1) Improper starting parameters
(2) Calling ready when not in proper parameters
(3) Inconsistent check turn mechanics causing improper perch position
(4) Incorrect range assessment — Calls “fights on” too early/late.
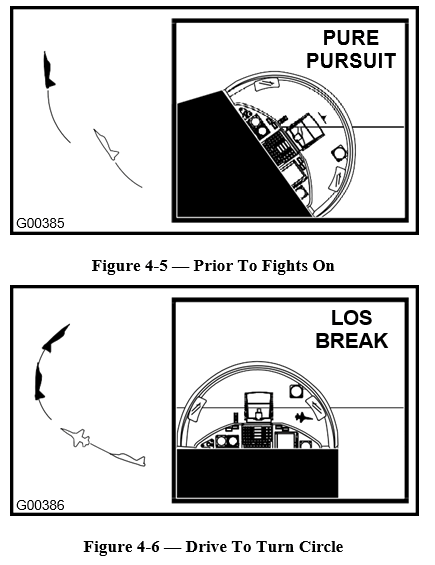
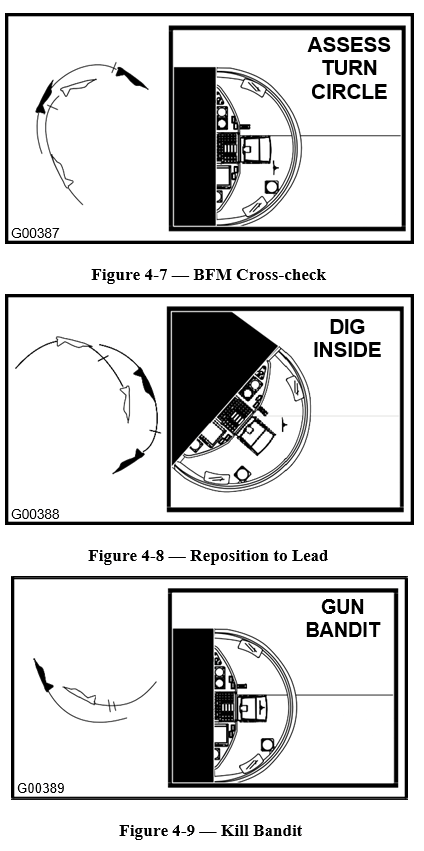
2. 6,000 ft Offensive BFM (Figure 4-5 thru 4-9)
a. DLO — Maneuver to gun WEZ and kill bandit.
b. At “fights on” — Roll out level. Modulate power to maintain 410 KCAS. Look for the turn circle entry cue.
c. Turn circle entry cue (Figure 4-6):
(1) Bandit LOS rate increases.
(2) Aspect Angle (AA) stops increasing.
(3) As a crutch, start turn when bandit is about at mirror/canopy bow.
(4) OBFM cross–check — Airspeed, G, altitude and LV (fix if required)
a. At turn circle entry, simultaneously:
(1) Perform AGSM and select MAX AB.
(2) Roll to put LV on bandit’s low wing.
(3) Pull to 5+ Gs or slow rate buffet.
b. When bandit is at the assessment window, assess ability to enter a controllable WEZ. Reassess combination of slant range, aspect angle and closure (relative airspeed). (Figure 4-7)
c. Maintain your position in the bandit’s control zone. Select appropriate pursuit curve to control position.
d. Predict bandit POM, fly to gun WEZ with nose in lead, in plane, and in range. Remember, you are only using the bandit as a reference to where the WEZ is; don’t fly to the wrist, fly to the elbow. (Figure 4-8)
e. If unable to enter a controllable WEZ, then reposition (relax G/modulate power to adjust your energy state).
f. When you are back at the bandit’s turn circle (increasing LOS rate), position LV and power to maintain about 410 KCAS. Reassess control zone. If able pull bandit into HUD and go for GUNs. (Figure 4-9)
g. End game — Control overtake, track bandit, transmit kill and KIO/terminate.
h. Perform post KIO procedures.
(1) Deconflict
(2) Visual — Regain if required
(3) Military power, 350 KCAS climb
(4) Regain tactical
3,000 ft Offensive BFM
1. 3,000 ft Offensive BFM
a. DLO — Maneuver to WEZ and kill bandit.
b. At “fights on” — Roll out level. Modulate power to maintain 410 KCAS. Look for the turn circle entry cue.
(1) If bandit is in an easy turn, pull lead for best gunshot (KIO).
c. If bandit is in hard turn and you’re unable to employ ordnance (IFF bandit), perform a slightly out–of–plane lag maneuver, but keep the bandit inside the canopy bow.
d. If bandit jinks downward, reposition:
(1) Pull Lift Vector (LV) towards bandit’s CZ.
(2) Pull to arrest closure and preserve your slant range. Keep the bandit just above the canopy bow.
(3) Assess bandit.
e. When you see that your closure rate is solved (negative Vc and sufficient range):
(1) Perform AGSM and select MAX AB.
(2) Roll to put LV half way between the bandit and the horizon.
(3) Pull to moderate buffet.
(4) Maintain airspeed (not increasing) 320 to 350 KCAS.
f. When bandit is at the assessment window, assess ability to enter a controllable WEZ. Reassess combination of slant range, aspect angle and closure (relative airspeed). Maintain your position in the bandit’s control zone.
g. If unable to enter a controllable WEZ, reposition (relax G/modulate power to adjust your energy state).
h. When able, enter WEZ and employ weapons:
(1) Solve bandit’s plane of motion.
(2) Power as required.
(3) Take a Fox II shot when in parameters.
(4) Continue to press for GUNs.
i. Reposition again as required. Pull your LV to the bandit’s control zone. Pull to arrest your closure and preserve range to bandit. Reassess combination of slant range, aspect angle and closure (relative airspeed). Assess bandit for re-entering the WEZ.
j. In close to the bandit, control of overtake/closure is critical in preventing a gross overshoot.
(1) Against a slow defender (below 250 KCAS), you can translate excess closure into some out–of–plane (vertical) turning room above the bandit.
(2) Inside the turn circle, power modulation may be all that is required to control closure and kill the bandit.
2. Offensive BFM recap:
a. The flying squadron expects you to understand BFM brevity codes and concepts.
b. Know your main objective — Kill the bandit and/or separate.
c. Chair–fly setup parameters — Be there at “fights on”.
d. Chair–fly OBFM engagements — Have a plan.
e. Bottom line — No two engagements are exactly the same, always need to assess bandit and apply BFM mechanics to kill the bandit quickly.
Review Exercise 4
Complete the following review exercise. Answers are in the back of the SG.
1. Which of the following is a common student error during ranging and/or heat-to-guns?
a. Improper energy management/lift vector control
b. Incorrect pursuit course
c. Bubble violation
d. All of the above are correct.
2. You are approaching a low aspect, tracking gunshot when the defender breaks into you and forces very high closure. An appropriate offensive maneuver would be a
a. lag roll.
b. quarter plane.
c. lag reposition.
d. lead reposition.
3. Out–of–plane maneuvers may be used by the attacker to
a. build turning room.
b. control closure.
c. gain closure.
d. Both a and c are correct.
e. All of the above.
4. You are “Winchester” and want to separate after a high angle gunshot. Which of the following situations represent a valid separation? When the bandit is at your
a. Right 4 o’clock, 2,500 ft, closing, nose in lead, and you have “tally”.
b. 6 o’clock, 5,000 ft, closing, and you are “no joy”.
c. Left 7 o’clock, 9,000 ft, aft line of sight rate, and you are “no joy”.
d. Left 7 o’clock, 9,000 ft, aft line of sight rate, and you have “tally”.
5. A describes a fighter pilot's ability to analyze aircraft airspeed, G, altimeter, and lift vector relative to the bandit.
6. During offensive maneuvering, the attacker’s goal, if not in a position to employ ordnance now, is to drive to the
, reduce aspect and maneuver to a WEZ.
7. As an attacker or defender it is important to assess whether your adversary is attempting to fight an energy/ fight or a “cash it in”/ fight.
8. Offensive BFM objectives include the following: (from a position of advantage)
a. Always strive to fly to the bandit’s control zone.
b. Control your aspect angle and closure.
c. Attain missile solution or gun tracking on the bandit. Kill!
d. All of the above are correct.
9. In close to the bandit the attacker must control to prevent a gross overshoot.
No comments to display
No comments to display