
SA-6 Pop–Up and Level Deliveries
Objectives
1. State how to prepare for a bomb delivery.
2. State the level pattern parameters and procedures, and reasons for using level deliveries.
3. Know definitions of pull–up point, angle off, pull–down altitude, apex altitude, track point, and minimum attack
perimeter (MAP).
4. State the minimum altitude (AGL) in the pop–up pattern.
5. State the landmarks for the local tactical pattern.
6. State the training rules for pop–up patterns.
Assignment
1. Review Lesson SA–6, Pop–Up and Level Deliveries, in the Surface Attack student guide, B/F-V5A-K-SA-SG.
2. Review MCMAN 11-238 Vol 2, Section 4.6, Pop–up Deliveries.
3. Review AFI 11-214, Chapter 5, Paragraph 5.3, Air–to–Surface Training Rules.
4. Review and bring to class local In–Flight Guide, Surface Attack pages.
5. Complete SA–6 review exercise.
Information
Admin
Objective 1 — State how to prepare for a bomb delivery.
1. What do I have to do to prepare to drop bombs?
a. The objective of fighter operations in surface attack is to get “bombs on target” and to safely recover the
aircraft. In order to do this the planning agencies and the pilot must take into consideration the enemy threat, the
enroute and target weather, and the element of surprise. Just these three items could force the decision to use a low
altitude ingress, a pop–up delivery, and a low altitude egress to deliver the weapon on target. Many of the “things”
that need to be done to get the bomb on target are considered to be bombing admin.
b. The admin items are divided into ground ops, “fence in”, and range pattern entry.
2. Ground Ops
a. MFD — Select the WPN page and review all of the parameters for the weapon program you are going to use.
b. UFCP — Select the WPN page and choose the type of airspeed that you want displayed for the weapons
delivery. Select the HUD function and ensure DRF is selected along with the HUD display type. Finally, select
the ALT function and choose what altitudes you will use for the barometric (MSL) and radar altimeter alerts.
3. Fence In — As the name would imply we are crossing into the combat area. The aircraft needs to be prepared to
get to the target area and put bombs on the target. The following items are typical “fence in” tasks on IFF training
missions.
a. Counter Measures Dispensing (CMD) switch set to ON, and appropriate Master Mode selected (NAV if a low
level or tactical entry is planned; A/G with correct weapons program for direct range entry).
b. Squawk set (IAW IFG or as briefed) from “fence in” to “fence out.”
c. Set the TCAS to TA ABOVE for the same “fence in” to “fence out” period.
d. The primary target destination selected.
e. Set the local range altimeter setting and set 500 ft for the radar altimeter (RALT) alert.
f. Ops check the Comm equipment when lead calls for the Fence check.
g. Verify on the UFCP that the VTR is recording the HUD.
4. Range Pattern Entry — Once the aircraft is prepared for combat the task of getting the bombs on target begins.
a. The first thing that must be done is to get the aircraft in proper positions in the range pattern. This is called
the spacer pass.
b. The next trip over the target area is to confirm the DEST selected is really the target you want to bomb. This
is called the designation pass and may or may not be accomplished.
c. Select the DCL function key on the UFCP. This will select the declutter program that you selected via the
MPC/JMPS on the ground.
d. Ensure the correct bomb delivery mode (CCIP, CCRP, MAN) and weapon program (A, B, C, D, E, F or Gun)
is selected on the UFCP WPN page.
e. Select the PFR mode on the MFD.
f. Master Arm switch – ARM.
g. CMD switch – ON.
5. Your instructors will relate all of these events to locations on the ground as you maneuver to and from the local
range.
Level Deliveries
Objective 2 — State the level pattern parameters and procedures, and reasons for using level deliveries.
1. The level method of bombing is used to deliver certain CBU and high–drag munitions at low–altitude. As you will
see many of the tactical considerations for level attacks will also apply to pop-up attacks.
2. Level pattern
a. Set up the weapons switches while wings–level on downwind.
b. During the downwind–to–base turn, descend from downwind altitude (MSL/RALT) toward release altitude
and begin acceleration to the desired airspeed (normally 420 KCAS). Base position is flown 15,000 ft out from the
target. Target identification may be difficult on level deliveries. Use your time on downwind and base to find the
target or run-in line cues. Minimum altitude in the level pattern is 500 ft AGL; minimum spacing is 15 seconds.
c. The base–to–final turn is level to slightly descending (no lower than 500 ft AGL) while lining up on the run-in
line (use the strafe pits or other visual cues to aid in lining up) and finishing the acceleration to the desired airspeed
(typically 420 KCAS).
d. Once on final, crab as necessary to track the target through the BFL. Crosscheck that the radar altitude
matches the anticipated MSL altitude (i.e., 500 ft AGL = xxx ft MSL).
3. Level bomb release
a. Bomb accuracy in level deliveries is less than in diving deliveries due to the inherent sensitivity of bomb
range to release altitude errors. You want to be in level unaccelerated flight when you press the pickle button.
b. The pipper is moving very fast across the ground. At 420 KCAS, the pipper is moving approximately 710 ft
per second. This means that you can go from “unscorable at 6” to “unscorable at 12” in less than a second.
c. With CCIP bombing you can minimize the azimuth errors if you rolled out on a good final position and follow
the command steering line presented. Being stable on final ensures the computer can correct for any other errors
that may occur before bomb release.
4. Level delivery parameter errors – manual versus CCIP
a. Higher than planned – In a manual situation the bomb would be short but with CCIP the release will be a
shack but you may see the delay cue and command steering line for a moment.
but the lower altitude could affect fuse arm, fragment clearance and weapons effects.
c. Climbing (shallow) – In a manual situation the bomb would be short but with CCIP there would be negligible
impact on the shack delivery.
d. Diving (steep) – In a manual situation the bomb would be long but with CCIP there would be negligible
impact on the shack delivery.
e. Slower than planned – In a manual situation the bomb would be short but with CCIP there would be negligible
impact on the shack delivery. May be a delayed release.
f. Faster than planned – In a manual situation the bomb would be long but with CCIP there would be negligible
impact on the shack delivery.
g. Azimuth and timing error can cause problems for both a manual and a CCIP delivery. If your heading is not
stabilized and the drift is killed the bomb will be left or right of target. If your pickle early or late the bomb will be
short or long no matter what sight you are using. All of the other comparisons above assumed you pickled on time
and had your drift killed.
5. Your instructor will cover the desired ground tracks for level deliveries at your local range.
Pop–Up Deliveries
Objective 3 — Know definitions of pull–up point, angle off, pull–down altitude, apex altitude, track point, and
minimum attack perimeter (MAP).
Objective 4 — State the minimum altitude (AGL) in the pop–up pattern.
1. Pop–up execution
a. A pop–up attack is one of the most demanding maneuvers performed in fighters. The IFF pop–up attack
(Figure 6–1) is initiated at a preplanned point, called the pull–up point (PUP), and at a preplanned airspeed for the
10° or 20° deliveries. At the PUP, call up (“two’s up”), select military power, and start a 3–4 G wings–level pull
to the desired climb angle (15º for the 10 degree delivery/30º for the 20 degree delivery). Unload to maintain the
climb angle until reaching the pull–down (PD) altitude.
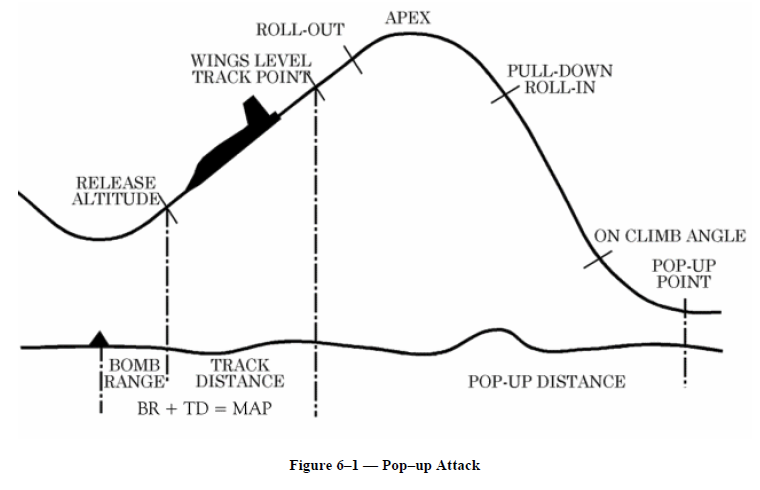
b. The target is located in the direction of the roll–in and may not be visible in the first part of the pull–up. A
properly planned pop–up has between 15° and 90° angle–off allowing easy target acquisition by the time roll–in is
initiated.
c. Approaching the desired pull–down altitude, roll and pull in the direction of the target (3–4 Gs). At pull–down
altitude, maneuver the aircraft to intercept the planned dive path. Make corrections here to compensate for winds
and errors in aircraft positioning. The aircraft will continue its upward vector until reaching the apex altitude.
This altitude normally occurs halfway through the pull–down maneuver. The apex of a pop–up equates to the base
leg of a box pattern, but is generally closer to the target and lower than the box pattern’s base altitude. Pop–ups
are designed with less time on final, so the IPP is closer to the target.
d. The roll–out on final through ordnance release is the same as conventional deliveries, except for less tracking
time on final (3–5 seconds versus 5–7 seconds for conventional patterns) and closer IPP setting. The track
distance on final is the horizontal ground distance covered by the aircraft during tracking time prior to release.
Bomb range plus track distance equals Minimum Attack Perimeter (MAP).
2. Pop–up planning.
a. The planning for a pop–up delivery starts at the target and then works backward to the IP. The first step is to
calculate the MAP for the weapon you are using. Remember that the MAP is the track distance (3–5 seconds on
final) plus the bomb range.
b. Draw a circle around the target using MAP as the radius of the circle. The next step is to determine the attack
axis that you intend to use. Look at the terrain features around the target and the threats to determine the best
attack axis.
c. The next step is to draw a turn radius (5,000 ft) tangential to the MAP and the attack axis. Depending on the
amount of turn (normally 15° to 90°) you will then draw the line out to the IP.
d. The route prior to the IP could be some type of low level (IR or VR – 500 ft AGL minimum) or other type of
preplanned routing.
3. Pop–up abort criteria
a. Abort the attack if establishing unsatisfactory entry or release conditions such as having the apex inside of the
MAP.
b. Abort the pass and do not release if airspeed drops below 300 KCAS.
c. Abort if the dive angle exceeds planned by more than 5°.
d. Unless an IP is with you, terminate the pass if roll–in will require less than 15° or more than 90° of turn.
e. Unless an IP is with you, terminate a pop–up if the actual pull–up point is inside the planned pull–up point.
4. Pop–up errors generally fall into two areas: either being outside or inside of the planned pull–up point.
a. Outside of PUP
(1) The effect of continuing normally from this position is that you will end up with a long shallow final that
tends to drive you below planned release altitude.
(2) To fix this error angle towards the roll–in point, continue the climb to have a higher apex altitude, or
shallow out the climb angle to get to the proper position in the pattern.
b. Inside of PUP
(1) The effect of continuing normally from this position is that you will end up with short steep final and a
very short time on final.
(2) To fix this error pull towards the run–in course to increase the final length or pull up steeper to intercept
the correct roll–in point.
correction and complete the pass. In that case, abort the attack.
d. Once you are on final the error analysis and corrections are the same as a conventional delivery except that
you have less time on final.
Local Landmarks
Objective 5 — State the landmarks for the local tactical pattern.
1. Your instructor will show you the various landmarks for performing pop–up deliveries at the local range. Study
these maps and photographs to ensure your ability to quickly learn the pop–up pattern.
Surface Attack Training Rules
Objective 6 — State the training rules for pop–up patterns.
1. The training rules for pop–up attacks are very similar to the conventional bombing pattern with a few exceptions:
a. Weather can be no lower the 500 ft above the highest pattern altitude or apex altitude.
b. The minimum IFF low–level navigation enroute to the PUP is 500 ft AGL.
c. Abort criteria has been modified to cover the unique environment of the pop–up delivery.
Summary
1. Admin
2. Level deliveries
3. Pop–up deliveries
4. Local landmarks
5. Pop–up training rules
Review Exercise SA–6
Complete the following review exercise by choosing the correct responses. Answers are in Attachment 1.
1. List 3 reasons for using the pop-up mode of ordnance delivery.
a. _______________________________________________.
b. _______________________________________________.
c. _______________________________________________.
2. Define the following:
a. Pull–up point (PUP): _______________________________________________.
b. Pull–down altitude: _______________________________________________.
c. Apex altitude: _______________________________________________.
d. Track point: _______________________________________________.
e. Minimum attack perimeter (MAP): _______________________________________________.
3. The minimum altitude in the pop–up pattern is ____________________.
4. The minimum altitude in the level pattern is ____________________.
5. General rules:
a. Angle–off in pops is between ____________________ and ____________________ degrees.
b. Minimum airspeed during pop–up attack is ____________________ KCAS.
c. Abort the pass if you pop inside ____________________.
d. Abort the pass if your dive angle is ____________________ degrees steeper than planned.
No comments to display
No comments to display