
AA-5 Defensive Maneuvering
2.0 Hrs
1. DBFM objectives
2. DBFM game plan
3. Pre-engagement preparation
4. Defensive turns
5. Extensions
6. Separation
7. Gun defense
8. Reversal
9. DBFM setups
Objectives
1. Know the defensive BFM philosophy and objectives.
2. Know the principles of a defensive BFM game plan and of DBFM tools.
3. Describe defensive turns and how to apply them.
4. Describe accelerations / extensions / separations.
5. Describe gun defense / jink considerations.
6. Discuss reversals.
7. Describe defensive BFM setups / exercises.
Assignment
1. Review Lesson AA-5 in the Basic Fighter Maneuvers Student Guide, B/F-V5A-K-AA-SG.
2. Review MCMAN 11-238, Vol 2, Chapter 3, Defensive Maneuvering.
Information
DBFM Philosophy / Objectives
Objective 1 — Know the defensive BFM philosophy and objectives.
1. A survival plan is easy to develop but implementation is more difficult. Defensive maneuvering is a real challenge.
2. Looking over you shoulder while max performing your jet requires:
a. A commitment to NEVER give up.
b. Great skill.
3. Survive until:
a. The bandit makes a mistake and you kill the bandit!
b. Another friendly enters the arena and kills the attacker.
c. You stagnate the bandit and are able to separate.
d. The bandit separates.
4. The specific objective in defensive BFM is to - SURVIVE:
a. Defeat bandit’s initial weapons employment opportunities or weapons.
b. Deny subsequent WEZ entry by the bandit.
c. Defeat any subsequent weapons employed by bandit.
d. Gain a neutral or offensive position.
e. Separate or kill the bandit.
DBFM Game Plan and Tools
Objective 2 — Know the principles of a defensive BFM game plan and of DBFM tools.
1. The plan for survival is simple; make your initial move and assess the results.
a. Maintain tally on your bandit.
b. Next, force BFM problems on the bandit.
c. Deny bandit turning room.
2. Tools at your disposal to implement your DBFM game plan include:
a. Defensive turns
b. Accelerations / extensions / separations
c. Guns defense / jink.
d. Reversals.
Defensive Turns
Objective 3 — Describe defensive turns and how to apply them.
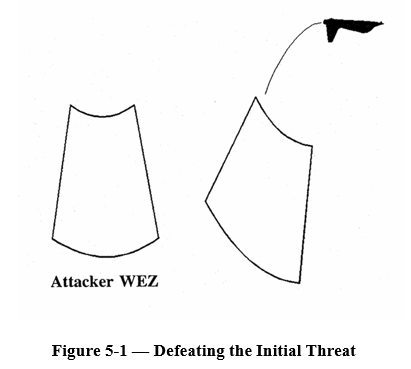
1. Defensive turns (Figure 5-1)
a. A defensive turn is any turn that defeats the threat by rotating the WEZ away from the attacker.
b. The type of turn depends on the threat. You must detect the threat and evaluate the attacker’s weapons and nose position. You must then maneuver and reassess.
c. If the bandit is in or approaching missile or gun parameters, you must execute a break turn. The missile break is a maximum performance, energy depleting, in–plane turn to exceed the missile’s turn capability. The guns break (jink) is an out–of–plane maneuver because the projectiles are unguided.
d. If the attacking bandit is not an immediate threat, you have to decide to separate or turn. If the
attacker is at long slant range, then a separation may be appropriate because a turn will allow the attacker
to close. As slant range decreases you may be forced to a “hard/break turn” to cause BFM problems that the attacker can not solve. The hard turn is an energy sustaining turn.
2. Break turn goals:
a. Defeat the threat. If the missile or bullets are launched then you must “BFM” them and not the fighter. At IFF setups occur with the attacker at or near the student’s vulnerable cone, thus an initial break turn is required.
b. Gain/maintain sight. After the weapons are defeated, you must maneuver in relation to the attacker. A “tally” greatly enhances your maneuvers; however, Advanced Maneuvering will discuss “no–sight defenses.”
c. Assess bandit — To decide on required follow-on maneuver.
d. A break turn is an energy depleting maximum performance turn.
3. Break turn execution
a. Power as required. Modulate power to attain energy levels for a corner velocity turn. Power will range from idle/boards if well above corner velocity to full A/B when at or below corner.
b. Set lift vector (LV). Put lift vector on the missile/attacker for a missile break. This will create the maximum aspect, heading crossing angle (HCA), and closure for the missile. The purpose is to generate a LOS that the missile/attacker cannot solve. For a guns break (jink) set the LV out–of–plane. As we learned in OBFM a gun attack occurs in–plane.
c. Turn at maximum AOA. Turning at maximum AOA/G, at corner velocity will generate the highest ROT and the minimum turn radius. If you are below corner your radius will not significantly increase but your ROT will seriously increase. What do you do? Use what energy you have as efficiently as possible to rotate your vulnerable cone away from the attacker.
d. Assess the situation. Look at the bandit’s nose position (lead, pure or lag). If the attacker is no threat then you can maneuver as required. If the bandit is still an immediate threat then you may have to continue your break turn. Remember the break turn has a high negative PS. Your ability to maneuver will depend on your energy state. To maintain corner velocity requires a descent. Descent will vary based on your initial break turn altitude/airspeed (total energy).
4. Break turn errors:
a. Airspeed — If too fast, ROT is reduced and radius increases, both are an advantage for the bandit. If you are too slow then ROT is reduced. You must be able to move your nose to rotate the WEZ and deny shots.
b. Lift Vector (LV) — Improper LV control may give attacker turning room or fail to attain a different plane–of– motion from the attacker. Improper LV also has negative effects on turn radius/rate.
c. G–load — Over–G may cause loss of control and/or aircraft damage. Under–G may decrease ROT and increase radius of turn.
d. No joy — Most common error. Students lose sight and cannot predict where the attacker will be for reacquisition.
e. Power — Incorrect power modulation decreases defender’s max performance capability.
5. Hard turn goals:
a. Defeat the threat. When the attacker is detected out of the WEZ the defender has more time and maneuver options. The defender can separate or turn depending on the attacker’s position.
b. Gain/maintain sight. Same as in a break turn.
c. Separate — Your primary defensive goal is to separate with mutual support. The decision to reengage or bug out depends on the tactical situation.
6. Hard turn execution:
a. Power as required. You must modulate power to maintain sustained corner velocity (PS = 0).
b. Set LV. Set the LV in relation to the attacker; however, consider radial–G and attempt to maintain airspeed.
c. Turn at sustained corner velocity. A slightly nose–low maneuver in the T–38C will enable you to perform an energy sustaining “hard turn”. Rapid energy decay will occur when the nose goes above the horizon. G capability and ROT will also drop off rapidly.
d. Assess the situation. The purpose of the turn is to force aspect and HCA problems the attacker cannot solve, enabling you to separate. If the situation does not permit a separation, you must continue to turn and develop another plan based on the tactical situation.
7. Hard turn errors:
a. Airspeed — Same as for a break turn except that sustained corner is at higher airspeed than corner.
b. G–load — Too much G will cause an energy loss resulting in reduced maneuverability for follow–on BFM. Not enough G may allow the attacker to get to the WEZ. Be careful not to ease off G during loss of sight situations.
c. Power — The most common error is not selecting A/B and getting slow.
d. Plane–of–motion — The most common error is a level energy depleting turn.
e. Loss of sight — Usually caused by not predicting apparent movement due to defensive maneuvering.
Accelerations / Extensions / Separations
Objective 4 — Describe accelerations / extensions / separations.
1. Accelerations
a. Accelerations are performed to efficiently gain airspeed for better maneuverability.
(1) In defensive situations, you are most likely trying to increase your opening velocity.
(2) On offense, you are often attempting to increase closure with the bandit.
b. Factors that affect your acceleration maneuver performance include:
(1) G – load
(2) Bank
(3) Pitch (e.g., 90° dive is most efficient).
(4) Airspeed at start of maneuver.
(5) Density altitude
2. Extension goals
a. Gain/regain energy — Extensions are used to regain energy and/or increase distance. You should only do extensions when the bandit is not a threat, with the nose off or excessively in lag.
b. Increase range — You must get out of the attacker’s weapons range (WEZ).
c. Separate — Your primary defensive goal is to get out of the fight alive, reengage, bug out, or continue your mission.
3. Extension execution
a. Analyze the attack. If you need energy or range and the attacker’s nose is not a threat then you can extend for energy or range. If the attacker’s nose is a threat then you must continue the defensive turn.
b. Full A/B for maximum acceleration
c. Accelerate — Unload as much as the situation allows. Zero–G in the T–38C yields the quickest acceleration. If possible get the nose below the horizon to help gain airspeed. An unload to zero–G might allow the bandit to solve aspect and HCA quickly, so an unload to zero–G may not be possible. In this case back off the G as much as the situation permits to at least maintain energy or increase distance from the bandit.
d. Terminate — Terminate when the attacker’s nose is a threat. If the attacker transitions from a rate fight to a nose fight then a max AOA/G break turn/jink may be required.
e. Assess situation — You must turn or run based on the threat. Look at the attacker and make your choice.
4. Extension example
a. T–38C flight test — 15,000 MSL at 400 KCAS, 5–G level turn, full A/B. Let airspeed decay to 300 KCAS then unload to zero–G.
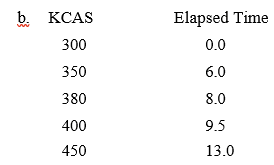
WARNING — The A/B light may require 5 seconds.
5. Extension errors.
a. Recognize need/opportunity — Students do not recognize low energy states from the “feel” of the aircraft. They need the airspeed indicator which they cannot see while looking aft.
b. Bandit nose position — Common error is to extend into a shot.
c. Airspeed — Too fast in a turn allows the attacker to arc. Too slow allows bandit to run you down.
d. Power — Most common error is failure to modulate.
e. G–load — Inappropriate G–load based on bandit position.
f. Loss of sight — Students tend to look forward and roll wings–level while unloading, resulting in loss of sight.
6. Separation goals
a. Increase slant range beyond weapons parameters (WEZ). Get out of the fight alive.
b. Gain/maintain sight. You have to see the attacker to determine if the separation was successful.
c. Major ingredients for a good separation are HCA, speed, range (normally need a minimum of two). Bandit aspect, relative to the defender’s turn circle, may also effect your ability to separate.
7. Separation execution:
a. Increase HCA — Use defensive turns to drive attacker to lag position.
b. Acceleration maneuver — To increase slant range and airspeed. During this extension a separation opportunity may develop.
c. Assess situation — A valid separation requires a slant range greater than bandit’s max missile range, opening Vc, and “tally”. If the attacker is a threat you may have to commence defensive turns.
8. Separation errors:
a. Misjudge slant range — Attacker may be in WEZ. Hard to judge range when the attacker is in pure pursuit.
b. Misjudge HCA — Bandit has energy/rate to square lag corner and arrive in WEZ.
c. Loss of sight — Most common error.
d. Bandit nose position — You must see the attacker’s nose to see if the attacker is a threat. Common error is to separate into the shot.
e. Airspeed — Too slow allows attacker to close. Common error is to forget max power or not attain zero G.
f. Improper LV control.
g. Late to regain tally or see bandit in WEZ resulting in an over G.
9. Separation bottom line:
a. Accelerate, Extend, Separate!
Gun Defense
Objective 5 — Describe gun defense / jink considerations.
1. A bandit is an extremely lethal threat when maneuvering to/or starting at approximately 5 to 7 o’clock and 3,000 ft range.
2. For a successful gun attack, the attacker must be in range, established lead and fired bullets into your plane–of– motion.
a. If the attacker has lead and closes to the gun WEZ, you must fly yourself out of the attacker’s plane–of– motion or bullet stream to defeat the attack.
b. How much out–of–plane required depends on how long the bandit can maintain gun attack position.
(1) The higher the aspect angle, the more overtake the bandit has assuming you are turning into the bandit.
(2) The lower the aspect angle, the longer the bandit maintains firing position.
3. High aspect gun defense — Requires a gun break assuming that sufficient aspect was generated to force an overshoot, but the attacker has lead established approaching the overshoot point.
a. Gun break execution — You must roll your aircraft out of the attacker’s plane–of–motion. How much roll depends on aspect — 135° aspect a 30° roll maybe sufficient. As aspect decreases a quick 90° roll to the attacker’s POM may be required to present the attacker with a “knife edge” and minimize your target size. Direction of roll depends primarily on your airspeed and follow–on intentions.
b. Max performance break turn — Your turn rate depends on radial–G. For example a max AOA/G 300 KCAS pull straight up results in 3 radial–Gs and turn rate of 8°/sec. A pull–down results in 5 radial–Gs and a turn rate of 14°/sec. As airspeed slows, use must use gravity to increase turn rate.
4. Low aspect gun defense — If the bandit achieves a low aspect, low closure, and low HCA tracking guns position a last ditch, all–out effort to survive is required.
a. Gun defense (Jink) execution
(1) Unload to near zero–G and roll out of the bandit’s POM. A 45° roll is normally a sufficient plane change. A pull straight up or straight down may get you well OOP but generates little closure problems.
(2) Perform an immediate max performance pull (jink) to move your jet out to the bandit’s POM. A downhill turn provides best turn rate. Power modulation is critical, below approximately 340 KCAS you can apply full aft stick (high over–G potential if fast).
(3) Analyze the bandit’s nose position. Normally a series of jinks are required to get the bandit out of sync. Be unpredictable to the attacker. Random jinks without “tally–ho” are hazardous in peacetime and combat.
(4) Effective gun defense will cause the attacker to lag off or overshoot. Excessive bandit lag may allow you the opportunity to transition to a rate fight/separation. A bandit overshoot may afford a defender reversal.
5. Gun defense errors:
a. Losing sight — Very hazardous, can’t fight what you can’t see.
b. Rolling at high AOA — A slow role rate can be deadly. To survive, defenders must unload/roll, set LV and pull!
c. Fail to recognize the need for a gun defense — Break early versus late.
d. Giving up — The most critical error you can make is settling into a constant plane turn.
e. Failure to get Out–of–Plane — Lead/Lag reposition, quarter plane.
f. Jink rate is too fast or too slow.
g. Fail to monitor/control G onset — an over–G or under–G results.
Reversals
Objective 6 — Discuss reversal opportunities.
1. As discussed in OBFM, the attacker will overshoot when faced with an unsolvable angular problem inside the defender’s flightpath.
2. Flightpath overshoot — Attacker crosses your flightpath. You must continue turning in the same direction and not offer the attacker a low aspect/HCA shot.
3. Longitudinal axis overshoot — Attacker crosses your longitudinal axis to the other side of your aircraft. To reverse or continue the turn is based on three conditions —range, aspect angle, and the attacker’s closure.
a. The higher the aspect and/or the higher the HCA of the longitudinal axis overshoot the more pronounced the overshoot. The more closure the attacker has at the overshoot, the farther across the longitudinal axis the attacker will go.
b. If you cannot reverse and gain 3/9 line advantage, roll to change planes and increase radial–G to maintain sight, continue same direction turn.
c. Range — If an overshoot occurs at long range, treat it as a 6,000 ft, nose in lag defense. Bottom line if you doubt your reversal options, continue turning.
4. Reversal opportunities
a. A reversal should create either more angle or closure problems than the bandit already has.
b. What to look for — Bandit range inside one turn radius back. Analyze aspect angle, HCA, should not be sufficient for the bandit to align fuselages aft of 3/9 line. Defenders should also look for high LOS.
5. Reversal execution — Execution is based on the type of overshoot.
a. Bandit close range, high aspect, HCA and LOS — Reverse with a minimum expenditure of energy so you will arrive inside weapons parameters.
(1) Unload and roll to place the bandit back inside your turn circle then pull to the bandit’s 6 o’clock to obtain 3/9 line advantage.
(2) Transition to OBFM.
b. Bandit further back, low aspect, HCA and LOS — This overshoot may not allow a reversal, but if a reversal is available then perform a loaded roll opposite the turn direction with aileron and top rudder. Continue pulling toward bandit’s high 6 o’clock. Consider a momentary power reduction to exaggerate 3/9 line advantage (watch rolling Gs).
(1) This type of reversal frequently results in a flat or rolling scissors. As discussed in OBFM always be prepared to transition to the offensive.
(2) If the bandit obviously maintains 3/9 line, reestablish your defensive turn by dumping the nose, rolling, and slicing out of the bandit’s plane.
6. Reversal errors.
a. Misanalyze bandit range and closure
b. Loaded roll — too slow/fast for the line–of–sight
c. LV control — lift vector on attacker versus high 6 o’clock
d. Misuse of G forces (too little or too much buffet).
e. Misuse of power (poor airspeed control)
f. Loss of sight.
g. Flightpath overshoot — mistake a flightpath overshoot for a 3/9 line overshoot.
Defensive BFM Setups
Objective 7 — Describe defensive BFM setups / exercises.
1. Defensive BFM (DBFM) objectives:
a. Negate immediate threat (bandit weapons)
b. Deny subsequent WEZ entries
c. Neutralize the fight and separate or go offensive
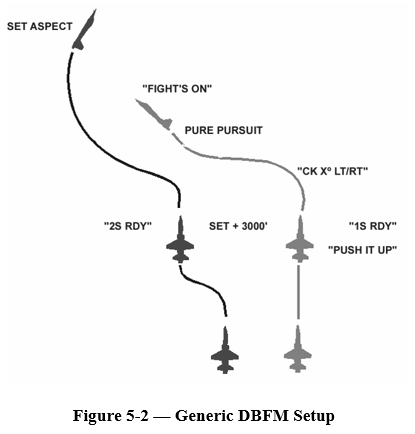
2. DBFM playbook setups (Figure 5-2):
a. Defensive Ranging Exercise
b. Reversal / Scissors Exercise
c. Jink Exercise
d. 6K’ Defensive Exercise
e. 3K’ Defensive Exercise
3. Defensive Ranging Exercise (pursuit curve)
a. Objectives
(1) Proper exercise start parameters.
(2) Show lag, pure, lead pursuits and demonstrate (call) bandit ranges from 9,000 ft in to 1,000 ft bubble.
b. Execution
(1) Fighter check away, select Mil power, roll out after 45° of turn, maintain tally and level flight, reverse back when bandit is pure, slow to 350KCAS. Identify bandit’s pursuit curves and ranges (with emphasis on 6K’, 3K’ and 1K’ bubble).
(2) Bandit check toward fighter, MIL power, enough G to hold airspeed (~ 410 kts), remain level to fighter, pull to pure pursuit. Bandit calls specific pursuit curve changes and range every 1,000 feet.
4. Reversal / Scissors Exercise
a. Objectives:
(1) Proper exercise start parameters.
(2) Defeat snap shot and reverse to achieve offensive or neutral position.
b. Execution
(1) Perform AGSM, select MAX AB and deploy chaff and flares
(2) If bandit pulls to a pure or lead pursuit position, tighten down on your turn. Avoid bandit gunshot.
(3) When bandit repositions, assess his reversal for cues. Unloaded roll, pull to bandit's high–six
(4) Max perform jet to 150 KCAS
(5) Go offensive, kill and/or separate
c. Reversal/scissors errors: Poor initial break turn, no or late gun break, lazy reversal or failure to get to 3/9 line position, improper lift vector/G/power control, lose sight of bandit, loss of SA, not forcing a forward LOS rate on bandit.
5. Jink Exercise
a. Objectives:
(1) Proper exercise start parameters
(2) Max G/AOA OOP break turn
(3) Timely jinks with tally and situational awareness.
b. Execution
(1) Pull power to idle initially, until moderate buffet is achieved, then back to MAX AB.
(2) Unload and roll to set lift vector (LV) 30° to 45° out-of-plane with bandit.
(3) Make a symmetric, maximum onset rate, two handed, stick in the lap pull to maximum allowable Gs and hold until aerodynamic stall.
(4) Assess bandit, follow–on jinks to defend (unload, roll, pull).
(5) DON’T GIVE UP!!!
(6) Bandit overshoot, reverse or continue turn based on 3/9 position.
(7) Floor transition as necessary. Jinks close to the floor should be flown in MAX AB.
c. Jink errors: “No Joy” on bandit / loss of SA, Over– G / under–G, poor power modulation, ineffective LV control, improper timing on reactions to bandit, giving up.
6. 6,000 ft Defensive BFM Exercise
a. DLO — Separate or survive (reverse / neutralize attacker) within 720° of turn.
b. At “fights on” — Best break turn = Perform AGSM. Select MAX AB and deploy chaff and flares (CMD)
Now!
Good Separation Cue
(1) Place your LV slightly lower than bandit’s POM. Make a blended pull of 5 Gs to a sustained rate buffet.
(2) Assess bandit. Continue maximum rate turn until separation cue (or floor transition is required).
(3) A good separation cue includes a combination of: high HCA, long range, high aspect angle, “winning cues” are all increasing, and sufficient energy to separate.
(4) Separation mechanics include: unloading to about 0.5 G, MAX AB, descend to within 2,000’ of floor, deploy chaff and flares, and check turns as required to maintain tally on bandit.
(5) Unsuccessful separation requires another break turn and may require idle/speed break.
NO Separation Cue
(1) If separation cues not met, safe separation is not possible, so you MUST continue a maximum rate turn.
(2) Reassess bandit. Continue maximum rate turn: Perform AGSM, select MAX AB, place your LV as required to maintain 410 KCAS, and pull to a sustained rate buffet.
(3) Continue turn until separation cue or floor transition.
(4) Floor transition mechanics: Perform AGSM, reduce dive angle to level off at desired altitude, and maintain a sustained rate buffet. If bandit is not a threat, ease off on Gs to maintain airspeed and reassess bandit’s position.
(5) If separation cues still not met, transition to a floor rate fight. Tighten down your turn if threatened.
(6) Don’t give up.
b. 6K' DBFM exercise errors:
(1) Slow to perform break turn.
(2) Low-G break turn
(3) No Joy on bandit / loss of SA.
(4) Mis-assessment of bandit
(a) Poor power and G application to tighten down defensive turn.
(5) Ineffective LV control.
(6) Allowing an over-G.
(7) Floor kill.
7. 3,000 ft Defensive BFM Exercise
a. DLO — Survive for at least 540° of turn.
b. At “fights on” — attacker approaching WEZ, go to idle power and JINK!!!
(1) Unload and roll to set your LV 30° to 40° out of plane with bandit’s POM. Make a symmetric, maximum onset rate, two handed, stick in the lap pull and hold until aerodynamic stall.
(2) Assess bandit. If bandit remains in lead/nose on, continue aggressive gun defense — JINK!
(3) If the bandit repositions, transition to a moderate rate buffet turn. Select MAX AB, set LV to the G- Awareness exercise picture to maintain moderate buffet. Maintain G as required to maintain moderate buffet (airspeed NOT increasing). Continue until you see the “tighten down” picture (reversal/scissors exercise).
(a) The tighten down cue is any bandit nose rate toward the fighter (a reduction of HCA/AON) fast enough to achieve a WEZ.
(b) Tighten down maneuver includes: select MAX AB, put LV on the bandit, and a smooth pull to full aft stick.
(4) If bandit repositions or gets stuck (stagnates), transition to a moderate buffet turn.
(5) If the bandit is still pulling lead near the Gun WEZ: JINK!!!!
(a) Unload and roll to set your LV 30° to 40° out of plane with bandit’s POM. Make a symmetric, maximum onset rate, two handed, stick in the lap pull and hold until aerodynamic stall.
(b) Transition to floor fight if necessary, select MAX AB.
(6) Continue JINKING until bandit repositions – DON’T GIVE UP.
(a) When bandit repositions, assess if a reversal is possible.
c. 3K' DBFM exercise errors:
(1) No Jink or inadequate Jink.
(2) Ineffective transition to turn rate fight (moderate buffet turn).
(3) Mis-assessment of bandit:
(a) Let bandit attain AIM-9 WEZ.
(b) Let bandit attain Gun WEZ.
(4) Lose sight of bandit.
(5) Floor kill.
(6) Giving up!
Review Exercise 5
Complete the following review exercise. Answers are in the back of the SG.
1. Which of the following are defensive BFM objectives?
a. Deny or defeat bandit weapons employment opportunities or weapons.
b. Gain a neutral or offensive position.
c. Separate or kill the bandit.
d. All of the above are correct.
2. The game plan for survival is simple. Maintain on your attacker, next force on the attacker. As the attacker attempts to gain turning room, you take away or deny the attacker the use of the turning room.
3. True or False: A break turn may be executed without regard to the attacker’s weapons.
4. During your hard right defensive turn, you are unsure that the attacker is going to overshoot your 3/9 line. You should
a. reverse.
b. continue the hard right turn.
5. True or False: Extensions should only be done when the bandit is not a threat, with bandit nose off or excessively in lag.
6. A valid separation requires greater than attacker weapon range, positive VC, and,
7. True or False: Gun break turns must be accomplished out–of–plane.
8. During an attacker longitudinal overshoot, the decision to reverse or continue the turn is based on three conditions:
, , and .
9. True or False: During a scissors, you should put your lift vector on the bandit to force the highest possible aspect angle.
10. During a missile break turn, you lose sight of the attacker and have lost situation awareness. The training rules require that you
a. knock off the fight and maintain a predictable flightpath.
b. call “no joy” and continue in a no–sight defense.
c. call “blind” and beg for mercy.
d. start a no–sight jink.
No comments to display
No comments to display