
AA-9 High-Aspect BFM Maneuvering
2.0 Hrs
- High-aspect defined
2. High-aspect BFM objectives / considerations
3. Lead turn concepts
4. High aspect setups
5. Merge options
6. Common errors
7. Training rules
Objectives
1. Define high aspect.
2. Know high aspect BFM philosophy and objectives.
3. Discuss high aspect BFM considerations.
4. Explain merge game plans.
5. Understand one circle and two circle game plans.
6. Understand lead turn concepts.
7. Describe high aspect BFM setups.
8. Discuss specific high aspect training rules.
Assignment
1. Review Lesson AA-9 in the Basic Fighter Maneuvers Student Guide, B/F-V5A-K-AA-SG.
2. Read MCMAN 11-238, Vol 2, Chapter 3, High Aspect Maneuvering.
3. Read the fall 1988 Fighter Weapons Review article “Turning Circles” by Major Mike Straight.
Information
HABFM
Objective 1 — Define high aspect.
High Aspect BFM (HABFM) — High aspect BFM is the result of a mutually detected attack and begins at aspects approaching head on.
Objective 2 — Know high aspect BFM philosophy and objectives.
1. Philosophy
a. High aspect is not necessarily neutral. When you pass beak-to-beak with an adversary, one may have an advantage based on one or more of the following:
(1) Energy States
(2) Aircraft Performance Capabilities
(3) Ordnance Capabilities
(4) Pilot Skills
b. Have a game plan to exploit the bandit’s weaknesses and errors when they occur.
c. Lead turns are the key and your energy management plays a big role.
2. The objectives of HABFM are based on employing excellent fighter pilot discipline:
a. Arrive at merge with an advantage.
b. Maneuver to a WEZ and kill.
(1) Gain turning room.
(2) Execute an effective lead turn.
(3) Maneuver to the control zone.
(4) Transition to a WEZ
(5) Take a valid weapons shot.
c. Separate before becoming defensive
HABFM Considerations
Objective 3 — Discuss high aspect BFM considerations.
1. Environment considerations:
a. Sun — Where is it? Can I use it to my advantage?
b. Sky — Look–up/down — easy/difficult, contrail level
c. Clouds — Will they highlight me or the bandit?
d. Haze — Same as clouds
e. Ground cover — Ground/paint scheme blend, vertical development, shadows, adverse missile heat signatures
2. Analyze adversary
a. Bubi Hartmann — Initially assume you’re fighting the best.
b. Joe Bagodonuts — Recognize his mistakes (airspeed, maneuvering, configuration) and kill him quickly.
c. What type of aircraft/weapons?
d. Know his expected tactics.
3. Maintain “tally–ho” – a common problem
a. When to padlock — When bandit’s “small”
b. When to cross-check inside — When the bandit’s showing planform or near distinguishable objects (cloud, mountain, etc.)
4. Energy management
a. If fast, try to go up hill to exchange airspeed for altitude (or modulate power).
b. If slow, try to go down hill to exchange altitude for airspeed (or modulate power).
c. Attain, maintain energy unless in a position to employ ordnance or deny attacker turning room.
5. Nose position versus energy
a. This isn’t a flying contest, if you have to use up your knots to stick your nose on the adversary then do it and shoot (but only to kill or keep from being killed).
b. Don’t waste energy for a questionable shot or no shot at all. Don’t sacrifice knots for a “pointing” bandit if the bandit’s not in or near a WEZ either.
6. Over–G potential
a. Between flying aggressively and being padlocked most of the time, adds up to big time over–G territory.
b. Aircraft feel — At 300 – 350 knots, 400 knots, 450 – 500 knots, and at different altitudes, T–38C aircraft feel varies dramatically; learn the differences.
Merge Game Plans
Objective 4 — Explain merge game plans.
1. Have a PLAN! You need to have plan before you step and definitely before you merge; however, you must be flexible to change plan if needed.
2. Your plan may be to blow through!
a. Do not have to turn and fight! What is your mission (disrupt)?
b. Low fuel, SA, undesirable lead turn/energy
Objective 5 — Understand one circle and two circle game plans.
Always try to lead turn. Recognition of bandit type aircraft should give a clue as to which way to turn for a one circle or two circle fight.
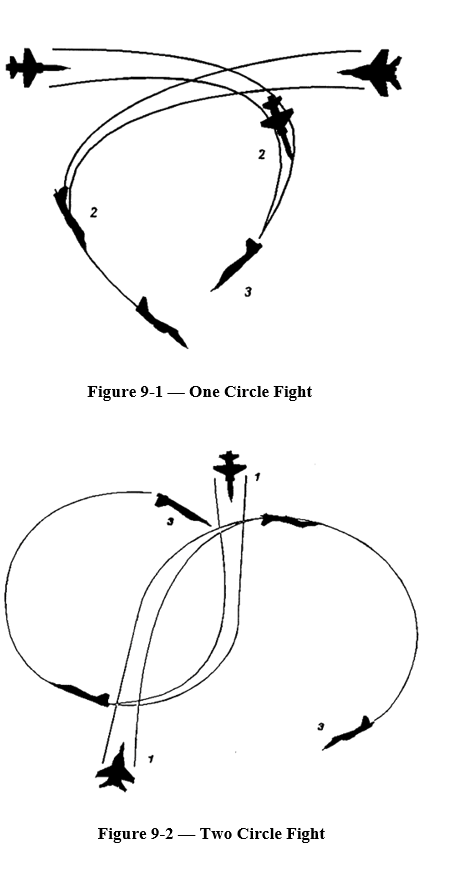
1. Merge game plans — (one circle fight)
a. Reference Figure 9-1 — Who is “winning” at point 3 and why? The aircraft with better maneuverability wins (nose position fight)!
b. Attacker power, G and LV as required to maintain an offensive nose position. Transition to OBFM and kill the bandit.
c. One circle fights may develop into vertical fights where the bandit forces a slow speed scissors engagement.
d. Fights can transition from one circle to two circle or two circle to one circle.
2. One circle fight advantages and disadvantages.
a. Use against inferior turning jet.
b. Use against a face shooter.
c. Use against a small adversary.
d. Advantage — usually results in a quicker kill than two circle merge.
e. Disadvantage — fight becomes anchored / hard to leave.
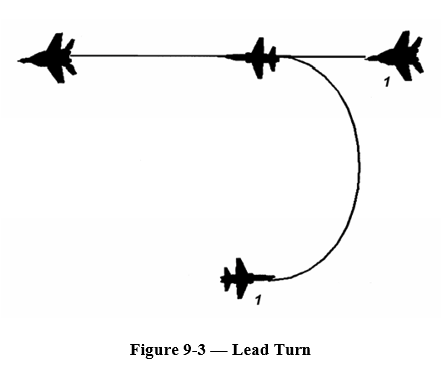
3. Merge game plans — (two circle fight)
a. Reference Figure 9-2 — Who is “winning” at point 3 and why? The aircraft with better turn rate/radius has the advantage.
b. During a two circle rate fight proper energy management is critical. You must control LV, power and G to gain an advantage on even a 5–G bandit.
c. Turn circle alignment takes patience. Remember, don’t point unless you can kill the bandit.
4. Two circle fight advantages and disadvantages.
a. Use against superior turning aircraft.
b. Advantage — Can use your lead turn, can use face ordnance.
c. Disadvantage — Normally takes longer to kill, hard to maintain tally on small adversaries, adversary face ordnance.
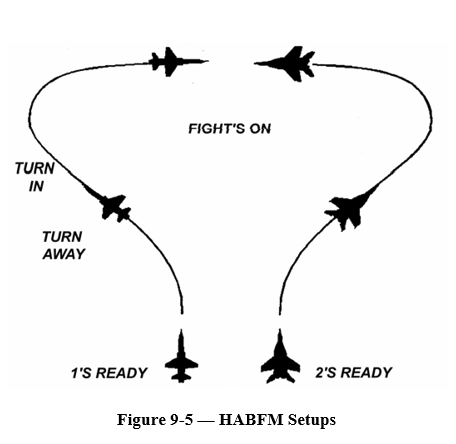
5. Lagging for turning room (Figure 9-3).
a. The idea is to get your turn circle center closer to the bandit’s turn circle.
b. An attacker with a better turn rate may eventually arrive at a low aspect perch setup on the bandit.
6. When to blow through.
a. Do not have to turn and fight! What’s your mission (disrupt)?
b. Low fuel, SA, undesirable lead turn/energy.
7. Have a PLAN!
a. Game plan versus known threat aircraft/capabilities
b. Game plan versus a limited bandit profile

Lead Turn
Objective 6 — Understand lead turn concepts.
1. Lead turn definition
a. A lead turn is an attempt to decrease HCA prior to passing the opponent’s 3/9 line.
b. To perform a good lead turn, you need:
(1) Turning room (3 dimensional).
(2) Energy to use turning room.
(3) A bandit that lets you use your turning room.
(4) Exclusive turning room.
c. Lead turns against maneuvering bandits or lead turns with less than one turn diameter do not produce a dead six position but may still yield some advantage.
d. Lead turn by both aircraft. If both aircraft attempt a lead turn, the result may also be a head–on pass. Although “neutral” in most situations one aircraft has an “advantage” i.e., type aircraft, ordnance, energy, skill, etc.
e. Lead turn with more than one turn diameter and the bandit does not lead turn (take your turning room away) a successful conversion to the bandit’s 6 o’clock results (Figure 9-4).
2. If the bandit flys straight through the merge (no tally on you, trying to blow through, has a trailer, etc.), you may be able to roll out in the WEZ.
a. The bandit may counter your lead turn.
b. Never willingly let a bandit lead turn you!
c. Lead turn the bandit and at worst case meet neutral.
3. Exclusive turning room
a. Bandit has to let you use it (both geometric and energy turning room).
b. Advantages, disadvantages of pure horizontal turning room
(1) Advantages — Low altitude, terrain mask
(2) Disadvantages — Bandit may acquire earlier tally/radar acquisition, less opportunity to exploit energy egg maneuvering (radial–G).
c. Advantages, disadvantages of turning room entries from below
(1) Advantages — Ability to acquire airspeed while also acquiring turning room, radar look up employment, vertical overshoot from low to high easier to control.
(2) Disadvantages — High airspeed during lead turn equals high over–G potential. Need more turning room when fighting “God’s” G.
d. Advantages / disadvantages of turning room entries from above.
(1) Advantages — Ability to complete the lead turn maneuver with a higher airspeed. Less turning room required when using “God’s” G.
(2) Disadvantages — Defender can look up at you, enhancing visual/radar acquisition. Insufficient turning room from high may also result in a vertical overshoot (critical when the target is at low altitude).
e. Turns in the oblique are usually best (advantages of both horizontal and vertical turning room).
4. When to start a lead turn
a. When line–of–sight rate starts to increase.
b. Lead turns require two hands — throttle/G application to acquire the desired turn rate/radius and final conversion/merge energy.
5. Countering lead turns
a. Never willing let a bandit lead turn you! Attempt to lead turn the bandit and at worst case meet neutral.
6. Lead turn common errors
a. Not having a lead turn plan.
b. “No Joy”/losing tally on bandit
c. Not anticipating start turn point or poor execution of lead turn
d. Making the lead turn in the horizontal plane
e. Pointing at the bandit throughout the lead turn
f. Improper use of your LV, use of G or energy management
g. Other potential errors to watch for:
(1) Passing up shot opportunities
(2) Failing to separate prior to defensive
(3) Lack of floor, fuel or situational awareness
High Aspect BFM Setups
Objective 7 — Describe high aspect BFM setups.
1. Butterfly setups (Figure 9-5)
a. Don’t call ready unless you are; have a plan! Plan based on environment, bandit actions, what your IP wants you to practice.
b. Cleared to maneuver at “Check (turn) away.”
c. Maintain “tally”, when to call padlocked (early!).
d. Discuss actions for single “No Joy” and both “No Joy” situations. Second “No Joy” call should include altitude.
e. Setup errors — Late to call padlocked, Incorrect range assessment; loses tally on bandit during turn in, improper parameters, failure to attain vertical/horizontal turning room, improper energy management, over-G.
2. Standard Bandit Profile
a. MIL power and level flight during check turn away.
Figure 9-5 — HABFM Setups
b. Maintain altitude, adjust power to maintain 410 KCAS and get tally on fighter.
c. At 3 NM separation (or Padlock call), turn in and call “Fight’s On”. Select min AB, make a level 5-G turn to 90° from initial heading. Have a tally!!!
Lead Turn Exercise
1. High Aspect Setup for Lead Turn Exercise (High to Low)
a. At check turn away: (4,000’, approximately 410 knots): Select MAX AB, roll to 45° bank, and check 30° away from initial heading. Regain tally on bandit. In MAX AB, begin easy pull to 20° climb, hold airspeed at 350 to 380 knots, and maintain tally.
b. At turn in / “Fight’s On” call: Perform AGSM, check for MAX AB, pull LV to bandit’s high control zone using moderate buffet. Airspeed will temporarily slow below 350 to 380 knots. Maintain tally!!!
c. At increase in bandit’s line of sight (LOS) rate: Check in MAX AB and put LV on bandit’s control zone. Continue moderate buffet turn to center of CZ and assess your energy in relation to bandit.
d. During the lead turn, adjust your LV to cross above bandit’s flight path at 350 to 380 knots.
2. High Aspect Setup for Lead Turn Exercise (Low to High)
a. At check turn away: (4,000’, approximately 410 knots): Select MIL power, roll to 45° bank in level flight, and check 30° away from initial heading. Maintain tally on bandit. In MIL power, maintain airspeed at approximately 410 knots, level flight to a slight descent (no more than 5° nose low), and maintain tally.
b. At turn in / “Fight’s On” call: Perform AGSM, select MAX AB, pull LV up to bandit’s control zone. Make a 5G blended pull to sustained rate buffet, then to moderate buffet.
c. At increase in bandit’s line of sight (LOS) rate: Check in MAX AB and pull LV up towards bandit’s control zone. Continue moderate buffet turn to center of CZ and assess your energy in relation to bandit.
d. During the lead turn, adjust your LV back down to cross above bandit’s flight path at 350 to 380 knots.
High Aspect One Circle Fight
1. High Aspect One Circle Fight
a. DLO — Fighter established in control zone (CZ) or weapons employment zone (WEZ).
b. Start the one circle fight from the high aspect lead turn as previously discussed.
2. As you recognize that a one circle fight develops after the merge:
a. Perform AGSM, select MAX AB, rotate LV on bandit’s high control zone.
b. Pull Gs to sustained rate buffet up to moderate buffet depending on your energy level.
3. When bandit is on your 3/9 line, assess your position of advantage. After assessment, continue moderate buffet turn to force forward LOS movement.
4. Assess your aspect angle, range and closure with the bandit:
a. If winning BIG (long range/low aspect angle/forward LOS), then transition to a WEZ.
b. If winning by a little (closer range/high aspect angle/only a slight forward LOS), then execute a second lead turn. Pull to center of bandit’s control zone and assess LOS movement. At LOS increase, start another lead turn.
5. When bandit is on your 3/9 line, assess your position (winning/losing/neutral). After assessment, continue moderate buffet turn to force forward LOS movement.
OR
6. Transition to a “Two Circle” fight.
High Aspect Two Circle Fight
1. High Aspect Two Circle Fight
a. DLO — Fighter established in control zone (CZ) or (WEZ) within 3 complete circles.
b. Start the two circle fight from the high aspect lead turn as previously discussed.
2. As you recognize that a two circle fight develops after the merge/lead turn:
a. Select MAX AB, rotate LV as required to maintain best energy state.
b. Pull Gs to sustained rate buffet up to moderate buffet depending on your energy level.
3. When bandit is on your 3/9 line, assess your position of advantage (e.g., Winning if aspect angle less than 90°). After assessment, continue moderate buffet turn to force forward LOS movement.
4. When the bandit is at the assessment window, assess slant range (typically 9-12 K feet on first assessment) and aspect angle.
a. If aspect angle greater than 90°, continue turn and offset for turning room, then execute lead turn.
b. If aspect angle less than 90°, extend to align turn circles (with bandit).
5. Continue to assess LOS rate.
a. At increase in bandit’s line of sight (LOS) rate towards your 3/9 line, begin lead turn.
6. To perform an extension to the bandit’s turn circle, roll out of turn and set power and adjust pitch to get or maintain approximately 410 knots.
7. To perform a lead turn and enter a turning rate fight, perform AGSM, check in MAX AB, and pull LV as required to maintain approximately 410 knots.
a. Make a 5G blended pull to sustained rate buffet.
8. Continue until you assess the ability to maneuver to a WEZ.
a. As range decreases, shorter/smaller repositions will be required.
Training Rules
Objective 8 — Discuss specific high aspect training rules.
1. Training rules
a. Remember, the two aircraft are approaching “cranium”- on with 800 knots of closure.
b. Loss of sight — Call it on the radio NOW!
c. Terminate pure pursuit in the front quarter by 9,000 feet range
(1) Fighter aircraft with newer heat-seeker missiles may be capable of close range head–on missile attacks — not here due to our AIM-9P WEZ, but in real life, rules of the road apply. Describe where your aircraft is going if there’s any doubt concerning flightpath deconfliction
d. 150–knot rule (minimum) — a player during one circle fight to scissors.
e. Flightpath deconfliction, never assume the other jet sees you.
Review Exercise 9
Complete the following review exercise. Answers are in the back of the SG.
1. True or False: High aspect BFM is the result of a mutually detected attack and begins at aspects approaching head on.
2. Which of the following are high aspect BFM objectives?
a. Maneuver to a WEZ and kill the bandit.
b. Maneuver to an offensive position.
c. Separate before becoming defensive.
d. All of the above.
3. Of the following, which is not an environmental consideration of high aspect BFM?
a. Sun/sky.
b. Clouds/haze.
c. Experience.
d. Ground cover.
4. True or False: During high aspect BFM, a good time to cross–check inside the cockpit is when the bandit is showing planform or near distinguishable objects.
5. Lead turns against maneuvering bandits or lead turns with less than one turn do not produce a dead six position but may still yield some advantage.
6. All of the following are advantages of lead turn entries from below versus lead turn entries from above except:
a. Ability to acquire airspeed and turning room.
b. Radar look up employment.
c. Requires less turning room.
d. Vertical overshoot easier to control.
7. Never willingly let a bandit lead turn you. Counter a lead turn by performing your own lead turn and attempt to meet the bandit at aspect.
8. True or False: A one circle fight disadvantage is that the engagement usually becomes anchored and is hard to leave.
9. Two circle fights normally work well against turning aircraft.
10. During a high aspect engagement, the second aircraft to call blind will also respond with his/her .
No comments to display
No comments to display