
4.6 Offensive BFM (OBFM).
4.6 Offensive BFM (OBFM).
OBFM trains the fighter pilot to maneuver from a position of advantage to a controllable WEZ and kill the Bandit. OBFM is a sequential set of problems solved by the offender to arrive at a controllable WEZ and employ valid ordnance to kill the Bandit in the minimum amount of time. Offensive BFM requires a well thought-out and executed game plan based on fighter and Bandit capabilities, training, and proficiency. The primary objective of OBFM is to kill the Bandit. Subobjectives further define the overall objective of KILL. Standard OBFM objectives are:
• KILL
- Maneuver to the CZ.
- Transition to a WEZ.
- 100 percent valid weapons employment.
• Maintain the offensive.
4.6.1 OBFM Perch Setups.
The current IFF syllabus requires two basic perch setups for OBFM: 6,000-foot perch setups and 3,000-foot perch setups. The primary difference is the fighter starts outside the Bandit’s TC on the 6,000 setup and inside the Bandit’s TC on the 3,000 setup.
4.6.1.1 6K Perch Setup.
Per the standard setup, the fighter starts 6,000 OBFM from 6,000 feet behind the Bandit at 30° to 40° of AA. Squadron standards dictate how to arrive at this position, but the flight lead normally directs the wingman to 9,000 feet LAB at the planned “FIGHT’S ON” airspeed. The flight lead checks both aircraft to the right or left so the fighter turns toward the Bandit. As the fighter reaches pure pursuit, the Bandit reverses the turn and sets the appropriate aspect angle. The fighter monitors the range and calls the fight’s on at 6,000 feet. The fighter holds the Bandit under the gun cross until he reaches 6,000 feet and continues to modulate power to maintain the briefed “FIGHT’S ON” airspeed. For a T-38C, the wingspan is 4 mils at 6,000 feet. This is one mil larger than the inside gap of the gun cross and one mil smaller than each side of the horizontal arms of the gun cross. The AAT will display
1.1 nautical miles (NM) due to system lag.
4.6.1.2 3K Perch Setup.
This setup is applicable to short-range BFM and the quarter plane exercise. Initial position before the check turn is 350 knots, 6,000-foot lateral spacing, stacked level with the Bandit. At the check call, the offender checks towards the Bandit to achieve pure pursuit. The offender maintains pure pursuit on the Bandit, modulating power to maintain 350 knots until 3,000-foot range is achieved. At 3,000 feet, the Bandit’s wingspan will be 8 mils. The AAT will display 0.6 nm due to system lag. The offender calls out “EASE” or “TIGHTEN” as appropriate for aspect outside the 30° to 40° window.
4.6.2 OBFM Exercises:
4.6.2.1 Offensive Ranging Exercise.
Begin the offensive ranging exercise from a 6,000-foot setup. Pure pursuit the Bandit until reaching the 6,000-foot HUD reference. Roll out to view lag pursuit for 1 to 2 seconds, select MIL power, and place the Bandit back under the boresight cross. Continue to pure pursuit until reaching the 3,000-foot HUD reference. Note the details on the Bandit’s jet at 3,000 feet as these references are important for OBFM. At 3,000 feet, the Bandit has a clearly visible canopy and canopy bows, distinct lines where the wings and tail meet the fuselage, and clear lines where the colors on the paint scheme change. At 3,000 feet, continue to pull the Bandit down the HUD until the Bandit’s wingspan fills the gunsight. Modulate power for steady, controllable overtake until reaching reposition cues. Reposition to avoid the 1,000-foot bubble and, as the Bandit reverses, maneuver to remain at 1,000 feet to view the Bandit references at the bubble.
4.6.2.2 Heat-to-Guns Exercise (Figure 4.11).
The objective of the heat-to-guns exercise is 100 percent valid weapons employment. Units will determine specific setup parameters and special instructions (SPINS) for the heat-to-gunsexercise.
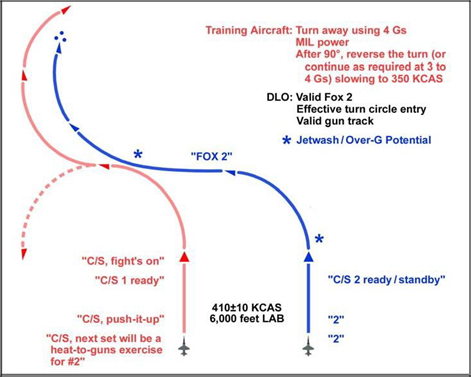
Figure 4.11. Heat-to-Guns Exercise.
4.6.2.2.1 Communication. Reference specific communications guidance in unit standards.
4.6.2.2.2 Bandit. At the “FIGHT’S ON” call, the Bandit will initiate a MIL power, 4- to 5-G level turn away from the maneuvering aircraft. At 90° of turn, roll out, and modulate power. As soon as a Fox 2 is called by the maneuvering aircraft, the Bandit will either immediately reverse the turn (if still checking away) or continue in the same direction and maintain 3 to 4 Gs while slowing to 350 KCAS and MIL power.
4.6.2.2.3 Maneuvering Aircraft. At the “FIGHT’S ON” call, select MAX afterburner, set the LV on the Bandit, start the AGSM, and perform best break turn. As the Bandit enters the HUD field of view (FOV), simultaneously relax the G, and attempt a valid AIM-9 shot. Call “FOX 2.” Then prepare to enter the Bandit's TC.
4.6.2.2.4 AIM-9 Employment. When pulling the Bandit into the HUD, consider a slight relax of G as required to slow the Bandit’s LOSR to the missile seeker FOV.
With the target’s heat source in the missile FOV, uncage the missile by depressing the NWS button. Attempting to hold or freeze the Bandit in the center of the seeker FOV for too long can result in a significant closure problem and decrease the time available to prepare for follow-on maneuvers. Firmly depress the pickle button to fire the AIM- 9 and confirm missile launch by witnessing the removal of the reticle (evidence of employment can also be checked by referencing the missile count in the bottom left corner of the HUD). After employing the AIM-9, call “FOX 2,” roll out, and begin a slight climb (normally flightpath marker [FPM] 3° to 5° above the horizon) to avoid the Bandit's jetwash. Modulate power to accelerate or maintain airspeed while approaching the Bandit’s TC.
4.6.2.2.5 TC Entry Recognition Cues. Recognizing the proper TC entry cues proves vital to successfully entering the CZ. The maneuvering aircraft is on the TC when AN INCREASE IN THE AFT LOSR of the Bandit occurs. Another recognizable cue occurs when the rotational motion of the Bandit turns into aft translational motion (AA stops increasing). Due to the low turn rates of the T-38, this increase in LOSR is relatively subtle.
4.6.2.2.6 Maneuver to the CZ. At the TC entry, select G and power as appropriate (usually MIL) to maneuver to the Bandit's CZ. Begin the AGSM, set the LV near the Bandit, and start a light to moderate buffet pull. As the Bandit approaches the canopy bow, begin to assess range and aspect. The area within two fists of the canopy bow is the “assessment window.” Range and aspect should look appropriate for transition to the gun WEZ. Avoid the potential of flying through jetwash by maneuvering either above or below the Bandit’s POM while flushing towards the Bandit’s tail.
4.6.2.2.7 Assessing for a WEZ. When the Bandit reaches the canopy bow, assess range, aspect, and closure. The canopy bow assessment should occur approximately one to two fists above the canopy bow. Commonly briefed cues to search for during this assessment include 3,000 feet of range, 30° of aspect, and steady, controllable closure (referred to sometimes as the “rule of threes”). Details on the Bandit's jet provide the most accurate method to determine range. At 3,000 feet the Bandit has a clearly visible canopy and canopy bows, distinct lines where the wings and tail meet the fuselage, and clear lines where the colors on the paint scheme change. To determine 30° to 45° of aspect, refer to the wingspan-versus-length relationship. (See Figure 4.11.) To determine acceptable closure, the Bandit's jet should slowly grow larger. If his jet is rapidly growing larger or smaller, improper closure exists. If all three cues from the Bandit exist at the canopy bow assessment window, continue to pull the Bandit into the HUD and employ ordnance.
4.6.2.2.8 Ease Reposition (Repo). If the range, aspect, and closure cues are not met at the canopy bow assessment window, execute an ease repo to drive the range and aspect lower. An ease repo drives the maneuvering aircraft back toward the Bandit's TC, reducing range and aspect in the process. Execute an ease repo by relaxing back- stick pressure to reduce G. Modulate power as required to maintain the desired rate fight airspeed. When reducing G, the fighter will see aft LOS from the Bandit (away from the canopy bow) as well as a reduction in aspect. Expect LOS to be immediate, although the amount of time required during the ease will vary based on the range, angles, and closure presented by the Bandit at the time of the ease. Select MAX afterburner, reset the LV for best rate, and blend the G back in. Maintain the best rate until the Bandit again enters the canopy bow assessment window. Assess and either execute another ease repo or pull G as required to enter the AIM-9/gun WEZ.
4.6.2.2.9 Gun Employment. A valid gun track opportunity requires proper POM, lead, and range during bullet time of flight. After deciding the attack cues are met, smoothly pull the Bandit into the HUD between the boresight cross and the AIM-9 FOV circle. Placing the Bandit in this position solves for POM. Next, establish the proper lead by matching the Bandit’s wingspan to the width of the funnel. Finally, assess the range by comparing the Bandit’s location in the funnel with the 2,500-foot pipper. While pulling the Bandit to the proper lead, range, and POM, the Bandit may pass through the AIM-9 FOV circle; if so, take a shot of opportunity as required. Prior to opening fire with the gun, ensure your feet are on the floor or exerting symmetric pressure on the rudder pedals. Unintentional yaw inputs will cause POM errors. Using fine muscle movements, stabilize your aiming reference on the center of the target aircraft. Adjust power as required based on closure, aircraft buffet cues, and LOSR. To open fire, use one smooth, continuous trigger squeeze per gun attempt. Intermittent pulsing of the trigger will minimize the Pk and will jam the 20mm cannon. Small adjustments in back-stick pressure and lateral stick displacement will be required to refine aiming based on continuously changing range and POM. Adjust for POM error using lateral stick pressure by attempting to adjust for one-half the distance of firing evaluation display system (FEDS) or lead computing optical sight (LCOS) pipper displacement. A controlled gunshot should be held for a 2-to-3 second lethal burst. This time may be shortened based on range, closure, and significant aiming errors. To terminate the gun attempt, RELEASE the TRIGGER prior to commencing a repo. Marksmanship is critical: at 60 rounds per second, your 450 rounds of simulated bullets will be depleted in approximately 7 seconds.
4.6.2.2.10 Repo Mechanics. While employing the gun, the maneuvering aircraft may encounter the need to repo. The maneuvering aircraft should repo for frag from a valid gun kill, or range and closure problems created during the gun attempt. Range and closure problems are the most common reason for the maneuvering aircraft to repo. The repo is a calculated bid to lag, using the vertical and induced drag to solve range, aspect, and closure problems. The goal of the repo is to transition back to the CZ.
4.6.2.2.10.1 Initial Move. Rotate the LV away from the Bandit; power placement, degree of LV change, and G/AOA used will depend on the severity of the closure problem the maneuvering aircraft is trying to solve. If unsure, a good default is to use idle, set the LV 60° to 90° above the Bandit (typically, perpendicular to the horizon) and use a smooth but deliberate pull to the moderate buffet.
4.6.2.2.10.2 Transition Back to the CZ. The repo is not finished after the initial move. Once arriving on or near the Bandit’s TC, begin pullback towards the Bandit to reduce HCA and begin the reassessment. Throttle position will depend on LOS and range cues from the Bandit.
4.6.2.2.10.3 Recommit from the CZ. Once established in the CZ with valid assessment cues, recommit for an AIM-9 opportunity on the way back to the gun WEZ. Use power as required, to include MAX afterburner, and place LV as required to position the nose for valid weapons employment. Where the LV is placed will depend on how much vertical the Bandit is using. The fight will go downhill in pursuit of the WEZ and a low yo-yo may be required to increase/maintain energy for nose rate. Be aware of position relative to the training floor during the recommit. Based on the assessment, if valid attack cues are not met, remain in or maneuver back into the CZ before attempting another WEZ.
4.6.2.3 High-Angle Guns-to-Separation (HAGS) Exercise.
Begin the HAGS exercise from a 6,000-foot setup. Call “FIGHT’S ON” at 6,000 feet. Begin an AGSM while selecting MAX afterburner and setting the LV in plane with the Bandit. Smoothly pull to 5Gs and blend to single-rate beeper (SRB. The Bandit will disappear beneath the nose of the aircraft. Continue to pull for 4 to 5 seconds. Roll out and modulate power for the briefed airspeed while reacquiring the Bandit. The Bandit should be level on the horizon and outside the canopy bow. As the Bandit approaches the canopy bow, squeeze the trigger and hold until the Bandit reaches the edge of the HUD. Select MAX afterburner; reset the LV to the Bandit’s deep 6 o’clock; and smoothly pull to either moderate buffet or SRB. Approximately 90° of heading change is required for a ballpark separation heading with a dive angle of 20°. Upon reaching this heading, look over the opposite shoulder to acquire the Bandit and update heading as required to place the Bandit at 6 o’clock. Modulate power to stay below the Mach while executing a floor transition.
4.6.2.4 Quarter Plane Exercise.
This exercise starts from a 3,000-foot setup. The objectives are to maintain 3/9 line advantage. At the “FIGHT’S ON,” maneuver the aircraft as to maintain pipper on the Bandit until the quarter plane picture is achieved shortly before reaching the bubble. At the quarter plane picture, set LV away from the Bandit (“feet on the Bandit”), select idle power, and execute a MAX performed pull to stop forward closure.
4.6.3 OBFM Sets:
4.6.3.1 Medium-Range OBFM (6,000-Foot Perch Setup).
The 6,000-foot OBFM setup begins outside the Bandit’s TC and CZ.
4.6.3.1.1 Objective. The objective is to kill the Bandit. A commonly desired learning objective is to accomplish the kill within 720° of turn.
4.6.3.1.2 Game Plan. The initial game plan is to fly towards the Bandit’s TC, execute an on-time TC entry, and assess for the ability to enter the Bandit's WEZ.
4.6.3.1.3 Initial Move. When the Bandit begins his break turn at the “FIGHT’S ON,” the fighter is outside of the Bandit’s TC. The fighter must drive to the Bandit’s TC in order to fly CZ BFM. Rolling out and pointing to the Bandit’s location at the “FIGHT’S ON” is the easiest way to drive to his TC. While rolled out and in level flight, the fighter must begin power modulation to arrive at the Bandit’s TC with the briefed airspeed. Typically, standing up the throttles maintains this airspeed, but additional power modulation will be required if the “FIGHT’S ON” airspeed was slightly fast or slow. Finally, the fighter must recognize and enter the Bandit’s TC.
4.6.3.1.4 TC Entry Recognition Cues. Recognizing the proper TC entry cues proves vital to flying effective BFM. In any fighter, fighting any Bandit, from any range setup, the fighter is at the TC when AN INCREASE IN THE AFT LOS RATE OCCURS AND THE AA OF THE BANDIT STOPS INCREASING. Due to the low turn rates of the T-38C, the initial increase in LOSR and the AA increase is relatively subtle compared with more maneuverable aircraft. Rapid increase in Bandit LOS is the primary TC entry cue, but a few crutches exist to help see this sight picture. The most common crutch uses the Bandit reaching the inside edge of the rearview mirrors on the canopy bow. Other crutches include counting 2 to 3 seconds after rolling out at the “FIGHT’S ON,” or starting the turn when the Bandit reaches 11 or 1 o’clock. These crutches only work under the specific conditions of a T-38C fighting a T-38C from a 6,000-foot setup with 30° to 40° of AA where the Bandit executes a 5G break turn.
4.6.3.1.5 TC Entry Mechanics. Upon seeing the TC entry cues, begin the AGSM, select MAX afterburner, and use 1G roll to set the LV. An LV setting to slightly below the Bandit brings the fighter’s nose below the horizon and sets up for an effective rate right. After setting the LV, return the stick to neutral and smoothly apply aft stick until reaching 5Gs. Physical cues for 5Gs include the G-awareness feeling and inflation of the G-suit. Once reaching 5Gs, smoothly blend the aft stick pressure to obtain light buffet, airspeed sustaining feel. Cross-check the HUD to ensure airspeed is remaining steady. Continue to hold the POM on the Bandit (LV slightly above the Bandit) and maintain the airspeed while watching for LOSR cues from the Bandit. A quick laundry list of the actions that need to occur at the TC entry follows:
• Power – MAX.
• LV - On to slightly below the Bandit.
• Pull to 5Gs and blend to light buffet feel.
4.6.3.1.6 Maneuvering to the CZ. After entering the Bandit’s TC, the next step is to maneuver to the Bandit’s CZ. To do this, use the concept of the assessment window. This is the point on the canopy bow approximately one to two fists above the canopy bow where the Bandit’s range, AA, and closure can be assessed. Ultimately, continuous assessment of the Bandit is the goal, but the assessment window provides a defined snapshot point on the canopy bow. Until the Bandit reaches the assessment window, the majority of the BFM cross-check should split between the Bandit and own ship parameters of power, LV, G, and airspeed. Bandit LOSR is another effective tool to judge rate fight success. Bandit LOS toward the canopy bow indicates one of two things. In an aligned TC rate fight, it indicates a winning rate fight as long as it is not occurring as a result of bleeding own ship knots. In the misaligned TC rate fight, this indicates apexing outside the TC and starting to point back inside the Bandit TC (See Figure 4.12). Bandit LOSR away indicates the exact opposite—a losing rate fight with an aligned TC or flushing outside the Bandit TC in a misaligned TC rate fight. The assessment window occurs as the Bandit is pulled down to one to two fists above the fighter’s canopy bow. This position allows the fighter to determine whether or not they are established in the heart of the Bandit’s CZ (30 AA and 3,000 to 3,500 feet). From the assessment window the fighter can determine which BFM steps to take next.
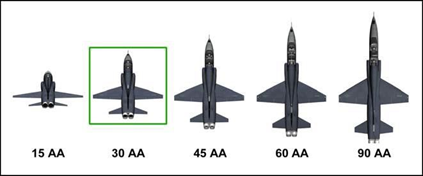
Figure 4.12. Estimating AA.
4.6.3.1.7 Assessing the Bandit. When the Bandit reaches the assessment window, analyze his range, aspect, and closure. Commonly briefed cues to search for include 3,000 feet of range, 30° to 45° of aspect, and steady, controllable closure (referred to sometimes as the “rule of threes”( Figure 4.13). Details on the Bandit’s jet provide the most accurate method to determine range. At 3,000 feet, the Bandit has a clearly visible canopy and canopy bows, distinct lines where the wings and tail meet the fuselage, and clear lines where the colors on the paint scheme change. As a crutch,
~0.5 to 0.6 on the AAT is a good cross-check of ~3,000 feet. To determine 30° of aspect, refer to the wingspan-versus-length relationship discussed in paragraph 4.2. To determine acceptable closure, the Bandit’s jet should slowly grow larger. If his jet is rapidly growing larger or smaller, improper closure exists. If all three cues from the Bandit’s jet are seen in the assessment window, continue to pull the Bandit into the HUD and kill. If one or more of the cues are not met, execute an ease repo as described in paragraph 4.6.3.1.8. An ease repo will help solve range and aspect problems by realigning TCs.
4.6.3.1.8 Ease Repo. If the range, aspect, and closure cues are not met at the assessment window, execute an ease repo to drive the range and aspect lower. An ease repo drives the fighter’s jet back toward the Bandit’s TC, reducing aspect in the process. Execute an ease repo by relaxing back-stick pressure to reduce G, freezing or reversing the Bandit's LOS. Closure and AA will decrease. Hold the ease repo until aft LOSR increases. (TC entry cue). Select MAX afterburner, reset the LV on the Bandit, and blend the G back in. Maintain the airspeed sustaining feel until the Bandit again enters the assessment window. Assess the Bandit again, and either execute another ease repo or trade energy for nose position in order to employ ordnance.
4.6.3.1.9 Transition to a WEZ. This series of MAX performance turns, assessments, and repos establishes the fighter in the heart of the Bandit’s CZ. From this position, the fighter can employ high Pk weapons. Though the gun is the weapon of choice for killing the Bandit during OBFM, take advantage of any AIM-9 opportunities when the Bandit is in the HUD.
4.6.3.1.9.1 POM. Additionally, due to own ship maneuvering, the Bandit may actually be in a POM that requires a climb to position the Bandit in the HUD. In order to maintain the energy and ability to collapse the range while preserving energy, pull to ensure lead before aligning the POM and expect a throttle setting of MAX afterburner to "climb the hill" to the Bandit's POM.
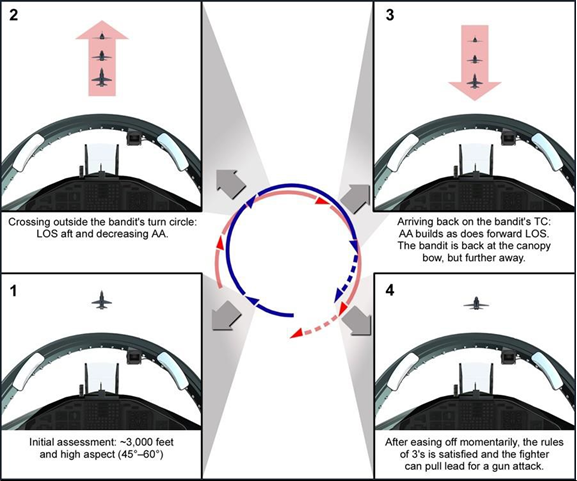
Figure 4.13. Canopy Bow Assessment: High AA at ~3,000 Feet (Offset TCs).
4.6.3.1.9.2 Throttle Techniques. To prevent excessive overtake, reduce power based on the degree of LOSR towards the HUD. At light buffet feel on the jet, if the Bandit is marching quickly towards the HUD, pull the power to IDLE when the Bandit is between the canopy bow and the HUD. If the LOSR is slow with light buffet pull, reduce power commensurate with that LOSR. Once the Bandit is in the HUD, reduce power based on the jet feel required to hold the Bandit in the correct amount of lead for the gunshot; a "smooth" jet-to-light buffet will only require IDLE power; light-to- moderate buffet will normally require throttles "stood up"/MIL power; moderate-to- heavy buffet will normally require MAX afterburner.
4.6.3.1.10 Missile and Gun Mechanics. Reference the detailed discussion on weapons employment in paragraph 4.6.2.2 (heat-to-guns exercise).
4.6.3.1.11 Repositioning From the Gunshot. Four factors drive the need to repo from a gunshot: range, AA, closure, and G. Range includes both maximum and minimum ranges. The repo must occur in time for the fighter to remain outside the TR bubble. Exact timing depends upon AA and closure but usually occurs between 1,500 feet and 1,800 feet. Training rules permit gunshots well outside comfortable AAs when employing a T-38C. When AA increases above 60 (Bandit’s length twice his width), repo to prevent excessive closure. As aspect increases, angular closure also increases. Additionally, any difference in airspeed between the fighter and Bandit creates closure. If the Bandit’s jet is rapidly growing larger, repo to prevent a Bandit reversal opportunity. Finally, if fighter is in MAX afterburner and moderate buffet with no LOSR towards HUD and not enough lead required for the gunshot, adequate radial G is not available. Repo to regain energy and reestablish a CZ position. To execute the repo, select idle, use 1G roll to set the LV to 90° out of the Bandit’s POM (should be almost straight up),and pull to moderate buffet or SRB. Wait for standard TC cues (LOSR away and AA stops increasing), then select MAX afterburner and set LV on the Bandit. Assess the Bandit’s reaction to the repo. The Bandit either continues the turn or attempts to reverse to a neutral or offensive position. Bandit LOS away from the HUD indicates the Bandit is continuing the turn. Little to no LOS combined with the Bandit resetting his LV toward the fighter indicates a Bandit reversal.
4.6.3.1.11.1 Bandit Continues the Turn. An effective repo at 1,500 feet to 1,800 feet will force a smart Bandit to continue his turn. Continue to pull to 90° out of the Bandit’s POM to force LOS and reverse the turn to arrive back in the heart of the CZ. Ensure MAX afterburner, use 1G roll to set the LV on the Bandit, and smoothly pull to moderate buffet until the Bandit enters the assessment window. During this pull, adjust the LV as required based upon the altitude available to sustain a moderate buffet turn. Cross-check the floor and begin a floor transition as required. As the Bandit enters the assessment window, reassess the attack cues and either pull the Bandit to the HUD for a kill or execute another repo as required to solve the range, aspect, or closure.
4.6.3.1.11.2 Bandit Reverses. A Bandit reverses in an attempt to go neutral or offensive. If the repo occurred early enough for the fighter to return to the CZ, the Bandit’s reversal presents an opportunity for a quick AIM-9 or gun kill. Capitalize on the Bandit’s mistake with valid weapons employment. If the Bandit reverses at a closer range, fight to maintain 3/9. Roll at 1G, reorient the LV to 90° out of the Bandit’s POM and pull to moderate buffet. Select MAX afterburner to maximize nose rate and gain an altitude advantage over the Bandit. A Bandit that reverses within one aircraft turn radius forces the fight into a scissors. Reference the DBFM section for scissors mechanics.
4.6.3.1.12 6K OBFM Contingencies:
4.6.3.1.12.1 Fighter No Joy. Most no-joy situations in OBFM occur from the fighter’s improper BFM cross-check. After recognizing the no-joy situation, simultaneously lag the Bandit’s last known position while calling “No Joy” and clearing flightpaths. Expect a “Continue” call from the Bandit and scan the Bandit’s last known position to reacquire the tally. If at any time safety of flight is in doubt, call “KNOCK IT OFF” IAW the training rules.
4.6.3.1.12.2 Bandit Tighten Down (TD). A Bandit with available energy will TD as the fighter’s nose approaches pure in order to create aspect and closure problems for the fighter. Recognize a TD with the increased aspect and closure created by the Bandit. If the Bandit tightens down while still outside the HUD, execute an ease repo to solve the aspect and closure problems. If the TD isn’t recognized until the Bandit is inside the HUD, execute a larger repo to fly back to the Bandit’s CZ. The Bandit will be at a lower energy state post TD and less likely to create significant problems through subsequent TDs.
4.6.3.1.12.3 Bandit Jinks. Jinking Bandits are discussed in more detail in the 3K OBFM section (paragraph 4.6.3.2.11.3). Use the same techniques in 6K OBFM to defeat a jinking Bandit as in 3K OBFM. In general, assess the Bandit’s jinks for effectiveness and either employ weapons if ineffective or repo if effective.
4.6.3.1.12.4 Floor Transition. A smooth floor transition sustains energy for a fighter’s floor fight while a floor save depletes energy in order to remain above the floor. Recognize an approaching floor through a proper BFM cross-check of altitude and not avionics warnings. One technique for beginning a floor transition is the 10° rule. Begin the floor transition 1,000 feet above the floor for every 10° of dive angle. For example, at 20° nose low, begin the floor transition 2,000 feet above the floor.
4.6.3.1.13 Floor Fight. Hold airspeed instead of G during a floor fight for best rate. Use any TR above the floor to maximize rate. Be patient as the maximum nose rate for a floor fight will be less than a normal fight, but the Bandit’s turn performance is affected by the floor as well.
4.6.3.2 Short-Range OBFM (3,000-Foot Perch Setup).
The 3,000-foot OBFM setup begins inside the Bandit’s CZ.
4.6.3.2.1 Objective. The objective is to kill the Bandit. A common desired learning objective is to accomplish the kill within 540° of turn.
4.6.3.2.2 Game Plan. The initial game plan is to attempt a gun shot while assessing the Bandit’s initial reaction.
4.6.3.2.3 Initial Move. At the start of the 3,000-foot BFM engagement, simultaneously roll to place the LV on the Bandit while evaluating the Bandit’s defensive response. With the LV on or slightly below the Bandit, aggressively increase G to pull lead to solve the gun solution (POM, range, and lead). Power settings are based on aircraft feel, relative LOSR, and closure.
4.6.3.2.4 The Bandit Who Breaks Level or Jinks Up. If the Bandit fails to maneuver out of plane and/or does not jink effectively to create closure problems, the offender should be in a position to continue the gun attack. In the 3,000-foot OBFM setup, gun range is nearly solved requiring a momentary pause to get to 2,500 feet. Refine POM by maneuvering the aircraft as to place the gun cross “+” on the HUD along the Bandit’s extended flightpath and establish the requisite amount of lead to take the shot. Continue to assess for cues to repo.
4.6.3.2.5 The Bandit Who Jinks Downhill. The Bandit may jink down and into the offender to spoil the gun solution and create a closure problem. Preserve TR by executing a repo to control closure velocity (Vc). The repo should include momentarily setting the LV back to the Bandit's CZ, pulling away to help generate LOS away (from the offender), and then aggressively realigning the TCs. Following the TC entry, select MAX afterburner and set the LV initially halfway between the Bandit and the horizon. Execute a moderate buffet turn shy of the wing rock or just short of the stall turn to follow the Bandit’s extended flightpath. Cues of max performing the aircraft during the turn include moderate buffet and airspeed not increasing. Continue to adjust LV and pull while maneuvering back into a position (in the CZ) to assess for a WEZ opportunity.
4.6.3.2.6 CZ Maneuvering. Once established in the CZ, most of the BFM concepts from medium-range BFM apply (paragraph 4.6.3.1.6).
4.6.3.2.7 Follow-on Maneuvering. In addition to the concepts and considerations discussed in the medium-range section (paragraph 4.6.3.1), consider the following:
4.6.3.2.7.1 Repos. The repo is a lag maneuver designed to reduce AA, increase range, and decrease closure. Some reasons for executing a repo include: Bandit blows up, excessive closure, approaching briefed minimum slant range (i.e., bubble), or Bandit changes the POM. If closure is excessive, a high aspect gunshot is attempted, or a BFM error occurs, a flightpath overshoot may be imminent. The first key is to preserve the offensive by recognizing the potential overshoot early, and performing an out-of-plane lag maneuver called a quarter plane.
4.6.3.2.7.2 Quarter Plane Maneuver. After recognizing a potential overshoot, roll to place the LV 90° out of the Bandit’s POM and execute a moderate buffet pull shy of the wing rock/stall in idle power to arrest closure and try to generate LOSR away. Once the overshoot is controlled, visualize the CZ and fly to that point by placing the LV back on the Bandit and turning to align the fuselages.
4.6.3.2.7.3 Bandit Reversals. During the quarter plane, the defender may reverse, placing his LV on or near you and executing a maximum performance turn. In this case, continue to analyze where the defender's CZ is and pull towards it so as to avoid the bubble. Your goal in this situation is to regain the offensive advantage by outperforming the Bandit and minimizing your forward ground track. There are two ways to do this: the tree and the scissors. Both minimize forward ground track in different ways. The tree (both high and low) minimizes the forward ground track with airspeed. In the scissors, minimizing forward ground track is accomplished by turning your jet with a minimized turn radius. To determine which to enter, the HCA at the flightpath overshoot must be assessed. Anything <120° of HCA will result in a tree. Greater than 120° of HCA at the overshoot will result in a scissors.
4.6.3.2.7.3.1 Tree. The fighter should select IDLE power initially and set the LV to level flight. Pull to the moderate buffet shy of the stall/wing rock and reapply MAX afterburner at ~175 to 200 knots in order to catch around 150 to 160 KIAS. The tree is now established. To get back to an offensive position, remain loaded at moderate buffet shy of the wing rock and attempt to fly shallow ‘S’ turns using rudder only (ailerons will drop the wing and result in loss of subsequent lift). Attempt to stay within 2,000 feet vertically of the Bandit as any more vertical is nearly impossible to use in the T-38. The combination of the slow airspeed and the ‘S’ turns will lead to a minimized forward ground track. Once greater than 3,000 feet of lateral spacing is achieved behind the Bandit, transition to OBFM.
4.6.3.2.7.3.2 Scissors. For HCA greater than 120° at the flightpath overshoot, the best way to minimize forward ground track is by entering a scissors. To enter the scissors at the flightpath overshoot, place the LV just above the Bandit such that the fighter will not encroach on the bubble. If possible, place the LV on the Bandit. Any higher placement of the LV will open the turn radius in relation to the Bandit and increase forward ground track. Once the LV is set, select MAX afterburner and pull to the moderate buffet shy of the wing rock/stall to minimize the turn radius. Ensure bubble deconfliction approaching the following flightpath overshoot and reverse at the TC entry cues (rapid LOSR increase across the ground and AA stops increasing). By better performing the jet in MAX afterburner and moderate buffet shy of the wing rock, the Bandit will have a larger forward ground track. Once ~2,500 feet of lateral spacing behind the Bandit is achieved, transition to OBFM.
4.6.3.2.8 3K OBFM Contingencies:
4.6.3.2.8.1 Fighter No Joy. Offensive maneuvering remains the same as medium- range BFM. The fighter must ensure strict adherence to training rules with respect to communications and fighter maneuvering.
4.6.3.2.8.2 Closing in Lag. If the fighter fails to max perform the aircraft post initial repo, the resulting increased turn radius and airspeed can generate cues of closing in lag where the fighter creates a faster turn rate along a larger circle. This is indicated by AA and range decreasing with the nose still in lag. The end result if allowed to continue will be insufficient weapon separation. Once recognized, the first corrective action is to attempt to max perform the aircraft, specifically more AOA. If closing cues are recognized late, then a repo will be required to maneuver back to the CZ. This lag repo is essentially the same as a one-fourth plane—select IDLE power, roll to 90° out of the Bandit’s POM and pull to the moderate buffet shy of the wing rock while waiting for range to open and LOSR away.
4.6.3.2.8.3 Jinking Bandit. Anytime the Bandit attempts to jink, the Bandit is expending energy to spoil POM. At high energy states, these jinks will be very effective at spoiling POM. Follow-on jinks will start with decreased energy, resulting in less effective changes to POM. If the Bandit’s jinks are assessed to be effective enough to spoil POM, the fighter should repo to preserve TR and seek a quick follow on WEZ for a Bandit with a depleted energy state.
No comments to display
No comments to display