
4.7 Defensive BFM (DFBM).
4.7 Defensive BFM (DFBM).
The goal of DBFM is to train the fighter pilot to survive while maneuvering from a position of disadvantage. The correct mindset is critical to DBFM, and a will to survive is paramount. Unlike offensive, DBFM requires the pilot to max perform the aircraft, while spending increased time looking backwards. The focus should be on surviving for as long as possible and creating problems for the Bandit based upon your current situation. So long as you are still alive and have a working aircraft around you, you are winning. NEVER GIVE UP! In addition to the proper attitude, you must be able to visually identify (ID) the aircraft behind you ("is that a MIG-25 or an SU-27?"). Likewise, you must know both the threat aircraft and the pilot's capabilities. At what altitudes/airspeeds does your aircraft outperform his? What types and how many missiles does he carry? How far off-boresight can he shoot those
missiles? Is his gun canted up or down (or does he have a gun at all)? The fighter pilot must know this information before the engagement begins. The Bandit WEZ for IFF is depicted in Figure 4.14. Bottom Line: Know the threat before you fight it. In order of priority the objectives in DBFM are:
• SURVIVE.
• Defeat the Initial Attack.
• Deny Subsequent WEZ.
• Defeat Subsequent Weapons.
• Neutralize, Separate, or Go Offensive.
4.7.1 Perch Setups.
Perch setups will be executed IAW the squadron standards and/or IFF Playbook. The “push it up” mechanics will be the same as OBFM. Since it is imperative that you see the Bandit during the fight, you need to position your body to obtain the maximum rearward visibility. While on the ground, maneuver in the cockpit to ensure you can visually see the opposite horizontal stab. This will equate to the required body position under G in order to maintain the tally. During the setup, rotate your upper body and adjust body position to ensure the stick and throttles are still accessible for full range of motion. A common technique is to lean forward and look "around" the seat back. Do not attempt to support the weight of the head and helmet by neck muscles alone. The second common error is to look forward under heavy G and then relax the Gs in order to look back at the Bandit. Improper body positioning during G-onset can lead to a loss of tally and possibly even injury.

Figure 4.14. IFF Bandit WEZ.
4.7.1.1 6K Perch Setup.
Once “ready,” the flight lead will direct a check turn into the fighter. After turning 45, roll out wings level. Maintain level flight and simultaneously prepare for the defensive body position and begin to assess the Bandit. At this point, it is fundamental to begin a cross-check between the Bandit and one’s own ship parameters. Wait until the Bandit has achieved pure pursuit to reverse the turn. The defensive fighter will be responsible for maintaining the airspeed contract, remaining level, and setting 30 to 40 of AOT. This will require you to start your DBFM cross-check during the fight setup. While looking backwards, assess and correct AOT (Figure 4.15). At 30 to 40 AOT, the Bandit should be above the wingtip. A common technique is to put the Bandit a fist distance away from the rear canopy bow and two fingers above the horizon. During the setup, occasionally reference the HUD and focus on airspeed (setup dependent) and the FPM to ensure level flight. Initially, your time will be divided equally between looking backwards and glancing at the HUD. However, the closer you get to the “FIGHT’S ON,” the more time you should spend looking at the Bandit, ready for the initial move.
4.7.1.2 3K Perch Setup.
Unlike the 6K defensive setup which requires the defender to maintain the same briefed airspeed as the pre “check” airspeed, the 3,000 feet setup requires slowing down. Decelerating from 350 knots and arriving at the “FIGHT’S ON” with less than 320 knots and 30° to 40° of AOT is a challenge. During the initial check turn, modulate power and pull to the buffet to bleed down to 320 to 330 knots; then allow the jet to decelerate the last 5 to 15 knots with throttle modulation after you have reversed your turn and have set the desired AOT.
4.7.2 DBFM Exercises:
4.7.2.1 Defensive Ranging Exercise.
Start from a standard 6K perch setup with the following exception: the Bandit will pull pure from 9,000 feet to 6,000 feet and then call “FIGHT’S ON” at 6,000 feet. At this point, the Bandit will roll out momentarily showing a “lag” pursuit curve. Then the Bandit will pull “pure” and then “lead” closing into a valid gun WEZ. The Bandit will continue closing the range and fly behind the fighter to not enter the 1,000-foot bubble.
4.7.2.1.1 Purpose. To familiarize the student with the defensive perch setup and to identify and practice assessing pursuit curves and ranges. The pure pursuit Bandit from 9,000 to 6,000 feet that is approaching the 6,000 feet “FIGHT’S ON” range is designed to calibrate long range estimation. Bandit pursuit course after momentarily driving to lag at 6,000 feet is designed to have primary emphasis on WEZ recognition (Figure 4.14). The Bandit will show “lag, pure, lead,” and drive all the way to the bubble. See Figure 4.16 for defensive assessments of Bandit pursuit curves.
4.7.2.1.2 Mechanics. After the check away, reverse back when offender is pure to maintain tally/altitude/airspeed. Power modulate to slow from 415+10 knots to 350 knots while slightly descending. Hold Bandit at 30° to 40° AOT (approximately 2.5 to 3 Gs). The primary task is Bandit assessment. Assess pure, lag, and the transition from lag to pure to lead as range decreases. In addition, assess the cues indicating the Bandit is in the AIM-9 WEZ (pure) and gun WEZ (lead). As the Bandit approaches the bubble, he will repo to lag. Roll out, wings level and quickly move your visual scan from to the opposite side of the aircraft. You will see the Bandit on the opposite side of the canopy, just outside the bubble (1,000 to 2,000 feet with low HCA). The exercise will end with a Terminate or KIO call.
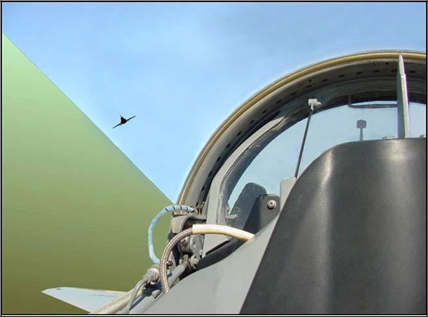
Figure 4.15. Setting the “FIGHT’S ON” AA.
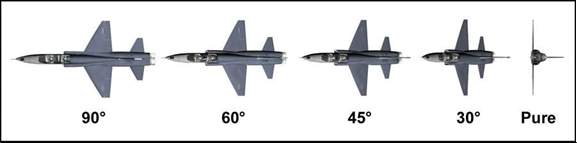
Figure 4.16. Bandit Lag Assessment.
4.7.2.2 Reversal/Scissors Exercise:
4.7.2.2.1 Purpose. The purpose of the reversal/scissors exercise is to recognize and defend against a Bandit that continues to pull lead, identify the reversal picture, and execute a reversal. Following the reversal, the exercise continues with an entry into a scissors fight to gain the 3/9 advantage from the Bandit.
4.7.2.2.2 Initial Move. Execute a defensive break turn and assess the Bandit’s pursuit curve. However, recognize that the Bandit will transition from pure to lead for a high- aspect gun attempt as he approaches a high-angle gun WEZ. Prior to the Bandit achieving pure pursuit, execute an out-of-plane maneuver to defeat the gun attempt. Assess the Bandit’s position for a reversal opportunity.
4.7.2.2.3 The Reversal. As the Bandit overshoots, assess the Bandit's LOSR, range, and HCA. There are several combinations of range and HCA that could present a reversal opportunity; high HCA combined with close range (generally inside of 2,000 feet) and/or high LOS may allow for a successful reversal. Figure 4.17 shows two typical reversal pictures: the lower HCA, repo near the bubble, and the higher HCA, rangier result of a Bandit attempting a high-angle gunshot. If in doubt, do not reverse and continue to turn while monitoring the overshooting Bandit.
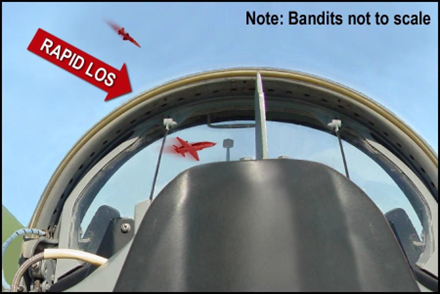
Figure 4.17. Two Common Reversal Pictures.
4.7.2.2.4 Reversal Mechanics. Simultaneously use an unloaded roll to reverse your turn and move your visual scan to the other side of the canopy to regain the tally. LV position will depend on HCA and LOS when the reversal is initiated. The higher the HCA and LOS, the closer to the Bandit you can initially place your POM to use as much of the in-plane TR as possible. With low HCA and LOS, you must ensure POM is not on the Bandit to prevent pressing the bubble. In this case, whether you place your POM above or below the Bandit will depend on his nose position. If the Bandit already has the high ground, go low and vice versa. Reference scissors mechanics in the OBFM section (paragraph 4.6).
4.7.2.3 Jink Exercise:
4.7.2.3.1 Purpose. The purpose of the jink exercise is to identify the Bandit’s gun WEZ and practice guns jinks. Jinks are last-ditch maneuvers to spoil POM and create closure.
4.7.2.3.2 Mechanics. Prior to the “FIGHT’S ON,” maintain setup parameters. Primary emphasis should be on assessing Bandit range for WEZ (Figure 4.14). At the “FIGHT’S ON,” immediately select IDLE power, unload and roll to set LV below the Bandit. Perform an aggressive symmetric, maximum onset rate, two-hand, stick in the lap pull and hold until the aircraft aerodynamically stalls. Assess the Bandit. If the Bandit is still in lead, jink again. You must break the AOA prior to resetting the LV. Be careful not to push forward on the stick as you reset your POM as this may introduce negative Gs. While maintaining IDLE power, reset LV out of plane (OOP) with the Bandit (opposite vertical side of Bandit from the first jink). Perform another aggressive symmetric, maximum onset rate, stick in the lap pull using two hands, and hold until the aircraft aerodynamically stalls. Assess the Bandit. Continue jinking until the Bandit repos. The Bandit will continue to threaten until forced to repo, presenting a reversal picture. Reverse and maneuver to gain 3/9. Reference reversal and scissors mechanics from OBFM. Power as required when necessary for own ship EM to ensure effective maneuvering. Use caution jinking down within 1,500 to 2,000 feet from the floor.
4.7.3 DBFM Sets:
4.7.3.1. Medium-Range DBFM (6,000-Foot Perch Setup). The Bandit begins slightly inside of your TC and outside the CZ.
4.7.3.1.1 Objective. The objective is to survive.
4.7.3.1.2 Game Plan. The game plan is to execute a break turn and assess the Bandit's reaction.
4.7.3.1.3 Initial Move (The Break Turn). To survive this engagement, the first thing you must do is Defeat the Initial Attack. You do this by rotating your WEZ away from the Bandit's WEZ. Execute a defensive break turn, looking over your shoulder at the Bandit to assess his pursuit curve. Select MAX afterburner, set the LV on or slightly below the Bandit, and pull to target G; 5.0 to 5.5. The G should feel the same as a during G-awareness maneuver. Continue to “squeeze” the G to the SRB and simultaneously assess the Bandit’s pursuit curve. Due to power and G limitations, the Bandit will be forced immediately outside of your TC. For the AIM-9P, more than 45° of AA is needed to defeat the missile, or prevent the Bandit from taking the shot. The break turn should be LV on and at max allowable G to generate as many angles, minimize vertical TR for the Bandit, and maintain airspeed. Figure 4.9 shows an additional advantage of a max performance turn while the Bandit is outside your TC. Each second the Bandit is outside your TC, you will generate 12 to 13 more degrees of turn, which are angles the Bandit will has to make up once he enters your TC. Once the Bandit is on/inside your TC, your rate advantage will decrease to about 2° (assuming a 10.5 to 11 degrees per second (deg/sec) Bandit turn rate). MAX performing your aircraft is essential in maintaining this advantage and achieving the objectives.
4.7.3.1.4 Pure/Lead Bandit. If the Bandit continues in pure pursuit or pulls lead, immediately transition to a TD maneuver. Timely assessment of this pure/lead Bandit is critical as he is only moments away from employing ordnance. In this case, you will not see LOS aft and the Bandit’s AA will not change. To transition from the defensive break turn to a TD maneuver, continue the break turn mechanics while raising the LV to on the Bandit and apply max allowable G. Continue to assess the Bandit. Continue to pull max allowable G to the buffet as you slow down. You will see forward LOS and range decrease as the Bandit approaches a WEZ. Prepare for guns defense. Recognizing the WEZ and honoring the Bandit’s nose with guns defense is paramount. The Bandit who stays pure will have a fleeting snap at the back edge of the WEZ. Your cue to start the OOP will be pure pursuit with range collapsing inside of 3,000’. The Bandit who aggressively pulls lead will have a high- angle snap shot at a closer range. Mechanics for these pictures will be IAW paragraph
4.7.2.2 (Reversal/Scissors Exercise).
4.7.3.1.4.1 OOP Components. There are two components to this OOP: (1) Change POM to defeat the gun attack, and (2) continue to assess the Bandit for follow-on game plan selection (i.e., reverse or continue the turn in a min radius fight).
4.7.3.1.4.2 OOP Mechanics. Quickly reduce G to break AOA and reset the LV to get OOP and smoothly pull back to the moderate buffet. If the Bandit is below you and you’re looking at the top of his jet, consider an OOP uphill. This moderate buffet pull will immediately create problems for the Bandit and will require follow-on maneuvers (i.e., repo or high-aspect GUN attempt). Do not hesitate to transition to your follow-on game plan.
4.7.3.1.4.3 Assess and Select a Game Plan. Assessment must occur during the OOP. If you see high LOS due to high HCA and/or close range, reverse (Figure 4.18). If you don’t, or are in doubt, continue with the turning fight and transition to a min radius game plan.
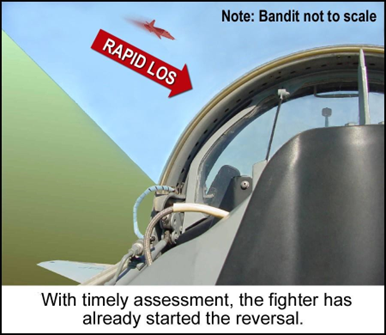
Figure 4.18. Reversal Cue, Lead Bandit.
4.7.3.1.4.4 Reversal. Versus a Bandit that pulls excessive lead for a high-aspect gun attempt, you will see high HCA and can afford to initially roll your LV closer to the Bandit without pressing the bubble. Fight to gain a 3/9 advantage and look for WEZ opportunities. Refer to Reversal discussion beginning with paragraph 4.7.2.2.4.
4.7.3.1.5 Lag Bandit. In order to transition from the defensive break turn to the sustained-rate game plan, you will need to refine your LV. Begin your DBFM cross- check, but don’t look forward for any longer than an occasional cross-check. Alter your LV as required to max perform the aircraft. Subsequently, refine your LV, striving for a sustained-rate fight airspeed and optimum rate fight.
4.7.3.1.6 Bandit Assessment. Continue to assess the Bandit; you will either be winning or losing the rate fight (Figure 4.19). Winning cues include: forward LOSR with range and HCA increasing (as you pull the Bandit into deeper lag). Losing cues include: aft LOSR with range and HCA decreasing.
4.7.3.1.7 DBFM Cross-Check. Cross-check LV, G, and airspeed to refine your optimum rate fight. The following are common errors and their corrective actions:
4.7.3.1.7.1 High Airspeed. Ensure max allowable G, apply a power reduction, and/or raise the LV to reduce airspeed. How much of each depends on the severity of your airspeed error. Take caution readjusting LV to prevent an asymmetric over-G.
4.7.3.1.7.2 Low G. If you are holding 400 knots or less, but sustaining 5 or less Gs, your LV may be too high. Slowly move your LV lower and smoothly increase the G. Additionally, cross-check engine operation and throttle placement.
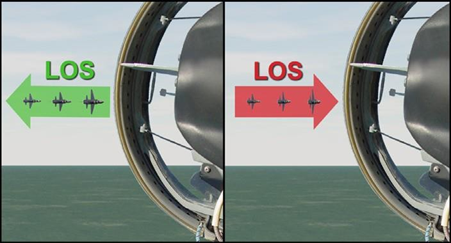
Figure 4.19. Winning and Losing LOS Cues.
4.7.3.1.7.3 Getting Too Slow. The LV is too high, but in this case you have already traded your airspeed for G in an attempt to keep target G or better. Deliberately lower your LV towards the game plan pitch picture, or lower. You must include altitude in your BFM cross-check to build floor awareness. See Floor Transition (paragraph 4.7.3.3.5). Additionally, cross-check engine operation and throttle placement.
4.7.3.1.8 Separation (Figure 4.20). Whether out of ordnance or fuel, or in a multi- bogey environment, the overall tactical circumstances may demand that you leave the fight. Regardless, none of these reasons is worth giving the Bandit an easy AIM-9 opportunity. Make sure your assessment is accurate and, if in doubt, don’t attempt the separation.

Figure 4.20. Separation Cues.
4.7.3.1.8.1 Separation Decision. If the Bandit is trending towards 90 of HCA (approximately 45 AOT and 45 plan form) and greater than 6,000 feet, consider separating. Trend information is important; you should see the Bandit getting smaller over time and lag increasing (Figure 4.20). A good range cue is to ensure the Bandit looks smaller than a T-38 in tactical formation and decreasing in size. Continue to assess the Bandit for winning and losing cues.
4.7.3.1.8.2 Separation Execution. If the cues to separate exist but altitude and airspeed are unknown, take a glance forward and cross-check own ship parameters. If slow and close to the floor, reconsider separating. With awareness of airspeed and altitude, reassess the Bandit and if separation cues exist, leave the fight. Use MAX afterburner and unload to less than 1G to increase airspeed as quickly as possible. A technique is to leave the bank in during the unload to mask the separation longer. Attempt to maintain tally or awareness of the Bandit's nose position while keeping an eye on the pending floor transition. Use of a small check turn during the separation will assist in tracking the Bandit, although do not turn too much. Continue to monitor the Bandit nose position and dispense countermeasures as required to defend against potential weapons employment from the Bandit.
4.7.3.1.9 Mature Fight Guns Defense. During the fight, if the Bandit demonstrates the ability to threaten with nose position, transition from the optimum rate game plan to OOP maneuvers. As soon as the Bandit's nose begins to rotate from lag towards pure at range, transition to the TD, flare, and get ready for guns defense.
4.7.3.1.9.1 OOP Maneuver. The first priority is to recognize the Bandit WEZ and subsequently move the aircraft's POM out of the Bandit’s POM. Whether the first move is up or down will depend on altitude remaining to the floor. Ideally, use gravity to command a downhill maneuver, but if within 1,500 feet of the floor, a level or pullup may be more appropriate. The decision to select an OOP maneuver or a jink will depend on Bandit AA and closure. Assuming you execute an effective TD and get AA to greater than 45°, expect to force the Bandit’s nose off with one OOP maneuver. If AA is less than 45°, you will likely need a series of jinks before the Bandit is forced to repo. Airspeed will also be a factor in game plan selection; full-up jink mechanics above 320 knots will increase over-G potential. (Reference paragraph 4.7.3.2 for jink mechanics.)
4.7.3.1.9.2 Post OOP/Jink. When the Bandit’s nose is forced to lag, look for reversal cues. If you see rapid LOS with high HCA and a Bandit inside approximately 2,000 feet, reverse. If not, continue the turn. SA on altitude in relation to the floor is a must during a mature fight.
4.7.3.2 Short-Range DBFM (3,000-Foot Perch Setup):
4.7.3.2.1 Game Plan. “Jink and assess.” Initial Move: Set power to IDLE, rotate the LV OOP below and towards the Bandit while applying max allowable G. In order to expedite the OOP maneuver, attempt to use both hands to pull the stick towards the seat pan. The aircraft will aerodynamically stall as the nose of the aircraft digs in. Pay attention to the Bandit's nose during the jink. If it’s still pointed at you, a follow-on jink up is required while the Bandit is attempting to adjust to your newly set POM. Reset the LV approximately 90° back above the horizon and jink again. Continue jinking until the Bandit’s nose repos to lag. Assess for reversal cues.
4.7.3.2.2 Jink Timing. Each jink needs to be held long enough to allow the aircraft to begin moving to a new POM. A delay in transitioning to a follow-on POM allows the Bandit to find a gun solution easily. Break the AOA prior to resetting the LV. Rolling the LV with AOA will not allow the aircraft to pivot around its flightpath axis quickly enough.
4.7.3.2.3 Setting the LV. As the Bandit gets closer, POM adjustments must be further away from the Bandit. Remember that POM will always fall below the LV— as the aircraft slows down in subsequent jinks, the difference between the two will increase. The T-38 does not fly well with the nose buried low due to small horizontal stabilizers and limited thrust. As a technique, aim to place the LV approximately 45° above or below the Bandit to ensure adequate POM changes (Figure 4.21).
4.7.3.2.4 Don’t Give Up. While the number 1 priority is initially getting OOP, emphasis must also include increasing aspect and closure to force the Bandit out of the WEZ. If jinks are weak and don’t generate closure, it may take several jinks before the Bandit is forced to lag.
4.7.3.2.5 Follow-On Maneuvering. Your jink sequence will end with the Bandit in a repo. During the repo, assess for reversal cues.
4.7.3.2.6 The Reversal. See paragraph 4.7.2.2.4 for specifics on cues and reversal mechanics. Be aware if you do reverse, HCA will probably be low, requiring your new LV towards the Bandit’s high CZ. You can quickly update it with a tally on the other side of the canopy if LOS, HCA, and/or range allow.
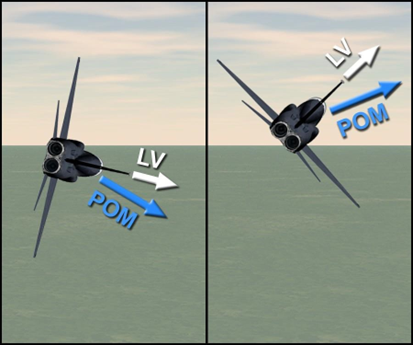
Figure 4.21. 3K DBFM Jink Lift Vector.
4.7.3.2.7 No Reversal Cues. If reversal cues are not present, immediately transition back to a max performing turn. Use MAX afterburner and set the LV as required below the horizon. This may require either a large LV change or none at all depending on if you were jinking above or below the Bandit when he repositioned.
4.7.3.2.8 Pulling to Moderate Buffet. Continue pulling to the moderate buffet in MAX afterburner while maintaining awareness of the Bandit. Airspeed should stay approximately the same throughout the turn. Extreme nose low and high attitudes will affect airspeed. Snapshots to the HUD will be required over time to build SA on attitude and the floor; however, during the first few seconds of the transition to the min radius fight, you should concentrate on the tally.
4.7.3.2.9 Maintain the Tally. Effective jinks followed by a quick transition to the min radius fight will allow you to maintain the tally. You should see plan form and low HCA. Keeping the tally will be extremely difficult unless you start the fight in a good body position and are timely with your game plan selection and execution.
4.7.3.3 Mature 3K Fight. Stay with the turn and keep up with the DBFM cross- check, preparing for a floor transition. Carefully assess the Bandit for a transition to pure/lead and a threatening nose position. As the Bandit approaches an AIM-9 WEZ, flare and immediately transition to guns defense. (Reference mature fight guns defense, paragraph 4.7.3.1.9.)
4.7.3.3.1 Future WEZ Expectations. Given the offset TCs, expect the Bandit to transition to another WEZ. As soon as you see the Bandit’s nose, begin to rotate from lag to pure at range, transition to a TD, flare, and get ready for another OOP and potential reversal opportunity. Despite the high probability of a second WEZ for the Bandit, it is possible that you are able to keep his nose in lag over time. In this case, there MAY be consideration for transitioning from your min radius fight towards a sustained-rate fight. If LOS is stagnant on the canopy and the Bandit’s nose is stuck in 45° of lag or more, with range opening to >4,000 feet, begin the transition to a rate fight. Relax G as much as Bandit will allow in order to gain energy (i.e., airspeed), but keep the Bandit from reentering a WEZ.
4.7.3.3.2 Keep The Tally. You will have aft LOS towards your 6 o’clock, but it will slow down and stagnate near the tail and/or canopy bow (possibly under it). Reference Figure 4.22. Given the Bandit’s high offensive potential, if you lose the tally at this point, you stand a good chance of allowing the Bandit an unobserved WEZ entry. Regardless, DO NOT ease off the pull. If you momentarily go NO JOY with the Bandit under the canopy bow or behind the seat, sustain the G/AOA. Per AFI 11-214, Air Operations Rules and Procedures, you are allowed to TD with respect to “remain predictable” while “no joy.” The TD maneuver will help to reacquire the tally by pulling the Bandit forward on the canopy.
4.7.3.3.3 No-Sight Defense. The primary goal of no-sight defense is to recover the tally while executing a min radius game plan. Make sure you spend the majority of your time scanning for the Bandit while maintaining a frequent cross-check to the HUD for altitude and attitude SA. MAX performing the aircraft in the min radius fight will provide the best opportunity to pull the Bandit forward on the canopy, and regain tally. Additionally, countermeasures dispenser (CMD) should be considered based on fight pacing SA.

Figure 4.22. Keeping the Tally.
4.7.3.3.4 Tally Recovery. SA on the Bandit’s HCA when he flies behind your seat will help you recover it. If HCA was low, look first and longest in the high Pk WEZ (Figure 4.23). If HCA was higher as the Bandit crossed your 6 o’clock, offset TCs will develop and as time goes on move your scan from the WEZ forward on your canopy, zigzagging both high and low.
4.7.3.3.5 Floor Transition. The fight will be going downhill. Your goal is to slowly adjust your LV during a floor transition to eventually level off before reaching the floor. Without a floor transition, you will be forced to roll wings-level in a floor save, which is energy depleting and will straight-line your TC. This could be the difference between keeping the Bandit’s nose in lag or allowing him to point and employ ordnance. To execute an effective floor transition requires the fighter to incorporate altitude in the BFM cross-check. For every 1,000 feet above the floor, you should be no more than 10° nose low. This is referred to as the “10 percent rule.” As an example, with a 9,000-foot MSL floor, you should not be more than 20° nose low passing 11,000 feet. Additionally, consider using a 1,000-foot BARO setting above the BFM floor. This will allow for small errors in LV control during a floor fight. Remember that once at the floor you must fight Ps=0 BFM. Referencing the T-38 EM diagram, you can still see that at Ps=0 you won’t be able to sustain the same G as during the descending, rate fight. (The jet will feel smoother as you are further away from the lift limit line; reference EM diagram, Figure 4.9.)
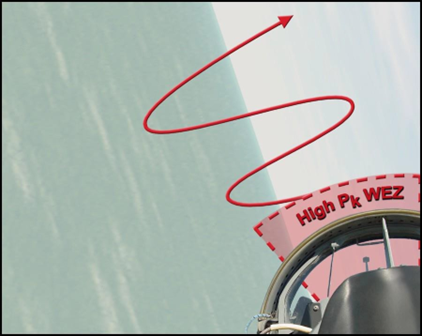
Figure 4.23. Regaining the Tally.
No comments to display
No comments to display