
6.8 Low Altitude.
6.8 Low Altitude.
There are two main reasons why one would be forced into low-altitude tactics. It is usually derived from threats in the AO or from weather. These tactics demand a much higher level of SA and attention to detail than medium-altitude tactics. The biggest focus of low-altitude tactics is task prioritization. SAT sorties are demanding on their own, and much more so when having to perform all the tasks at low altitude. Remember, the biggest threat at low altitude is the ground. Some benefits of low-altitude tactics are surprise and in some cases weapons effects. Some drawbacks are not being able to identify the target, susceptibility to threats, and decrease in fuel efficiency, not to mention increased task loading. All these factors are part of the flight lead’s mission planning and are always being updated once in the battle space.
6.8.1 Low-Altitude Tactical Admin.
Low-altitude tactical administration will be the same as medium altitude. However, task prioritization is a must. Mutual support isn’t just looking out for threats; it’s keeping each other honest with respect to basic aircraft control as well.
6.8.2 Low-Altitude Holding.
There are several ways to hold low altitude; however, the large turn radius of the T-38C limits these options. Here, in IFF, you will hold one of two ways: Racetrack or Figure 8 at approximately 2,000 feet AGL and 350 KCAS. The shape of both is relatively self-explanatory. More specifically, however, you as the wingman should always strive to be in wedge outside of your flight lead looking through him to the target and threat area. Also, whenever possible, your flight lead will attempt to make his holding turns towards the target area. The main reasons for this are target area SA and target ID. By swinging your nose through the target area you keep your visual lookout up and, if able, build your target area SA via a quick steer-point diamond check as the target area passes through your HUD. During low-altitude holding, you must be eyes outside the cockpit during any turns.
6.8.2.1 Figure 8 (Figure 6.9).
In the figure 8 hold, you will again be outside of your lead in a line or wedge formation. Your flight lead will turn away from you towards the target at both ends of the hold.
6.8.2.2 Race Track (Figure 6.10).
In the racetrack, you will be outside of your flight lead in line or wedge formation. Your flight lead will turn as required to keep the flight in the hold; your job is to use geometry so that you always end up on the outside of flight lead, opposite of the threat and target area.
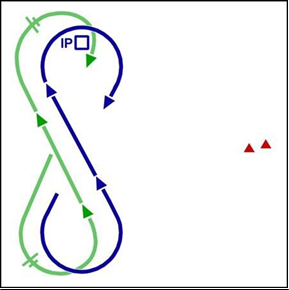
Figure 6.9. Low-Altitude Wedge Figure 8.
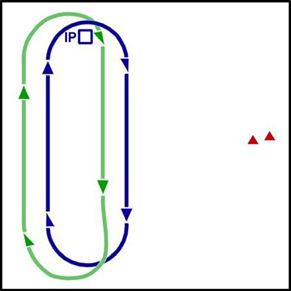
Figure 6.10. Low-Altitude Wedge Racetrack.
6.8.3 Low-Altitude Execution.
Most likely, you will only execute shooters attacks in a low-altitude (high-threat) environment. The concept is that you are not going to stick your nose into the bee’s nest without being offensive in some way. So walking out of the brief you already know your role to be shooter; now your biggest concern is flying the briefed geometry and employing valid ordnance. Remember, the first time you pop your toughest task will be target ID, so good target area study in the brief is key. Although you will see other formations in the future, most attacks low altitude are done from wedge or trail. Below, you will see wedge attacks as common examples of the attacks that you will execute in IFF SAT/CAS missions.
6.8.3.1 Exiting the Low Altitude-Hold.
Since you should be on the outside of the hold looking through lead, he will most likely be turning away from you and, therefore, you must be ready to take advantage of the geometry and your energy to expeditiously achieve the attack formation on the appropriate side.
6.8.3.2 General Contracts:
6.8.3.2.1 Fly Off of Lead. After exiting the hold, flow out to the 45° to 60° wedge cone, and strive to maintain at least 1 NM spacing. At the same time, the flight as a whole will be descending to 500 foot AGL and accelerating to 420 knots. Fly off of your flight lead, remembering to not fly below his altitude, and you will end up pretty close to your desired parameters. Cross-check your RALT, AAT, and KCAS as required.
6.8.3.2.2 Action With/In the Same Direction as Lead. At the appropriate range for his attack, your flight lead will action to pop. When you see his wings crack for this maneuver, you should also begin your action. How much you action will depend on the attack.
6.8.3.2.3 Pop Off of DME. Your flight lead will give you visual cues for when you should be popping. This is usually a specific time in his attack such as wings level on final, or at pickle. These are good cues, but when dropping bombs, your parameters are so specific you will need to use DME from the target as your primary reference for when to pop. The gun is a much more flexible weapon, so you can use your flight lead’s cues as primary, but a DME backup will also be given.
6.8.3.2.4 Ensure CFOF. If you didn’t maintain at least 1 NM spacing between the jets, you may find yourself rolled out on final ready to shoot with lead still in the HUD. In all cases, you must comply with applicable ROE regarding CFOF. If you cannot, come off dry.
6.8.3.2.5 SEM Into Lead. Always make your turning maneuver level turn in the same direction that your lead egresses.
6.8.3.3 Low-Altitude Attacks.
Tactics will drive numerous variations in low-altitude attacks; below are some sample attacks that emphasize various roles and attack geometry.
6.8.3.3.1 Gun/Bomb. This is one of the more flexible attacks from low altitude because it allows flight lead to find and “mark” the target while you drop bombs to destroy it. The attack geometry will be built around the bomb pass since the delivery parameters are more restrictive. You should arrive at an action/pop distance that is familiar to you from your range rides (Figure 6.11).
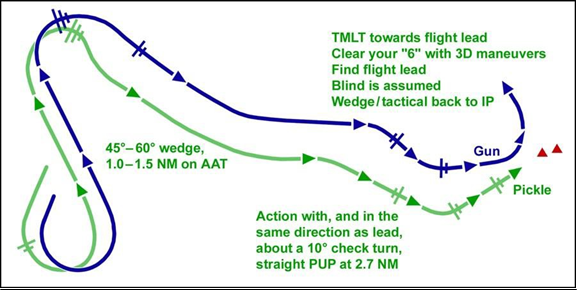
Figure 6.11. Low-Altitude Gun/Bomb.
6.8.3.3.2 Bomb/Gun. When it’s time for your lead to drop his bombs, you will follow him into the target area and kill with the gun or suppress the enemy defenses while he egresses. The primary concern on your pass should be effectively employing the gun and remaining clear of leads frag cylinder. Remember that the frag cylinder of a basic MK-82 is about 3,000 feet in height and diameter. As a general ROT, if you fire by 1.3 NM slant range (under the gun cross) and start your recovery, you will stay clear of the frag (Figure 6.12).
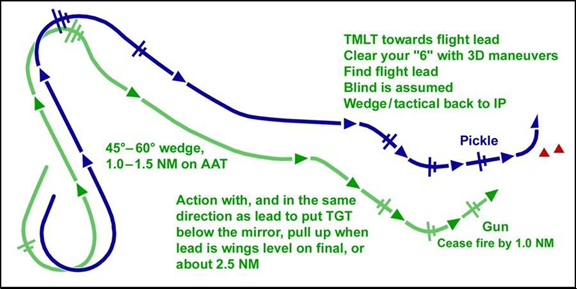
Figure 6.12. Low-Altitude Bomb/Gun.
6.8.3.3.3 Guns. Remember that the gun is a very flexible weapon that can be shot from almost any reasonable distance. A general way to think about your gun shots is that if you have a valid solution in the HUD, the bullets will hit where you are aiming; how much damage/penetration you get from those bullets depends on slant range. Always remember to track – shoot - track. In this attack, notice that the lead actions away from wing in Figure 6.13. This allows both jets to be down virtually the same run-in heading. This type of attack, where flight lead actions away from wing, can be used with any combination of ordnance.
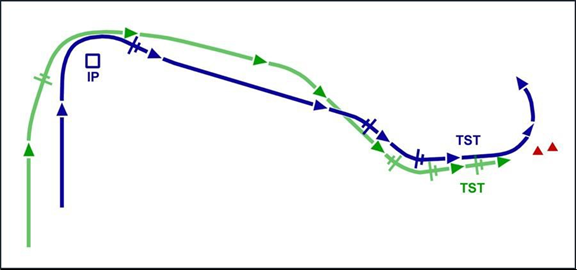
Figure 6.13. Low-Altitude Guns.
6.8.3.3.4 Bombs. Another low-altitude attack is a Shooters - Bombs attack. This attack requires some planning due to frag deconfliction. By looking at the frag cylinder for the type of weapon you are employing, you can determine whether timing or altitude deconfliction would be best. Usually, timing deconfliction offers the most mutual support during this attack but requires more work from the wingman. Altitude deconfliction minimizes the work of the wingman but can sacrifice mutual support prior to expending and during off target maneuvering.
6.8.3.4 Off-Target Priorities. There are several tasks to accomplish once you have pickled. Be sure to prioritize flying the jet first as always.
6.8.3.4.1 Turning Maneuver Level Turn SEM. Your first priority after weapon release is a valid SEM. The mechanics and parameters of these SEMs remain the same as the BSA pattern. Realize that the purpose of these maneuvers is to keep you safe from the ground, the frag of your own weapon, and to get you away from other threat rings in the area as quickly as possible.
6.8.3.4.2 Clearing Your Six. With threats in the target area, you should keep your jet moving and use CMD to decoy IR and radar threats. In all cases, your primary defense against AAA is 3D maneuvers. In a low-altitude (high-threat) scenario, following your TMLT you will be slightly below pickle altitude, approximately 600 to 800 feet AGL. With a minimum altitude of 500 feet AGL, you are left with not much maneuvering room below you. You must move the jet in three dimensions, but realize the biggest threat is the ground. While accomplishing this, you should also preemptively CMD to defeat any MANPADS.
6.8.3.4.3 Find Your Flight Lead. After concentrating on attack geometry, valid weapons employment, and your off-target priorities, finding lead turns out to be much easier low altitude. Lead will give you a rough idea of where he will be upon completion of your off-target maneuvers, but you will be assumed to be blind off target. You must call visual as you egress the target area in a good mutually supportive formation like wedge or tactical.
6.8.3.4.4 Get Back into Position. Even at low altitude, you can find yourself low on energy when trying to get back into wedge on lead. Remember to use geometry/cutoff to regain correct distance/AA from number one.
No comments to display
No comments to display