
5.13 Weapons Employment
5.13 Weapons Employment:
5.13.1 Roll In.
You should use the target as your reference for when to roll in; attempt to lead turn so as to roll out on final at the planned attack heading. Roll-in pacing will vary based on altitude and airspeed at the roll in. The lower and/or faster the aircraft is prior to roll in, the earlier the roll in should be. The roll in is used to transition from base to the planned wire, arriving on final at the planned attack heading, flying to the AOP. It is essential that the attacking aircraft’s POM remain on the AOP throughout the roll in.
5.13.1.1 Communication and HOTAS.
Upon cracking wings for the roll in, call “C/S, IN DRY.” The RCO may wait until visual to confirm that the aircraft is rolled out on the attack heading before calling “CONTINUE DRY.” Make another call if clearance is not received after a couple of seconds. Additionally, the RCO may respond to an “IN” call with “CONTINUE.” In this case, no response is required; continue the attack expecting to hear “CONTINUE DRY” shortly. Do not release ordnance unless/until the RCO calls “CONTINUE DRY.” If in CCRP, wait to go from CCRP to CCIP until rolling towards the target area to minimize the opportunity to accidentally release a weapon somewhere other than the impact area on the range.
5.13.1.2 Roll-In Mechanics.
While the target is your primary reference, eyes should transition from the target to the AOP in the roll in. The goal is to set the LV to start the aircraft tracking towards the AOP and then refine the LV to keep POM on the AOP. Adjust the LV as required during the end of the roll in to have the AOP set as precisely as possible prior to roll out.
5.13.1.2.1 Initial LV Reference and Bank Angle.
IFF conventional attacks are normally planned for 3 to 4 Gs. Approximate, initial LV ROTs are:
10: LV 5° above the horizon (equates to approximately 100 ° of bank) 20: LV on the horizon (equates to approximately 110° of bank)
30: LV 10° below the horizon (equates to approximately 120° of bank) 45: LV 30° below the horizon (equates to approximately 135° of bank)
Note: These references are good for understanding where the LV should be for an accurate POM; however, in execution your attention should be on the AOP. Concentrate on pulling the gun cross or FPM toward the AOP and not directly to the target. Precise base parameters followed by a repeatable roll in are the best way to build the experience to “see” and fly to the planned wire.
5.13.1.2.2 Using the Roll in to Compensate for Base Errors. If rolling in from an incorrect base position without correcting it or noticing it until time to roll in, it is possible to adjust the roll in LV to compensate. If the base position appears too far out, the turn should be flown level for the first 30° to 45° before overrotating toward the AOP. If the base position appears too tight, slightly overrotate (by 5° to 10° of bank) for the first portion of the turn, and then readjust the LV towards the AOP.
5.13.1.2.3 Adding ITP to the Roll In. Initial target placement is a useful technique to refine LV control during the final portion of the roll in. ITP can be read directly off the pitch ladders as the target approaches the HUD (Figure 5.6 shows an ITP of 13° for the 10 low-angle high-drag [LAHD] roll in). Approximately two-thirds of the way through the turn, the FPM will approach the planned dive angle for the attack. As the target approaches the HUD FOV, an assessment of the wire is made to make adjustments to the final portion of the roll in, the earlier, the better. Assess where the target is tracking relative to the pitch ladder in the HUD. If it is trending towards a point that is greater than planned ITP, the aircraft is above the planned wire: overrotate slightly. The opposite is true if the target is trending towards a point on the pitch ladder that is less than ITP. In this case, raise the LV slightly. Making the above ITP corrections will get the aircraft closer to the planned wire at roll out.
5.13.1.2.4 Rolling Out on Final. As the target approaches the edge of the pitch ladders, begin a smooth rollout so that once wings level the target is centered in the pitch ladders. This will compensate for any crosswind present; the target and pitch ladders will be offset downwind left or right with the BFL centered vertically through the target.
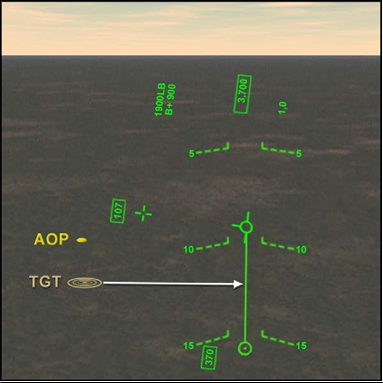
Figure 5.6. Adding ITP to the Roll In.
5.13.2 Final.
Once rolled out on the final attack heading, there are numerous items to cross- check and adjust in a relatively short amount of time (approximately 5 seconds).
5.13.2.1 Fly to the AOP.
If the base, roll in, and rollout portions of the pattern have been flown well, the aircraft should arrive on or near the planned wire and be pointing at the wind corrected AOP (while the flightpath marker will be close to the target’s 6/12, the gun cross will be more offset left or right; pointed into the wind). Flying towards the AOP will help keep the aircraft on the planned wire and fly it to the correct point in space at release producing the desired weapons effects. If base distance or the roll in weren’t flown perfectly and the aircraft ends up off of the planned wire at rollout, adjustments can be made to converge back towards the appropriate wire to arrive as close as possible to the desired release point.
5.13.2.2 AOP References.
On range, AOD markers (easy to identify points at known distances), are helpful in judging where a particular AOP lies. If at roll out the AOD is not set, a positive push over or pullup must be made to put the FPM on the AOP. The earlier this is done the more time the jet has to correct back to the proper release point before release. Visually, the FPM should remain on the AOP through pickle. Different from HUD track references, AOD is valid at any altitude and so should be set and held from rollout to release. The use of the HUD references can be used on the range as well. HUD references are discussed later in this section. Regardless of the technique used, you will be setting dive angle by adjusting the FPM relative to the visual AOP or the target. DO NOT blindly adjust the FPM relative to the pitch ladders in an attempt to achieve the planned dive angle. Correct dive angle does not always indicate correct wire.
5.13.2.3 Confirm Target Location.
During any attack, make certain that the correct target has been identified; if unsure, abort the pass.
5.13.2.4 Power Modulate.
Build awareness and modulate the throttles as required. Assuming that roll in airspeed were flown, the following power adjustments to idle will generally result in a weapons release inside the airspeed window of 400 to 440 knots:
10°: 400 KCAS (half-way down final)
20°: 380 to 390 KCAS (half-way down final)
30°: 350 KCAS (at roll out) 45°: as you start the roll in
5.13.2.5 Correct 3/9.
The target should be on or very near the BFL. Make a small change in bank to put the target on the BFL and roll out. Avoid ‘S’ing through final by attempting one small correction. Hold a small amount of forward stick pressure or trim so as not to let the FPM run during 3/9 corrections. If a big 3/9 correction is required, bank into the target pulling the BFL back to the target and roll out. A small amount of bank at pickle is acceptable but not ideal. Make big 3/9 corrections quickly as positive G on final will cause the nose to drift up away from your AOP.
5.13.2.6 Make Adjustments a Track Altitude.
IAA and %BFL are only valid at track altitude. Track altitude is planned to occur shortly after rolling out on final. With experience, you will be able to maintain awareness of track altitude as you dive through it by precisely using your HUD track reference right at track altitude. Until then, using your HUD track reference shortly after rolling out on final is a good approximation of track altitude.
5.13.2.6.1 Using IAA. Once rolled out on final (at track altitude), pullup or push over as required to set the FPM the specified number of degrees (IAA) long of the target. If you rolled out on the planned wire, it should already be there with no adjustment required. Once it is set, the point on the ground now under the FPM is the AOP, and the aircraft must be flown to that point using the visual AOP techniques discussed above. The point of using a HUD reference is that it eliminates the need to visually estimate distances over the ground. Once the HUD reference tells you where the AOP is, however, flying to it is accomplished the same way.
5.13.2.6.2 Using %BFL. All of the above principles associated with IAA are the same for %BFL. The only difference is that instead of setting the FPM relative to the target using degrees, you will use a position on the BFL relative to the total BFL. Once rolled out on final (at track altitude), pullup or push over as required to set the target at the specified percentage of total BFL (measured down from the FPM).
5.13.2.6.3 BFL Delay Cue. There are times when the pipper is HUD limited (due to being excessively high, slow or due to heavy headwinds on final). In this case, the entire BFL is not displayed in the HUD. Real-time this is indicated to the pilot by the presence of the delay cue on the BFL (Figure 5.7). This rarely happens, however, if
%BFL is used, plan to include the delay cue in the cross-check after rolling out on final; be ready to transition to IAA if required.
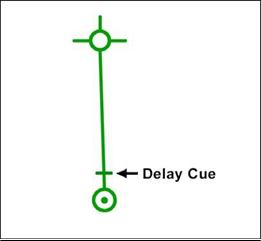
Figure 5.7. Delay Cue.
No comments to display
No comments to display