
Formation
This chapter builds on the formation fundamentals learned in undergraduate flying training— refer to AFMAN 11-251, Volume 1, T-38C Flying Fundamentals.
3.1 Introduction.
We generally understand formation to mean two or more aircraft working together with understood roles under one flight lead’s control. Control of the formation and flight integrity are essential to coordinated effort, and can only be maintained if the lead has complete knowledge and control of all the wingmen’s actions. It is the lead’s responsibility to brief and direct the desired formation position and the wingman’s responsibility to be in that position until the flight lead directs another, or the wingman gets permission to change his position.
3.2 Purpose.
The two-ship is the basic employment standard for tactical aviation. Even when part of a four-ship, you will have element leads and wingmen. The primary reason for two-ship execution is mutual support. This concept follows the basic rules of war: mass of firepower and coordinated maneuvering. Additionally, aerial warfare moves at a rapid pace and in multiple dimensions. As a result, visually supporting one another in the air increases our likelihood of survival and mission success. In many fourth- and fifth-generation fighters, this visual mutual support is enhanced with “sensor” mutual support as well.
Solid formation flying by both flight leads and wingmen is the foundation upon which element tactics are built. Flight leads are responsible for directing the formation to maximize lethality and survivability. Wingmen are responsible for being in position and ensuring flightpath deconfliction from their element lead as well as other members of the flight. As a wingman, your priorities are remaining visual, being in the correct/correcting to the correct formation position, and then working the radio and navigational aids (NAVAID). This can be remembered with the acronym VFR. When multiple tasks are required, the key to success as a wingman is task prioritization—knowing what to do first. At FENCE OUT, it is preferable to be padlocked and momentarily on the wrong frequency than blind on the correct frequency.
3.3 Communications.
All communications must be received and understood by every member of the flight in order to be effective. As a guide to clear, concise, and correct communication, utilize the brevity words found in AFTTP 3-1.1, Attachment 1. As a rule, you will use visual signals in accordance with (IAW) AFI 11-205, Aircraft Cockpit and Formation Flight Signals, to the max extent possible in order to preserve communication time available on our working frequencies. While in IFF, you and your flight lead will likely be the only players using your tactical frequency. Nonetheless, we will strive to use visual signals whenever possible to train for future tactical environments where multiple players are using the same frequency simultaneously.
3.3.1 Radio Discipline.
Efficiency on the radios requires discipline. By discipline we mean not only clarity and brevity when you transmit, but also limiting unnecessary transmissions. An old fighter pilot mantra says that a pilot, and especially a wingman, should never miss the opportunity to be quiet on the radio. However, there will be times when it is necessary to communicate information that is crucial to mission success. The fine line of silence versus transmission varies from mission to mission and is something that should be debriefed on every sortie.
3.3.2 Transmission Format.
The first part of every call should always be the call sign. In the case of directive or interrogative communication, this should be the call sign of the aircraft you are transmitting to. This serves to get the attention of the person to whom you are directing the transmission. After the call sign, the communication should be directive, then descriptive. This format is important because it gets the flight moving in a very dynamic environment, and then tells why the action was necessary. EXAMPLE: “SMURF 1, CLIMB, TRAFFIC 12 O’CLOCK, 1 MILE LEVEL.”
3.3.3 Acknowledgement.
When responding to radio transmissions, you should mimic flight lead whenever possible. EXAMPLE: "SMURF 1 OPS CHECK, 1 IS 2.7, 5.0 Gs." "2 IS 2.5, 6.1Gs." Not all radio calls require a radio response, such as when you can signal acknowledgement with your actions. EXAMPLE: "SMURF 2 GO FIGHTING WING." As a general rule, if flight lead’s direction involves safety of flight (aircraft separation, terrain avoidance, fuel, etc.) or switches related to weapons, wingman should acknowledge on the radio.
3.4 Ground Operations.
Working as an element starts on the ground. Ensure that during the preflight and engine start you cross-check your flight lead. A frequent glance to your flight lead will build your SA (ground aborts, etc.) and start good habit patterns that will transfer well once airborne. Additionally, it will allow you to match your flight lead’s configuration in a timely manner.
The initial check-in is a great opportunity to build your flight lead’s confidence in your capabilities. Be aware of and ready for check-in time. As a general rule, if you’re not moving switches with your left hand, have it on the throttle ready for a check-in at all times (unless maintenance personnel are under the aircraft). Strive to be timely and crisp. If your mask is hanging, raise it first. Be aware that there is a slight delay from the time you move the mike switch to the time the radio actually transmits.
On taxi out, maintain the correct spacing from the flight lead. When taxiing as a four-ship, number 3 and number 4 should mirror number 2’s spacing. All formation members should mimic flight lead’s configuration and checks.
3.5 Basic Formation.
Basic formation is IAW AFMAN 11-251, Volume 1. However, more is expected from a fighter wingman than just the basics of ensuring deconfliction, maintaining visual, and being in position. A smart wingman should also back up his flight lead by "staying ahead of the jet." One example is being in close route formation anticipating fingertip when approaching clouds or coming up initial, yet moving out and forward during longer during visual meteorological conditions (VMC) transits in order to better clear for the formation. Being a smart wingman involves, but is not limited to:
• Maintaining SA on the profile.
• Keeping up with the NAVAIDs.
• Clearing for the flight both visually and by LISTENING on the radios.
• Anticipating the next radio calls.
• Querying lead when unclear or when necessary to prevent safety or rule violations.
3.6 Two-Ship Tactical Formation.
Two-ship tactical formations are the baseline formations for employment. These formations include line abreast (LAB) and wedge. Although the parameters vary from airframe to airframe, the tactical formations flown in IFF are very similar to what you will see in the combat air forces (CAF). Factors that affect how we fly our formations include the threat, weather, visibility, background, and terrain. Unlike specialized undergraduate pilot training, we use tactical formations not as an end to themselves, but as a means to facilitate proper visual lookout, task prioritization and offensive and defensive tactics.
Wingmen should aggressively pursue being in position. This is an “aggressive” mental state, not necessarily aggressive flight control actuation. The degree of aggressiveness depends on how far out of position you are. Maneuvers to correct excessively poor formation may be aggressive but never erratic. Continuously assess your position and make corrections. The earlier you perceive a formation error the smaller the fix required and easier it will be to correct.
3.6.1 Line Abreast (LAB).
4000 to 6,000 feet with 0° to 10° aft and up to 2,000 feet of altitude stack. Always strive for 0° aft. Your priorities in flying LAB formation are: LAB first (0° aft), range second, and lastly taking a stack. Maintaining a cross-check instead of constantly staring at the flight lead will allow you to see subtle changes in your position.
3.6.1.1 Correcting LAB Position.
The easiest way to correct formation position is to establish a cross-check that allows you to perform all assigned tasks and maintain your assigned formation position. In order to determine whether or not you are LAB with your flight lead, assess aspect angle; you should see 90°. Assuming you are coheading, this position is approximately when the other aircraft is over your shoulder to about an inch in front of your shoulder in the 4,000- to 6,000-foot range. Additionally, if you are stacked above or below lead and can see both wingtips, they should be lined up. Always strive to use geometry to fix your formation position versus just power.
3.6.1.1.1 Behind the Line. If you find yourself behind the LAB line (less than 90° aspect), use the vertical and power to catch up to lead. You will need more airspeed than lead, so expect it to increase as you bunt and use mil power to catch up. It is OK to change from a stack above lead to stacking below unless you are in the low altitude structure. As the airspeed increases you should start to see aft line of sight rate. Remember, when you are LAB again you will still have overtake, so begin to decrease your airspeed to match lead slightly before you get to LAB. This can be accomplished by reducing power and/or trading airspeed for altitude. If not in special use airspace and flying an ATC assigned altitude you will primarily have to use power to get back into position.
3.6.1.1.2 Ahead of the Line. If you are only slightly ahead of the line, you can climb to and fly a slightly longer total flightpath to “let” lead catch up with you. Forward line of sight rate should be generated during this process. Once again, anticipate getting back to the LAB position and work to match lead’s airspeed as you arrive at the proper LAB position. If you are far in front of lead, you must maneuver in the horizontal as well. Generally, it is best to make an aggressive, slightly climbing bid away from lead. Once you perceive line of sight forward, check back into lead (this will collapse range again). Finally, you will need to return to coheading and reassess whether you are LAB again.
3.6.1.2 Correcting Lateral Position.
Correcting lateral position is generally simpler than correcting LAB. Check into or away from lead as required to get to 4.000 to 6,000. When checking into or away, apply aft stick to make a positive input. An
unloaded check that adjusts your heading a couple of degrees may not do much for your lateral position. Every correction you put in has to be taken out again. The earlier you perceive a formation error the smaller the correction required and the easier it will be to fix. To assess range from lead, primarily use visual cues and then back them up with the air-to-air tactical air navigation (TACAN) (AAT). Use caution: the AAT lags and can cause range pilot-induced oscillations (PIO). This is especially true during and after tactical turns. Fly based on visual cues, then once you have stabilized, verify your range using the AAT.
3.6.1.2.1 Visual Cues for Formation Ranges:
• >6,000 feet = “Cigar” with vertical tail, can’t see distinct burner cans.
• 6,000 feet = Burner can barely visible protruding aft of vertical stab.
• 5,000 feet = Can see burner, can distinguish from tail, “L” shape where boat tail meets aft end of vertical stabilizer. Canopy detail starts to become visible.
• 4,000 feet = Canopy distinguishable from fuselage, can see but not read the tail letters.
• <4,000 feet = Detail on airplane, distinct canopy, can read tail letters. Beacon will be visible.
3.6.1.2.2 Common Error. The most common error related to range in tactical formation flying is simply not assessing it in the first place. Once the task load builds in flight, students roll out of turns and don’t assess range. This allows current errors to go unchecked or even build. The best time to start correcting for both LAB and lateral spacing is DURING tactical turns (discussed in conjunction with tactical turns).
3.6.1.3 Correcting Vertical Position.
Corrections to the vertical position are normally referred to as “setting a stack.” At the proper range for LAB, the flight level will be approximately two beer cans above or below the horizon for a 1,500-foot stack. Since it is the last priority, ensure the LAB and lateral aspects of the formation are correct before working for a stack. Once that is accomplished, choose a stack direction that is most advantageous for you and your flight lead to remain visual. When looking into the sun, stack to pull lead away from it. If you are directly between your flight lead and the sun, stack to stay above or below the sun (usually a low stack). If neither direction makes maintaining the visual easier, stack high, to increase your potential energy for follow on maneuvering.
3.6.1.3.1 Stacking High.
To move from a level or low position, you must increase the power to achieve a high stack. In the T-38, this almost always requires MIL power. Your airspeed must increase very slightly to maintain your LAB position while climbing provided you were stabilized at LAB before you started the climb. When the proper stack is achieved, remember to pull the power back to the previous setting.
3.6.1.3.2 Stacking Low.
To move from a high or level position to a low stack, you need to reduce your power. The amount you reduce the power will be proportional to the angle of dive you use. Reduce the power enough to maintain your airspeed during the move to stack low. Remember to push the throttle back up when you achieve the desired position.
3.6.2 Two-Ship Tactical Turns.
Two-ship tactical turns are accomplished IAW AFMAN 11-251, Volume 1, except as noted here. Expect flight leads to have solid wingman consideration; however, they will fly wherever required to accomplish the mission. This means that turns may not be exactly 180°, 90° or 45°. As tactical turns are initiated, you should assume standard turn amounts, however, continue to monitor and fly off of lead during the remainder of the turn. This will allow you to make corrections early and still roll out in position.
The contract for tactical turns is MIL power and G to hold airspeed (normally 350 knots calibrated airspeed [KCAS]). When in level flight between 10,000 and 18,000 feet, this will be approximately 80° of bank and 3 Gs. However, not all turns are level (for example, climbing between BFM sets), and sometimes turns are initiated from nonstandard positions and/or energy states (for example, just after a BFM set). A constant cross-check of the flight lead is necessary so that you can match their turn rate, radius, and line-of-site rate (LOSR) and end up in the proper formation.
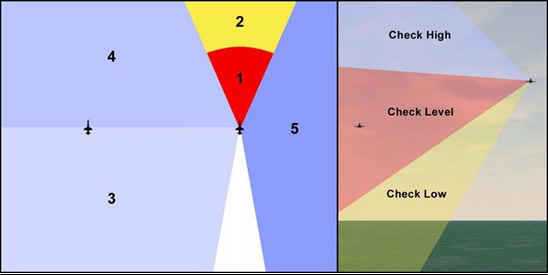
3.6.3 Visual Lookout.
One of the most compelling reasons to fly tactical formation is to increase the effectiveness of our visual lookout in the tactical scenario. Despite our advanced radars, radar warning receivers (RWR) and off board SA enhancers such as Airborne Warning and Control System (AWACS), it is possible for an enemy to achieve an undetected entry into our combat formation. Therefore, you need to exercise a disciplined visual lookout to detect threat aircraft before they can achieve a weapons engagement zone (WEZ) on any member of the formation. Figure 3.1 shows the priority of visual lookout for both members of the formation. It is important to remember that we operate in three dimensions. Therefore, every sector of the visual lookout must be scanned not only level with your own jet, but higher than you, and lower than you. As a result, each sector depicted in Figure 3.1 can be divided up into three vertical sectors as well. It is also important to pause in each sector allowing your eyes to focus at range and detect movement. The environment, threats, weather, and other factors may alter the visual search responsibilities of each member of the flight. For instance, at low altitude, checking 12 o’clock and own ship altitude are very high priorities.
3.7 Four-Ship Tactical Formation.
Four-ship tactical formations build on the basics of two- ship formations. These formations are typically used to efficiently maneuver two elements to mass firepower and maximize offensive and defensive capabilities. Four-ship tactical formations include: Wall, Fluid-4, Container, and Offset-Container. Each of these formations have advantages based on the tactical situation and must be flown proficiently. Typically, number 2 will set the stack. Number 3 will stack opposite of number 2, and number 4 will stack further in the opposite direction. To maximize the advantages of each of these formations, all flight members should strive to maintain visual with the other flight members. As a minimum, wingmen MUST maintain visual with their respective element leads.
3.8 FENCE Check.
FENCE IN/OUT is a directive call made by the flight lead to set cockpit switches as appropriate prior to entering/exiting the combat or working airspace. Unit standards and/or the flight briefing will dictate what items are to be accomplished during FENCE checks. Normally it will require multiple intracockpit switch actuations.
3.8.1 FENCE IN.
Do not forget your priorities as a wingman: visual, formation, radios. It is likely that the formation will be maneuvering during the FENCE check. As a technique, ensure you are in the proper formation, decide what switch needs to be changed and reach for it; make a quick glance inside the cockpit to ensure you have the correct switch; and make the actuation as you are cross-checking and fixing your formation position. Repeat until all required items are accomplished for the fence check.
3.8.2 FENCE OUT.
The same principles apply to the FENCE OUT. Expect to be task saturated as your flight lead may simultaneously direct the FENCE OUT, a rejoin, and frequency change. Chair fly before the flight and task prioritize onceairborne.
3.9 G Exercise.
The G exercise serves several purposes. First, it gets your mind and body used to the high-G environment. Second, it gives the pilots a chance to practice their AGSM with no distractions from tactical maneuvering. Third, it gives the pilots a chance to make sure the systems on the jet continue to function normally under G. Finally, it gives the student a fresh reference for lift vector (LV) and nose position pictures and aircraft feel that will be used during tactical maneuvering. Emphasis should be to focus on performing a good AGSM. The G- exercise is not an instrument maneuver and will require looking outside the cockpit to deconflict with other aircraft. Starting parameters for the G-exercise are LAB (striving towards 6,000 feet) and 420+20 knots indicated airspeed (KIAS). During the turns, constant adjustments to the LV will be required to maintain approximately 420 KIAS and the required G.
3.9.1 G Warmup.
Select MIL power, roll to approximately 100 of bank, and pull to 4 to 4.5 Gs. Initially, this will bring the nose in a downward vector, towards a pitch picture of 2/3 ground and 1/3 sky. You will then need to reset the LV to slightly above the horizon to sustain airspeed and G. For the G warmup, this equates to approximately 8 to 12 nose low. Another reference which might help is to roll to drag the top of your HUD along the horizon. In any case, adjust LV as required to get the correct G and airspeed combination.
3.9.2 G Awareness.
This turn is flown at 5 to 5.5 G/single rate beeper and serves to continue to prepare the pilots, check the function of the aural warning system for Gs, and give the pilots a feel for the initial G to be used for BFM break turns. Roll to approximately 120 to 135 of bank, and select MIL power and blend in the G. For a sustained nose position reference, the horizon should be near the “high” mirror (this is about 15 to 25 nose low). Manage LV in the same manner as the G warmup while sustaining G.
3.9.3 Formation Considerations.
While the G exercise will be initiated from LAB formation, there are special considerations for station keeping between the G warmup and G awareness. After rolling out of the first G-awareness turn, maintain MIL power and climb. Setting the FPM to approximately 3° to 5° should maintain 420 KIAS. Simultaneously, check into or away from lead to remain 4,000 to 6,000 feet. If not LAB, DO NOT attempt to accelerate or slow down to return to LAB. Instead, your priority is the correct airspeed for the second turn and setting range from your flight lead. Once both turns are complete, if not in LAB formation, maneuver to get back into position
No comments to display
No comments to display