
4.8 High-Aspect BFM (HABFM).
4.8 High-Aspect BFM (HABFM).
HABFMs may occur throughout many phases of a tactical engagement. During the transition from the intercept to the BFM phase, the Bandit may have a tally or may be turning into the attacker based on RWR indications, radar contact, or ground controlled intercept (GCI) information. Always attempt to achieve TR prior to a merge. If the Bandit is aware, the Bandit may deny any TR opportunities. Do not continue to try for TR and lose the opportunity for a lead turn. Remember that TR for you is typically TR for the Bandit. The Bandit may have a tally, and may attempt to achieve TR also.
4.8.1 HABFM Concepts.
The BFM concepts already introduced in the offensive and defensive phase will be expanded upon and some new concepts added as they apply to the high aspect arena. Unlike perch BFM which starts at specific parameters, HABFM is much more fluid and unpredictable.
4.8.1.1 Premerge Turning Room.
TR is displacement in any plane (vertical, lateral, or a combination) from an adversary’s flightpath (Figure 4.24). Prior to the lead turn, the fighter will seek to gain an advantage by “building” TR prior to the lead turn. The optimum amount of TR is a full turn diameter between you and your adversary’s flightpaths. In the T-38, we strive for at least 6,000 feet. It is important to realize, however, that TR for one fighter is normally TR that can be used by the adversary as well. There are exceptions to this rule. For instance, one fighter may have exclusive use of TR that the other fighter cannot use. An example of this exclusive TR is when two aircraft merge, high-aspect at low altitude, with one aircraft just above the ground and the other less than a turn diameter above the ground. The low fighter can execute a pure vertical lead turn; however, the higher aircraft cannot execute the same maneuver to match the lower aircraft. If he does, he will impact the terrain. Thus, the lower fighter enjoys exclusive use of this TR.
4.8.1.2 Merge Entries.
The decision to merge above or below the Bandit is dependent on several considerations to include environmental factors, current energy, and the surrounding tactical situation. Weigh all the factors and execute a decisive game plan.
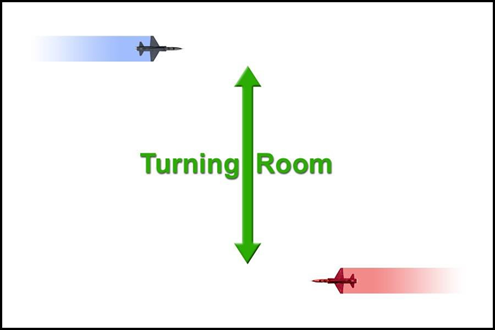
Figure 4.24. Turning Room.
4.8.1.3 Lead Turn (Figure 4.25).
The lead turn is an attempt to use TR to decrease HCA prior to passing the opponent’s 3/9 line. In an ideal situation, against an unaware, nonmaneuvering Bandit, the initial lead turn will result in the fighter rolling out in a WEZ at the Bandit’s 6 o’clock. If both aircraft are aware and simultaneously use the TR, the result will be a close aboard, neutral pass. In general, you want to gain TR before the merge or the Bandit becomes aware and begins to turn into you. However, if your adversary begins to take that TR away (they become an aware Bandit and turn into you), you must stop trying to get more TR and use what you have. The figures below are two dimensional, but HABFM will happen in three dimensions. In a pure sense, a lead turn that maximizes use of available TR will have POM on the Bandit regardless of where the LV is in relation to the horizon (specific LV considerations are discussed later).
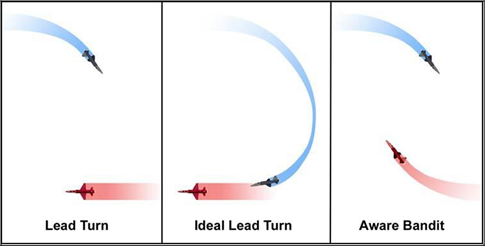
Figure 4.25. Lead Turn.
4.8.1.4 Energy Atom (Figure 4.26).
6K OBFM or DBFM engagements always start with the fighter and Bandit at the same altitude. Since the fighter’s nose position is near the horizon and will predictably lower, it is advantageous to start close to rate airspeeds. After the “check away” in HABFM, however, the fighter will intentionally maneuver to build in an altitude differential to gain vertical TR in addition to lateral TR. Regardless of power setting, the T-38 will quickly slow down maneuvering uphill and likely accelerate when going downhill. As a result the fighter will want to be slower than rate airspeed when maneuvering high to low in the lead turn and faster than rate in the opposite situation.
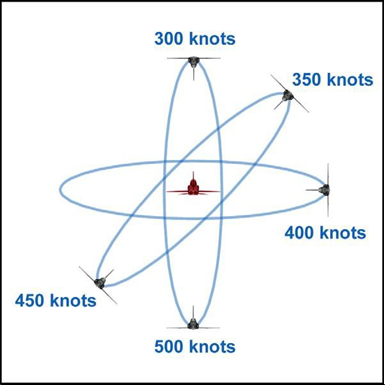
Figure 4.26. Energy Atom.
4.8.1.5 Use of the Vertical.
Hypothetically, to execute a pure vertical lead turn from high to low, you would want approximately 300 knots. If you have more than this, it will be difficult for you to control your airspeed. As airspeed builds, so does the over- G potential. Additionally, the turn radius at high speeds may make the floor more of a threat than the Bandit. Conversely, if you are converting from low to high, purely in the vertical, you want closer to 500 knots. Starting at this airspeed, using target G, the fighter will easily be slowing through 400 knots in less than 90° of turn. The more co- altitude you are, the closer to 400 knots you should strive to be.
4.8.2 HABFM Setups.
Butterfly setups will be executed IAW the squadron standards and/or IFF Playbook. The goal of “canned” high-aspect setups, especially early in IFF, is to introduce HABFM execution in a more predictable engagement. On subsequent missions, the student will be given the opportunity to evaluate the tactical situation and make a decision prior to the check away regarding planned merge geometry. Flying the proper setup mechanics will allow the fighter to arrive at the merge in a position of advantage. The Bandit will not allow the fighter an ideal lead turn to a stern conversion. Instead, he will allow the student some amount of TR depending on mission and engagement circumstances. Additionally, the Bandit will not typically maneuver until the fighter has reached his 3/9 line. Refer to Figure 4.27. The fighter should strive to cross through the Bandit’s CZ (Fighter 2) with airspeed between instantaneous corner and sustained-rate velocity (380-420 knots). If the fighter crosses inside the Bandit’s turn radius (Fighter 1), he will allow the Bandit the opportunity for a reversal and give up the advantage gained in the lead turn. If the fighter merges too far behind the Bandit (Fighter 3), range will build and increase the time and fuel required to kill the Bandit. Additionally, this could allow the Bandit to capitalize on a separation opportunity.
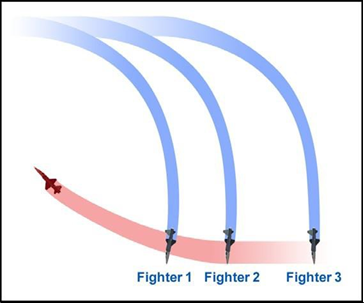
Figure 4.27. Merge Objective.
4.8.2.1 Prior to the Check Away.
Determine if you will use vertical TR above or below the Bandit. There are several factors that will affect your HABFM game plan selection of whether to use a high-to-low or low-to-high conversion. However, the most important and therefore overriding factor is ease of tally for the fighter and attempting to deny the Bandit the tally. Use the environment to your advantage. Placing the Bandit between you and a cloud layer will vastly improve your ability to keep the tally. Likewise, placing yourself between the Bandit and the sun will make his job much harder.
4.8.2.2 Check Away.
Select military power and begin a 30° turn away from the Bandit. While modulating power as required and maintaining awareness of the Bandit, begin to build vertical TR with a climb or descent and apply a cross-check that favors more attention to the Bandit the further away the two aircraft get. Monitor airspeed in the climb or descent to achieve briefed game plan. If approaching the limits of visual acuity prior to the “FIGHT’S ON ” begin to turn as directed or briefed to maintain the visual and call ‟padlocked.”
4.8.2.3 At the "TURN IN, FIGHT’S ON."
The best way to achieve the merge objective is to build in a combination of vertical and lateral TR prior to the lead turn. This combination of vertical and lateral TR will then be used in the lead turn to decrease HCA and fly to the merge objective. This will require a max performance energy depleting turn. The objective is to turn inside the Bandit’s TC to point at his CZ (Figure 4.28). If the fighter floats to the outside, there won’t be enough time or range to gain TR prior to the merge. During the turn, AGSM is a priority to maintain the tally. You will be looking at a T-38 rotating towards pure pursuit more than 2 NM away. If you are not padlocked on the Bandit, you will lose the tally. DO NOT LOOK IN THE COCKPIT DURING THE TURN IN. The fighter’s second priority is a max performance turn that gains lateral TR and doesn’t use up too much of the vertical TR already gained.
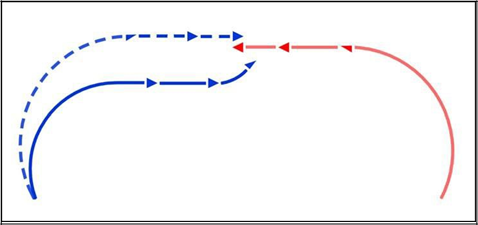
Figure 4.28. Get to the Inside at the Turn In.
4.8.2.4. High-to-Low Turn In Mechanics.
Set throttles to MAX afterburner, stare at the Bandit while overrotating the LV, and begin a max allowable G pull. As the nose drops towards the horizon, reset the LV closer to the horizon to preserve vertical TR. Continue the turn, pulling the Bandit across your nose for approximately 2 seconds (Figure 4.29). You may momentarily lose sight of the Bandit as he passes under your nose. Regardless, continue to pull the Bandit across your nose and aim your gun cross towards the Bandit’s CZ. Consider rolling past wings level into the Bandit to aid in tally maintenance and Bandit assessment. Your goal now is to manage energy and assess LOSR cues for initiating the lead turn. Even after a well-executed turn in, you won’t have longer than 1 to 2 seconds prior to executing the lead turn. Power placement will depend on current airspeed and vertical displacement relative to the Bandit. However, as a default, leaving the power in MAX afterburner is usually warranted. Reference the energy atom discussion (paragraph 4.8.1.4) for desired airspeed based on the ratio of lateral to vertical TR available. Generally, 350 to 400 knots is a good target airspeed for the lead turn. You will have little more than just enough time for one quick BFM cross-check in the HUD prior to starting the lead turn.
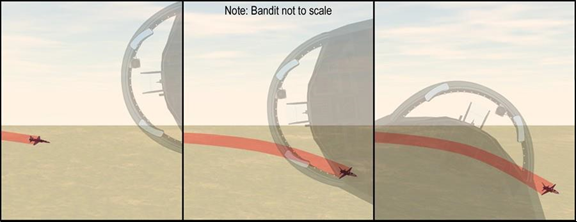
Figure 4.29. High-to-Low Turn In.
4.8.2.5 Low-to-High Turn In Mechanics.
Select power as required, and set the LV to bring the nose up to the Bandit’s low CZ. For the turn in, blend the G into the SRB or moderate buffet, whichever occurs first. As a default, select MAX afterburner during the pull. However, if you encounter the SRB with little to no buffet, sustain the SRB and delay increasing power. Similar to the turn in for a high- to-low conversion, you will pull the Bandit across the nose aiming to put the gun cross in the Bandit’s low CZ. This time the Bandit will be above you and tally maintenance will be easier. Given a max performance turn in, you’ll need to gain airspeed. Leave the throttles in MAX as a default and if circumstances allow, glance at your parameters (with the Bandit against a blue sky background, you won’t be able to). Depending on how quickly you approach your game plan airspeed you may need to reduce power. Attempt to have 420 to 450 knots for a typical low-to-high conversion. Use caution for the floor. Depending on altitude at the check away and your descent rate prior to the turn in, you may have to adjust you LV before or during the turn in to stay above the floor.
4.8.3 Lead Turn.
Lead turn keys to success are: continuous Bandit assessment, LV placement, and turn performance.
4.8.3.1 Lead Turn Cues.
A rapidly increasing LOSR aft is the cue to start the lead turn. For a right-to-right pass, the Bandit will swing from approximately 1 to 2 o’clock (Figure 4.30). The most common error is a late lead turn. If in doubt, start the lead turn early; however, do not to turn in front of the Bandit.
4.8.3.2 Lead Turn Assessment.
If you start your lead turn late, there is nothing you can immediately do; you have built in a BFM problem you will have to solve later. If you start your lead turn early, the LOSR will slow down or freeze on the canopy. In this case, you must ease off the G momentarily to let the LOSR increase again
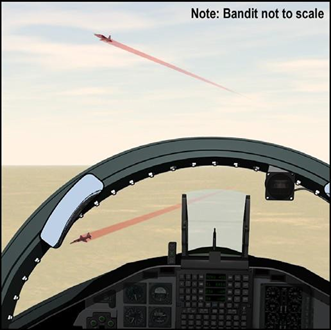
Figure 4.30. Lead Turn Cues.
4.8.3.3 Bandit Turn Direction.
During the lead turn, you must also evaluate the Bandit’s game plan in order to develop your own. The Bandit will be the last to turn and therefore will determine whether you initially enter a one or two-circle fight. If, as you cross the Bandit’s 3/9, he turns into you, he has established a two-circle fight. On the other hand, if he turns away from you, you will be in a one-circle fight. Early recognition of the fight the Bandit has set will be critical to achieve the quickest kill. Figure 4.31 illustrates the cues to identify a two-circle and one-circle fight respectively.
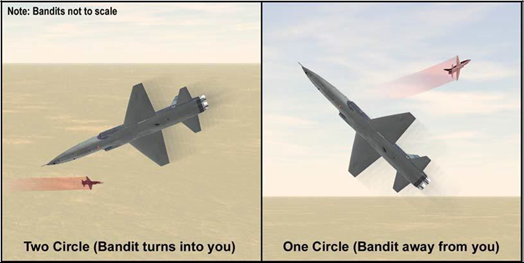
Figure 4.31. Bandit Turn Direction.
4.8.4 HABFM Post-Merge:
4.8.4.1 Two-Circle Fight:
4.8.4.1.1 Game Plan. The game plan in HABFM is to gain TR, execute an effective lead turn, transition to a sustained-rate fight, align TCs, and kill.
4.8.4.1.2 Merge Assessment. A two-circle fight, (when both fighters turn toward each other at the merge and continue) is primarily a rate fight where the fighter with the better rate over time gains an offensive advantage. At the completion of your lead turn, readjust LV slightly below the Bandit and sustain the best rate airspeed the Bandit will allow. Immediately assess your position in relation to the Bandit. A good check point for this assessment is the 180° point in the turn. This point is when the two aircraft are the furthest apart and may present WEZ opportunities.
4.8.4.1.3 Transition to the Rate Fight. Post-merge mechanics will vary depending on the Bandit maneuvering. Regardless of merge geometry, maneuver to gain the sustained-rate airspeed between 380 to 420 knots.
4.8.4.1.3.1 High-to-Low Conversion. Continue the max performance pull of the lead turn and adjust LV and power to achieve sustained-rate airspeed between 380 and 420. If accelerating to or through your target sustained-rate airspeed, reduce power and/or the LV to get closer to the G warmup picture then return to MAX. If the lead turn LV was closer to the horizon, the required LV change will probably be small and power may be left in afterburner (AB).
4.8.4.1.3.2 Low-to-High Conversion. As you cross through the Bandit’s CZ and he turns into you, your airspeed will be decreasing and your nose may be above the horizon. The longer this continues to happen, the more difficult it will be to transition to the rate game plan. Timely assessment of the Bandit’s turn into the fighter and subsequent rapid repo of the LV lower are critical to success. The instant you perceive a two-circle fight developing, quickly move your LV to below the horizon and ensure the throttles are in MAX. How far below the horizon the LV is placed will depend on airspeed and the position of the Bandit. The further above the horizon the nose is and the slower the fighter is, the further below the horizon the LV should be (up to 60 initially). As the nose transitions through the horizon, update the LV. However, you will need to use the vertical to recover airspeed while maintaining G. As the fight matures, capitalize on TC extensions to increase airspeed if required.
4.8.4.1.4 Energy Management. Given the limitation of the T-38 and rear aspect ordnance, the fighter must first realign TCs striving for the CZ to achieve a WEZ and subsequent kill. The fighter should have an angular and a power advantage throughout the fight. The use of TC extensions will help realign TCs. The average two-circle fight will require more than one extension. This will take time compared to offensive perch setups. Patience and a solid BFM cross-check to manage the LV for sustained energy are critical. Additionally, the fighter will hold a significant amount of Gs for an extended period of time, so an effective AGSM will be required to maintain the tally and correctly assess the Bandit.
4.8.4.1.5 Turn Circle Extensions (TCX). Achieving a nose position advantage and extending to the Bandit’s TC becomes the fighter’s next priority. TCX’s will be required to bring the TCs closer together and allow the fighter to establish themselves in the CZ. Some axioms of TCXs include:
• Can only be used if the fighter is winning.
• Must happen at the correct time.
• Should be held long enough to pull the TCs towards each other, but not so long that range and HCA build excessively.
4.8.4.1.5.1 Winning Cues. LOSR towards the canopy bow, with aspect angle usually
<90 is one cue. If AA is building significantly past 90° (the Bandit’s nose is rotating towards you) with LOSR towards the canopy bow, execute another lead turn. The fighter should continue the turn, prioritizing rate parameters to gain a rate advantage. Given typical merge geometry and Bandit cuffs, most of the time the fighter will quickly see winning cues.
4.8.4.1.5.2 When to Execute the TCX (Figures 4.32 and 4.33). The goal is to extend just inside the apex of the Bandit’s TC. (This is the quickest way to move the fighter's TC closer to the Bandit’s. Extend too late (dotted line) and you will cut too far inside the Bandits TC; if too early, then range will build significantly (dashed lines). With forward LOSR towards the canopy bow, the Bandit will appear to rotate (increasing aspect) as the fighter starts to point towards or slightly inside the apex of the Bandit’s TC. A simple rule of thumb of extension direction is to pull the Bandit to the assessment window, assess AA and LOSR and then extend or continue to the second merge.
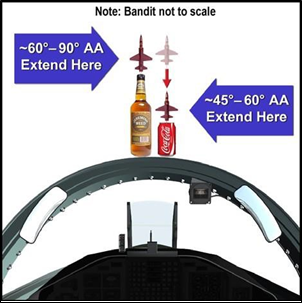
Figure 4.32. When to Extend Part 1.
Figure 4.33. When to Extend Part 2.
4.8.4.1.5.3 TCX Mechanics. Pull the Bandit to the assessment window, ease off the G, and freeze the picture. Once LOSR aft develops, reapply G to the sustained turn rate. The ease normally lasts 2 to 3 seconds. Airspeed awareness prior to reapplying the G is essential. If sustaining your target airspeed and G, you will need to reduce power or climb during the extension to prevent getting fast. On the other hand, if slower than desired, leave the power in MAX and deliberately unload to accelerate during the extension. If you don’t extend for long enough and G is applied too soon, you will see immediate LOSR towards the canopy bow; ease off again and let LOSR aft develop before “getting back on the pull.” Remember, the merge objective and requirement to assess Bandit turn direction applies to every merge. At subsequent merges, if you erroneously cross too close behind the Bandit, he may reverse and transition to a one-circle fight.
4.8.4.1.6 Transition to OBFM. Eventually, you will see range and aspect pictures that look similar to canopy bow assessment from the OBFM phase. The amount of TR allowed, lead turn effectiveness, and energy management all factor into how long it will take (and how many TCXs) before the transition to recognizable OBFM “pictures” will happen. Depending on the above factors, the time required can vary from 500 of fighting to over 1,000! It is likely you will be near the floor before transitioning to OBFM. Remember that Ps=0 mechanics at the floor won’t allow the same G as during the descending portion of the fight. To continue with a sustained- rate game plan you will have to let G taper off slightly at the floor; you will feel less buffet as you are further away from the lift limit line (Reference Figure BFM 8). Be patient, and be deliberate with your BFM cross-check and Bandit assessment.
4.8.4.2 One-Circle Fight:
4.8.4.2.1 Game Plan. Once identified as a one-circle fight, the game plan is to transition to a min radius fight and lead turn the Bandit to align fuselages and kill.
4.8.4.2.2 Merge Assessment. A one-circle fight results when the fighters turn in opposite directions at the merge, but both aircraft’s ground track is in the same direction.
4.8.4.2.3 Transitioning to the Min Radius Fight. Post-merge mechanics will vary depending on if the fighter is merging from below or above the Bandit. Regardless of merge geometry, pull to the moderate buffet (or SRB, whichever occurs first).
4.8.4.2.3.1 Low to High. Given you have the desired airspeed relative to merge geometry, leave the power in MAX and pull with POM on the Bandit. As you slow down, SRB will BE replaced by buffet (assuming constant pull); the aircraft is transitioning from the G limit to the lift limit. Approaching 350 knots, radius will decrease as the aircraft slows. From 350 knots to approximately 250 knots the turn radius remains about the same. Below 250 knots, however, the turn radius opens back up again.
4.8.4.2.3.2 High to Low. If airspeed is high, immediately select IDLE power. As your nose will be below the horizon, quickly reset the LV to get POM on to slightly above the Bandit (use caution if you are in the SRB). As the nose tracks to or above the horizon you should be slowing towards instantaneous corner; put the power back in MAX and continue a moderate buffet pull.
4.8.4.2.4 Bandit Assessment Across the Circle (Figure 4.34). As you and the Bandit are approximately coheading across the circle from each other, start to assess whether you are winning, neutral, or losing the min radius fight (Figure 4.34). At the second merge, expect the fight to transition to a scissors, a two-circle (energy fight), or continue in a min radius fight.
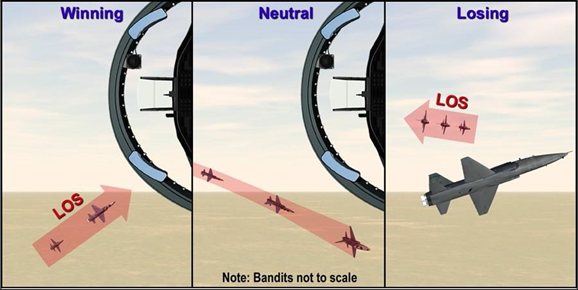
Figure 4.34. One-Circle Assessment.
4.8.4.2.4.1 Winning Cues. With AA stagnant or decreasing, you see LOSR forward begin to develop. With winning cues, execute a lead turn to minimize HCA. Use LOSR towards and then across your nose as the cue to execute the lead turn. At this second merge, you must assess Bandit turn direction just like you did at the initial merge (dashed rectangle in Figure 4.35).
4.8.4.2.4.1.1 Scissors. If the Bandit reverses his turn (the solid red arrow in Figure 4.35), you will transition to a scissors. Your game plan is to lead turn to align fuselages and slow down as required to gain weapons separation.
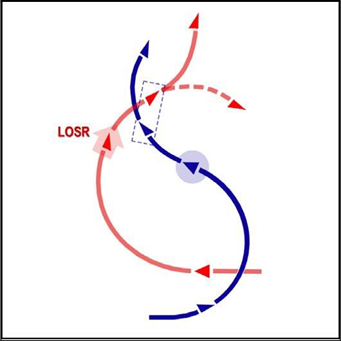
Figure 4.35. One-Circle – Winning.
4.8.4.2.4.1.2 Two-Circle Fight. If the Bandit continues his turn (with his LV and nose dropping below the horizon), he is transitioning to an energy fight (dotted red line in). Use power as required and quickly reset the LV to below the horizon to get on the briefed rate fight game plan.
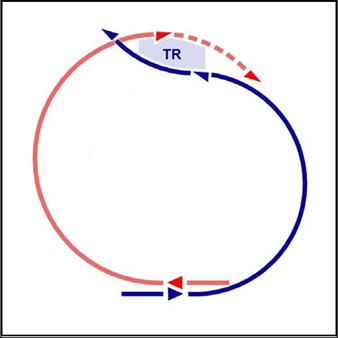
Figure 4.36. Use the Turning Room.
4.8.4.2.4.2 Neutral Cues. LOSR is forward, but Bandit aspect steadily increases towards pure as he approaches the nose. The LV may have to be changed as range decreases to ensure vertical deconfliction in a truly neutral second merge. With neutral cues, you will end up in a second merge where neither the fighter nor Bandit possesses a significant advantage. The engagement could continue one circle or transition into a two-circle fight. The last fighter to turn determines the fight. Do not be indecisive.
4.8.4.2.4.2.1 Approaching the Next Merge. If there is ANY lateral TR between you and the Bandit, use it; don’t let the Bandit lead turn you! In Figure 4.36, if the fighter continues the turn (solid blue line) the TR between him and the Bandit (green hashes) becomes exclusive TR for the Bandit. Instead, the fighter should use the TR (dotted blue line). As you do so, assess Bandit turn direction and continue the min radius fight or transition to the two-circle fight.
4.8.4.2.4.2.2 Neutral Pass. In a completely neutral pass with no lateral TR, the last fighter to turn sets the fight. Again, don’t be indecisive; however, take your energy state and nose position into consideration. At 350 knots or less, consider forcing a one-circle, min radius fight. If >350 knots or with the nose >~15 below the horizon, consider forcing a two-circle fight.
4.8.4.2.4.3 Losing Cues. LOSR is stagnant or aft with the Bandit’s nose rotating towards pure. Typical BFM errors that cause this situation are a light G pull at the initial merge and poor LV control transitioning from a high-to-low conversion to the one-circle, min radius fight. If you find yourself assessing losing cues, make sure you are in a moderate buffet, pull close to the lift limit line, and transition to DBFM if necessary. While executing the appropriate defense mechanics, continue to assess the Bandit for opportunities to reverse, neutralize, or separate. NEVER GIVE UP!!!
No comments to display
No comments to display