
4.9 Air Combat Maneuvering (ACM).
4.9 Air Combat Maneuvering (ACM).
ACM is a substantial leap from BFM in terms of employment. No longer is it a single-man concept where your only cross-check is the Bandit. You now have to bring your element mate into your cross-check along with the normal Bandit assessment. ACM is the first mission where you employ as a team and attempt to maximize visual mutual support. Task prioritization now becomes an issue because the fighters are attempting to either kill or survive while maintaining element deconfliction. While it is the responsibility of each pilot to clear his own flightpath with all sensors available, the wingman carries the primary responsibility of element deconfliction. There are situations, however, when the wingman is not capable of adhering to his primary responsibility, and that responsibility needs to be transferred to the flight lead until the wingman is in a position to reassume his primary role. If deconfliction responsibility is disregarded or not shared appropriately, there can be disastrous consequences.
4.9.1 ACM Roles:
4.9.1.1 Engaged Fighter Versus Support Fighter.
The term “engaged” is used to establish the engaged fighter role in an ACM engagement. Once established, the other fighter by default is the "support" fighter.
4.9.1.2 Establishing the Roles.
Establishing the engaged and support roles is important in the visual arena because both fighters are maneuvering in relation to
the Bandit to defensively survive and offensively achieve a quick kill, while deconflicting within the element. The establishment of engaged and support roles can aid in ensuring element deconfliction by shifting the responsibility for deconfliction to the fighter in the best position to deconflict. Initially, before roles are established, it is the wingman's responsibility to deconflict with the flight lead. While both fighters are responsible for clearing their own flightpath, the support fighter has the ultimate responsibility for element deconfliction, allowing the engaged fighter to have the right of way. The bottom line is one Bandit equals one engaged fighter.
4.9.1.3 Engaged Fighter Role and Responsibilities.
The engaged fighter executes his best BFM to survive and kill the Bandit, regardless of status (defensive/offensive/neutral). In addition, the engaged fighter should strive to maintain tally and visual, if able.
4.9.1.4 Support Fighter Roles and Responsibilities.
The support fighter’s primary responsibility is to deconflict from the engaged fighter. In order to provide element deconfliction, the support fighter must stay visual throughout the fight, even at the expense of good BFM against the Bandit. The support fighter’s secondary responsibility is to take shots of opportunity with a clear field of fire. The support fighter’s tertiary responsibility is to clear the fight for other adversaries that are a factor to the element and to maintain overall element SA to include area orientation, fuel, and separation opportunities.
4.9.1.5 Establishing Roles.
The key to positive role establishment is clear, concise, correct, and timely comm. Roles are established by an “ENGAGED” call from one fighter and a “PRESS” call acknowledgement by the other. The roles are not established without the “PRESS” call. It’s important to note that the “ENGAGED” call is a request from number 2, and until the flight lead responds with a “PRESS” call, number 2’s primary responsibility as the support fighter is to continue to deconflict. The hierarchy to determine who should be calling “ENGAGED” is as follows:
• Most defensive fighter.
• Most offensive fighter.
• Flight lead.
4.9.1.5.1 Most Defensive. The fighter upon whom the Bandit has focused the offensive attack should call “ENGAGED,” or a defensive fighter whose immediate priority is focused on survival instead of deconfliction should call “ENGAGED.”
4.9.1.5.2 Most Offensive. With the element being offensive, the most offensive fighter should call “ENGAGED.” The most offensive is:
• The only fighter with a tallyho. If both fighters have a tallyho; then…
• The fighter with the most offensive entry (will have offensive angles). If not clear, whoever has the most offensive entry; then…
• The first to merge with the Bandit.
4.9.1.5.3 Flight Lead. If a maneuvering fight is developing, and no roles have been established, the flight lead should declare “ENGAGED.” If there is any confusion, the wingman continues to deconflict until roles are confirmed.
4.9.1.5.4 Directing the Wingman to Engage. The flight lead can direct the wingman to call “ENGAGED” with a “PRESS” call. In this example, the wingman should be engaged but has not called it. The flight lead calls, “EAGLE TWO, PRESS.” The wingman responds with, “EAGLE TWO'S, ENGAGED.” The role swap has now officially occurred and Eagle 2 is the engaged fighter with Eagle 1 providing deconfliction as the support fighter.
4.9.1.6 Engaged and Support Role Changes. Once roles have been established, the element should strive not to change the engaged/support roles unless absolutely necessary (unnecessary communications and possible confusion). The driving factor to force a role swap is the support fighter's inability to “survive/kill” while continuing to deconflict. The following are examples of when the role exchange would be required.
4.9.1.6.1 Engaged Fighter Is Offensive/Neutral. The support fighter does not require permission to employ ordnance as long as flightpath and weapons deconfliction can be maintained. Shots should always be communicated. If the support fighter cannot employ ordnance and deconflict, call “ENGAGED.” Consideration should be given to not calling the engaged fighter out of an offensive position for a fleeting missile WEZ. If the engaged fighter is neutral or stagnated in an offensive position and the support fighter has a better entry into the CZ and gun WEZ, the support fighter should call “ENGAGED” to initiate and request the role exchange. The support fighter will maintain deconfliction until the role swap has occurred through a “PRESS” call. (See paragraph 4.9.3 for detailed discussion on ACM communication.. The support fighter should call “ENGAGED” prior to maneuvering the aircraft into a position where there is a potential flightpath conflict.
4.9.1.6.2 Support Fighter Becomes Defensive. The Bandit could elect to switch fighters at any time. The roles should swap when the support fighter becomes defensive and can no longer defend and deconflict. This will require communications for the swap to be complete. Until the role swap has occurred, however, the support fighter’s primary job is maintaining element deconfliction, even when defensive.
4.9.1.6.3 Weapons Employment and Deconfliction (Figure 4.37). After the support fighter has maneuvered his aircraft to a position where he can maintain deconfliction, he should start looking for shots of opportunity with a clear field of fire (CFOF). Different A/A weapons have different weapon deconfliction requirements. For the T- 38C AIM-9 (to include the P+) to meet weapons deconfliction, the other blue fighter can’t be within a 10° FOV at pickle for the entire time of flight (TOF) of the missile. A 10° FOV can be simulated by an area inside the airspeed, altitude, and heading bars on the HUD. If the other blue fighter is or will be in that region at pickle through missile impact, CFOF has not been satisfied and the shot should not be taken. Missile TOF can be simulated by the following rule of thumb (ROT): 6 seconds per NM with a tail aspect, 4 seconds per NM in the beam, and 2 seconds per NM with an H aspect. If the engaged fighter calls “DEFENSIVE” at any point in time, or if the support fighter determines the engaged fighter is defensive, weapons deconfliction may be relaxed but not entirely discarded. The track of the missile is still the responsibility of the shooter, but a much smaller CFOF may be acceptable if the engaged fighter is in danger of being killed in a short period of time. Example: If a fighter is defensive at ground level, out of energy and ideas, with a Bandit stuck at 6 o'clock and 1,000 feet, the situation is a bit more pressing.
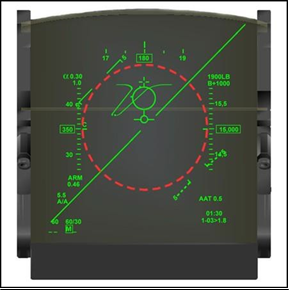
Figure 4.37. Weapons Deconfliction Zone.
4.9.2 ACM Communications:
4.9.2.1 Standard Communication.
Pilots must use standard terminology in order to avoid confusion, enhance SA, and minimize excessive radio transmission time. Nonstandard radio terminology, lack of call signs, and excessive communication can cause confusion and misunderstanding at a critical time. Use a separate radio to the maximum extent possible for ACM communication.
4.9.2.2 Categories.
There are four categories of communication words that apply to ACM: engaged/support, directive, descriptive, and informative. This discussion is presented in terms of an engaged element.
4.9.2.2.1 Engaged/Support Communication:
4.9.2.2.1.1 “ENGAGED.” The fight member is informing the element of the intent to take the engaged fighter role. From the wingman, it is a request for the engaged fighter role. In either case, a response is required. If it will enhance SA, include a descriptive term: “EAGLE ONE ENGAGED, DEFENSIVE.”
4.9.2.2.1.2 “PRESS.” A response to an “ENGAGED” call that confirms the flight member who called “ENGAGED” is the engaged fighter. The member who called “PRESS” is the support fighter. This is the only acceptable response from a wingman when the flight lead calls “ENGAGED” unless the wingman is blind or will go defensive and die. Roles are established or swapped.
4.9.2.2.1.3 “UNABLE.” A response to an “ENGAGED” call indicating the engaged fighter is unable to disengage or pick up the support role without going defensive or dying. This communication usually includes a descriptive term stating the reason. “EAGLE TWO, UNABLE, DEFENSIVE/BLIND.” Roles are not swapped.
4.9.2.2.1.4 “NEGATIVE.” A flight lead’s only response which simply means “NO.” The flight lead, based on inherent authority, is unwilling to allow the wingman to become the engaged fighter. Roles are not swapped
4.9.2.2.2 Directive Communication. Directive communication tells the other fighter in the element to do something. Used to maneuver the element in the most advantageous manner to survive or engage the threat. When using directive communication, preface the call with the call sign of the flight member to act. For example, a wingman who visually detects a Bandit approaching weapons parameters from the flight lead's right side would say, “EAGLE ONE, BREAK RIGHT.” Examples of directive terms are:
• Break (with direction): a maximum performance, energy depleting turn with flares.
• Hard (with direction): a maximum power sustained performance turn.
• Flare.
• Separate (with direction).
• Jink.
• Reference (with direction).
4.9.2.2.3 Descriptive Communication. Descriptive communication informs the other fighters where to look or what they may see. After initiating a reaction with directive communication, fill in with descriptive commentary, as required to coordinate between involved fighters. Descriptive commentary is normally prefaced with the call sign of the flight member being addressed. For example, Eagle 2 says: “EAGLE ONE, BANDIT RIGHT 3 O'CLOCK 2 MILES, LOW.” The following are additional descriptive items as the situation requires:
• Type aircraft or threat identification
• Left or right (side of aircraft)
• Clock position
• Range
• High/level/low
• Amplifying remarks
4.9.2.2.4 Informative SA Building Communication. Additional examples of descriptive communication that informs the other flight members of intentions include “EAGLE TWO...
• OFFENSIVE/DEFENSIVE”
• ANCHORED”
• IN/OUT”
• Bandit SWITCH”
• SPLIT”
• FOX 2”
4.9.2.2.5 Plain English. While communication discipline is of extremely high importance in the air combat arena, killing the Bandit in minimum time while ensuring blue force deconfliction is paramount. If undecided what to say, revert to plain English to convey intentions to the other fighter.
4.9.3 ACM Execution Based on Attack/Detection Quadrant.
The following sections address element ACM execution when committed to a merge. The requirement to enter the ACM environment could occur at the end of an intercept or in the post-merge arena. Execution mechanics will address response based on threat detection from visual detection, traffic collision avoidance system (TCAS), or AWACS/GCI. The principles of ACM are:
• Detect the threat.
• Engage:
- Direct an initial move to defeat any initial attack.
- Maintain element mutual support by establishing roles.
- Best BFM to kill and survive.
• Separate with visual mutual support.
4.9.3.1 Threat Detection.
In order to prosecute and defeat a short-range attack, the threat must first be detected. Detecting threats is a continuous effort. Element members must clear the area around their flight for new threats and multiquadrant attacks. The complete attention of both element members cannot be focused on a single threat attacking them. The support fighter, in particular, must be alert for additional threats. Detection can occur from a GCI point out, TCAS, or visually. To successfully prosecute and defeat a short-range attack, visual acquisition by at least one element member early in the initial move sequence is essential.
4.9.3.2 Target Detection.
Once the decision to engage has been made, the element needs to effectively communicate, sanitize for other threats, and arrive in the visual arena with an offensive advantage. As a minimum, be in a position to get the tallyho and have immediate weapons opportunity at the merge. If the pilot with the initial detection is expecting to merge with a Bandit, the other fighter needs to quickly know where to visually search as well as where to position the aircraft.
4.9.3.3 Initial Communications at Visual Pickup.
The fighter who initially detects the threat needs to base their initial radio transmission on the Bandit's proximity to a WEZ. Communicate with the appropriate AFTTP 3-1.1 brevity terms to state the Bandit's location. If the Bandit appears unaware, depending on the mission, the initial call may just be descriptive to point out the threat: “EAGLE TWO, TALLY ONE, BRA 260, 2, COLD.” If the intent is to get the flight turning toward a Bandit who is not in a WEZ (due to range or nose position) then a hard turn should be called by the flight lead: “EAGLE HARD RIGHT.” If the Bandit is in or approaching a WEZ the
first radio transmission needs to be geared toward ensuring the survival of the flight: “EAGLE ONE, BREAK RIGHT.” The first priority is directive calls to ensure flight survival, followed by descriptive calls to allow the other flight member to get a tallyho. As a general ROT, all visual pickups with an aspect >90° should be assumed to be approaching a WEZ and consideration should be given to “Break” turns versus “Hard” turns to engage.
4.9.3.4 Formation.
The element should attempt a bracket with both vertical and lateral offset in order to maximize split-plane maneuvering to deny the Bandit “Tally 2.” The objective is to intercept the Bandit from two distinct sides, force the Bandit to turn, providing one fighter a shot/kill opportunity. Both fighters should maneuver for TR. If the Bandit maneuvers to flank or beam the element, it may be impossible to execute a bracket attack and should transition to a single-side offset (SSO) intercept with vertical offset. If intercepting from a SSO, the non-tally fighter should take spacing and establish a 1- to 1.5-nm lateral and 2000-3,000 feet of vertical separation. Vertical spacing should be in relation to the Bandit. This ensures TR and weapons separation at the merge while preventing the Bandit from visually acquiring both fighters. The element should be in a position that if the Bandit survives to the merge, the ACM roles can then be defined, and visual maneuvering will result in a quick kill of the Bandit.
4.9.3.5 Visual Pickup in the Front Quarter:
4.9.3.5.1 High-Aspect Bracket Game Plan. The element should attempt a bracket with both vertical and lateral offset in order to maximize split-plane maneuvering to deny the Bandit “Tally 2.” The objective is to intercept the Bandit from two distinct sides, denying the ability to defend against both fighters, and giving one fighter a shot opportunity. See Figure 4.38 for an example of the merge flow. Both fighters should maneuver for TR if able and force the Bandit to pass between the element. The engaged fighter, (the flight lead or whoever the Bandit is leaning on) should execute the merge prep checklist and strive to arrive at the merge in an offensive position. The support fighter should float his formation out to visual limits with a vertical stack off the horizon to deny the Bandit “Tally 2” (the desired formation is a 1- to 1.5-nm lateral and 2,000- to 3,000-foot vertical separation) in order to achieve TR and weapons separation. The support fighter should then turn towards the fight and prepare to take a quick shot with weapons deconfliction once the identification (ID) is made. A common description of this event is "filming the merge" because of the opportunity that exists for the wingman to have the Bandit in the HUD at the time of ID (due to the geometry of the intercept) (Figure 4.39). In this case, the fighter without the tally (default to the wingman) should pick up a formation position that will allow shot at the merge.
Figure 4.38. High-Aspect Bracket.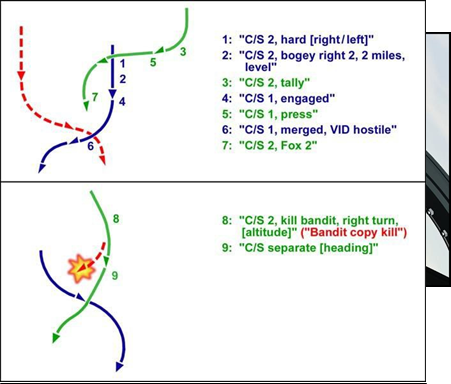
Figure 4.39. Filming the Merge.
4.9.3.5.2 Establishing Engaged and Support Roles. Just prior to the merge (turning is about to begin), the element should establish the engaged and support roles. Since neither fighter is defensive, the most offensive fighter should call “ENGAGED.” This would be the only fighter with the tallyho. If both have tallyho, then the fighter with the most “offensive entry,” will call “ENGAGED,” If neither fighter clearly has an offensive advantage (significant lead turn), then maintain the element deconfliction contract and assess Bandit actions. The Bandit’s choice on whom to turn with should determine the resulting engaged/support roles. If the wingman is unsure, then lean forward with an “ENGAGED” call, and the flight lead can easily veto with “NEGATIVE, EAGLE ONE ENGAGED.”
4.9.3.5.3 Merge. When merging with a Bandit, the appropriate fighter should always make a “MERGED” call if the flight has visual mutual support (VMS). This should help to get the other fighter's eyes on the Bandit and ensure both fighters see the same Bandit.
4.9.3.5.4 Visual Identification (VID). If a VID is being accomplished and all ROE have been met, make the call in the following format: “EAGLE ONE, VID (ID ROE), (TYPE AIRCRAFT as required)”. The merge and VID call may be combined to reduce excessive comm. Example: “EAGLE 1 MERGED, VID, HOSTILE (VIPER).”
4.9.3.5.5 Quick Kill or No Turn at Merge. With effective communications, formation, intercept, and ID, the fight should be over at the merge with a quick missile kill. The support fighter should have weapons separation prior to the merge and be in a position to shoot once the ROE and weapons deconfliction criteria have been met. If this is not accomplished and/or the flight lead does not want the element to turn at the merge, this should be communicated as soon as possible with a radio call.
4.9.3.5.6 Engaged Fighter Turning at the Merge. The engaged fighter should turn to execute the best BFM to kill the Bandit. This will also make the Bandit somewhat predictable. Typically, single-circle fights put more pressure on an adversary than two-circle fights. Single-circle fights force the Bandit to get anchored and low on energy, allowing for an unobserved rear-hemisphere WEZ entry by the support fighter.
4.9.3.5.7. Status Calls. If unsure of which aircraft is which, the support fighter should query with a radio call: “EAGLE ONE, STATUS HIGH/LOW.” “HIGH/LOW” can be substituted with whatever the support fighter sees or makes sense from his angle. Other acceptable description fill-ins may be “NOSE HIGH/LOW, RIGHT/LEFT SIDE, LEFT/RIGHT TURN”. Cardinal directions and headings should be avoided because it requires head’s down time by both fighters. Eagle 1 at this point should be as descriptive as possible and always tell the status in response to what he was asked, and then any other SA enhancing parameters of Eagle 1’s aircraft. As an example, “EAGLE ONE IS HIGH MAN, OFFENSIVE.”
4.9.3.5.8 Kill Calls. The shooter should use the ROT as mentioned earlier for missile TOF before making a kill call. Kill calls should be as descriptive as possible. Example: “EAGLE TWO, KILL BANDIT, RIGHT HAND TURN, 14K FEET,
NOSE LOW.” The shooter should ensure the Bandit acknowledges the kill, “BANDIT, COPY KILL,” while directing the separation.
4.9.3.5.9 Separations. Once a kill is achieved, execute a separation. The support fighter is primarily responsible for directing the separation since his tertiary responsibility is to gain SA on the battlefield. The support fighter needs to assess the energy states of both fighters in order to give a separate heading that will put them close to LAB. As a general ROT, the separation direction should be limited to less than 90° from the current flow. This will ensure that both fighters will be banked up for a limited amount of time, thereby decreasing the possibility of another Bandit picking up the tally. It also allows the fighters to get to a VMS formation quickly so that the coordinated sensor ops game plan can be reestablished in a timely fashion. Power should be MAX, and the jet should be unloaded to 0.5G. This gets the formation back to an acceptable energy state and gets the formation low to decrease possible WEZ’s from other Bandits.
4.9.3.6 Visual Pickup in the Beam:
4.9.3.6.1 Shooter-Eye Game Plan. The element should position itself to engage as described in visual pickup in the front quarter. As stated earlier, if it was a visual pickup, assume the Bandit is approaching a WEZ. The fighter who picked up the Tally should direct the formation towards the Bandit with a “Break” turn. If a “tally” from the defensive fighter is not immediately forthcoming, whichever fighter called the break should follow quickly with directive and descriptive communication to prevent the other fighter from breaking so far as to go belly up to the Bandit. If both fighters see the Bandit, the closest fighter to the Bandit should call “ENGAGED” and press an attack on the Bandit since he will be the first to merge. The initial break turn will likely drive the fighters into a trail formation from which the trail and outside fighter should have weapons separation and a shot opportunity if the Bandit engages the lead fighter.
4.9.3.6.2 Merge. As stated above, the inside fighter is best suited to be the engaged fighter (first to merge). Lack of proper ID may force a merge before any T-38Cs can shoot. Whether or not the engaged fighter turns immediately at the merge depends on whether trailers are suspected. Regardless, the first to merge should call the VID. Turning at the merge will immediately put pressure on the Bandit and will facilitate a quick exit of the trailing fighter's field of fire (depending on what the Bandit does). This will present a quicker shot opportunity to the trailing fighter and allow offensive angles by the engaged fighter if the Bandit extends to merge with the support fighter. Regardless of which fighter merges and engages with the Bandit, they should still execute merge prep and be prepared to fight their best 1v1 BFM with the game plan of anchoring the Bandit single-circle if the merge geometry allows.
4.9.3.6.3 Bandit Turns with the Lead Fighter. If the Bandit turns on the first fighter to enter the merge, the trailing fighter should have an easy shot opportunity and an offensive entry. The trailing fighter should ensure weapons deconfliction and shoot if in a WEZ. If required to enter a gun WEZ, the support fighter (the trailing aircraft) can subsequently initiate or request an exchange of roles by calling “ENGAGED.” See Figure 4.40 for an example of the fight flow.
4.9.3.6.4 Bandit Extends to the Trail Fighter. The Bandit also has the option to blow through the first merge and switch to the trail fighter if “Tally 2.” The first to assess this should call out “Bandit Switch” with your call sign, and expect a role swap will logically ensue. This will allow the engaged fighter (first to merge) to rapidly gain an angular advantage on the Bandit. In either case the element should be able to achieve a quick kill. See Figure 4.41 for an example of the fight flow.
4.9.3.7 Visual Pickup in the Stern.
Despite tremendous advances in all-aspect weaponry, the stern quadrant is still the flight's most vulnerable cone. First, the fighter will have no shot opportunity until nearly 180° of turn—an expenditure of time and energy. Second, in a stern attack, the Bandit may continue firing ordnance until forced out of 6 o'clock. Unlike a beam or head-on attack, reduced closure will allow the Bandit to remain in firing parameters for a longer period of time. Both fighters can greatly increase their probability of post-merge survival by keeping their speed up, descending to lower altitudes (SA and threat permitting), and maintaining optimal tactical formation. If possible, an altitude stack (1,000 to 3,000 feet, unless on the deck) and wider tactical formation (9,000 feet, plus) should be flown. A Bandit converting on two coaltitude, 6,000-foot spaced T-38s is presented with a much easier tally two (or four) opportunity. This section will cover element maneuvering against a threat that is initially detected in the flight's stern quadrant.
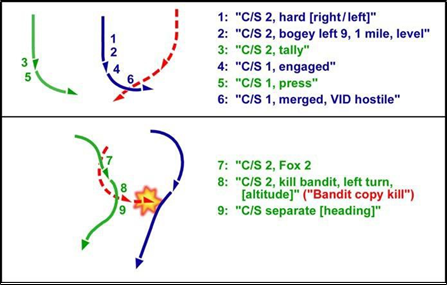
Figure 4.40. Bandit Turns with the Lead Fighter.
Figure 4.41. Bandit Extends to the Trail Fighter.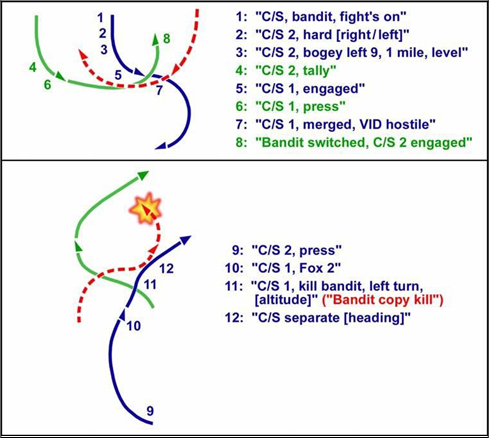
4.9.3.7.1 Initial Move. Bandit is assumed in a WEZ. With a Bandit in a WEZ, the first to gain tallyho should direct a break turn into the attacking Bandit. The break direction should always be called in the direction most advantageous for survival for the person being attacked. Generally speaking, the formation should break in the direction of whomever the Bandit is lined up on. If the Bandit is attacking from significantly above or below the horizon (more than 30°), the fighter directing the break should include the terms “up” or “down” respectively: “EAGLE ONE BREAK LEFT AND UP.” The element should execute their best DBFM and infrared missile defense (IRMD) while continuing to deconflict from each other.
4.9.3.7.2 One Fighter Tally. The fighter with the tally must provide descriptive commentary to get the other pilot's eyes on the Bandit. This requires descriptive calls that isolate the Bandit in a portion of the other fighter's canopy and includes range. For example, if Eagle 2 were pointing out the threat to Eagle 1: “EAGLE ONE, BANDIT LEFT 7 O’CLOCK, 2 MILES, LEVEL.” Communication is required to add SA if the Bandit is clearly attacking one eagle or the other: “EAGLE ONE, BANDIT LEAN ON YOU” OR “EAGLE TWO ENGAGED, DEFENSIVE.” This way, the
engaged and support roles are established even if only one fighter has tallyho.
4.9.3.7.3 Establishing Roles and Execution. Once it is clear who the Bandit is focusing the attack on, the “ENGAGED/PRESS” calls should be made to establish roles. To allow an effective energy state for maneuvering, the support fighter should immediately select full AB and consider a sustained energy turn as soon as the Bandit's nose is off.
4.9.3.7.3.1 No Switch. Optimal tactical formation discussed previously may limit the Bandit to see only one fighter. In this case, or due to a poor tactical decision, the Bandit may press the attack without regard to the other fighter. The support fighter should have a quick missile shot or transition to a gun WEZ. Since WEZ opportunities are fleeting, the support fighter should anticipate the WEZ and be prepared to shoot while ensuring weapons deconfliction is met. See Figure 4.42 for an example of the fight flow.
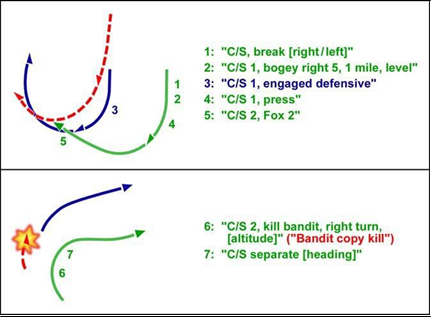
Figure 4.42. Defensive Perch (No Switch).
4.9.3.7.3.2 Bandit Switch. A Bandit who stern converts on two fighters, both of which are seen, will usually attempt to switch to the fighter on the outside of the turn at some point after the fighters initiate their break. This could happen immediately (“Early Switch”) or after the Bandit pursues one fighter for a short time and then switches to the other (“Late Switch”). Typically, the inside fighter will see the Bandit's nose go to lag with LOS towards the outside fighter. Both fighters should be careful not to confuse a Bandit belly check or quarter plane with an actual switch. When the switch occurs, it must be quickly recognized and, if possible, communicated within the element. If it was not clear within the element who the Bandit was on, then use previously discussed calls to make it clear and establish roles. If roles had been established, call the switch and exchange of roles if necessary: “EAGLE TWO, BANDIT SWITCH,” “EAGLE TWO, ENGAGED,” “EAGLE TWO, PRESS.” As soon as the Bandit’s nose comes off to execute the switch, the defensive fighter must anticipate the three-dimensional (3D) merge geometry to assess whether his element mate will be able to execute the overall game plan and take the Bandit single-circle, or if the merge geometry requires the fighter to take him two-circle. If the Bandit has more than 1,500 feet of TR and/or 30° of lead turn at the merge, the merging fighter has no choice but to go two-circle with the Bandit to prevent putting himself in an immediate defensive position. If the Bandit has less than 1,500 feet of TR and/or 30° of lead turn at the merge, the merging fighter can execute the overall game plan and force the Bandit into a single-circle fight. Whether the merging fighter forces a single-circle or two-circle fight will determine the support fighter’s follow-on maneuvering.
4.9.3.7.3.2.1 Early Switch. An early switch will almost always allow the Bandit to gain greater than 1,500 feet of TR and/or 30° of lead turn. This forces the merging fighter to go two-circle. Prior to arriving at the merge the fighter should execute merge prep and establish roles. At the merge the now engaged fighter needs to call the VID. This can all be condensed into one comm call. “EAGLE ONE, MERGED, VID HOSTILE, 1’S ENGAGED” followed by “EAGLE ONE, PRESS” from Eagle 2. Eagle 1 as the engaged fighter should execute his best two-circle BFM. As soon as the Bandit executes the early switch from Eagle 2 onto Eagle 1, Eagle 2 needs to start executing his smartest BFM while maintaining deconfliction, IAW the support fighter’s priorities. This scenario is the most difficult for the support fighter to maintain deconfliction because it stretches the formation to visual limits. The best game plan for the support fighter is to keep power in MAX, immediately set LV 45° to the horizon (pitchback picture) in the direction of the merge, and max perform the aircraft into the vertical. This will get the support fighter sufficiently off of the horizon, so that as the Bandit’s nose turns toward him, it will be difficult for the Bandit to see him. If the Bandit does see him, this maneuver ensures that the Bandit will not threaten him with his nose because it will allow the engaged fighter an easy WEZ opportunity if he does. This maneuver will also slow the support fighter’s forward ground track (in the same way scissors do) so that he can maneuver to a more mutually supportive position from the engaged fighter while maintaining WEZ separation for shots of opportunity. Weapons deconfliction, kill calls, and separation execution still apply as the fight matures and reaches those milestones. See Figure
4.43 for an example of the fight flow.

Figure 4.43. Defensive Perch (Early Switch).
4.9.3.7.3.2.2 Late Switch. A late switch will almost always allow the merging fighter to gain some TR and lead turn on the Bandit as he executes his merge prep. At the very least the merging fighter should have a neutral merge and geometry that allows the merging fighter to drive a single-circle fight. Prior to arriving at the merge, the fighter should establish roles. At the merge, the now-engaged fighter needs to call the VID. This can all be condensed into one comm call. “EAGLE ONE, MERGED, VID HOSTILE, 1’S ENGAGED” followed by “EAGLE ONE, PRESS” from Eagle 2. As soon as the Bandit executes the late switch from Eagle 2 onto Eagle 1, Eagle 2 needs to start executing his smartest BFM while maintaining deconfliction IAW the support fighter’s priorities. The best game plan for the support fighter is to keep power in MAX, overrotate LV (G-awareness picture) to use altitude to get nose turned around quickly, and MAX G allowable (SRB). It may be difficult for Eagle 2 to keep sight of Eagle 1 at this point due to the geometry putting Eagle 1 at his dead six. Element deconfliction can still be assured due to SA that they are not in the same piece of sky at this point (nor will they be in the next 15 seconds), thereby negating the requirement to call “EAGLE TWO, BLIND.” It should be rather easy for Eagle 2 to maintain the tally on the Bandit throughout this turn. He should follow the Bandit until he hears Eagle 1 call “MERGED” and then look around the Bandit with a good search pattern to reacquire the visual on Eagle 1. If at this point Eagle 2 still is not visual, it warrants an “EAGLE TWO, BLIND” call. If Eagle 2 sees two aircraft but is unclear of which aircraft is which, his next job is to figure out which aircraft is friend or foe. Use status comm as depicted earlier and offset the fight at the 11 to 1 o’clock position until tally/visual is regained. Once Eagle 2 is tally/visual (he knows who is who), he can point at the fight while assessing range for a valid AIM-9 opportunity with weapons deconfliction. Eagle 2 needs to be vigilant about assessing closure because the single-circle fight will quickly decay into a 150-knot joust for 3/9 advantage. If Eagle 2 is faster than 250 to 280 knots, he can cause excessive closure, including the possibility of flying out in front of the fight prior to missile impact. See Figure 4.44 for an example of the fight flow.
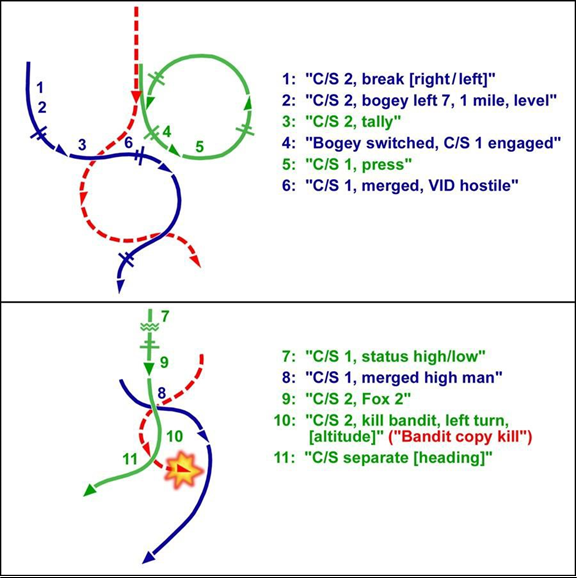
Figure 4.44. Defensive Perch (Late Switch).
No comments to display
No comments to display