
5.10 Conventional Pattern Procedures
5.10 Conventional Pattern Procedures:
5.10.1 Purpose.
The conventional pattern allows orderly, repetitive weapons delivery practice for up to four aircraft on the range. It is designed to allow you to get from one pass to the next as efficiently as possible to maximize learning basic diving weapons delivery.
5.10.2 Conventional Pattern Overview.
The conventional pattern is similar in structure to a standard landing pattern, with the following segments: crosswind, downwind, base, and final (Figure 5.2). While the basic pattern remains the same between different events, altitude and base position will change to accommodate the various release altitudes and dive angles. Depending on the event, a complete “lap” around the pattern will take only 1 to 2 minutes or about 100 to 150 pounds of fuel. In addition to the required tasks for each segment of the pattern, you will have to maintain briefed altitude, airspeed, and ground track.

Figure 5.2. Conventional Pattern.
5.10.3 SEM.
All SEMs will be executed IAW T.O. 1T-38C-34-1-1. Using 4.1 to 4.3 Gs in the pull is a good technique to ensure the SEM is valid while minimizing the potential for an asymmetric over-G due to jetwash. Use caution on steeper events; airspeed errors and dive angle increase over-G potential. Rapid G application is not necessary; you have 2 seconds to blend to 4 Gs. It is a good technique to complete an SEM anytime you commit your nose to the target, even if the decision is made not to release ordnance.
5.10.4 Crosswind. The first priority after the SEM is to regain visual on the preceding aircraft. With 8,000 feet of pattern spacing, the preceding aircraft should be near 10 o’clock and hold steady on the canopy until rolling out on. You will be looking at almost tail aspect making the visual tougher to reacquire. When turning crosswind (or any other place in the pattern), realize that you may be turning inside the preceding aircraft (the "coffin corner"). Look outside as well as inside your turn until you are sure your turn is clear.
5.10.5 Check Spacing.
After finding the aircraft in front of you, assess your pattern spacing; you should be 6,000 to 9,000 feet behind the preceding aircraft. The AAT can be used to back up a visual assessment of 6,000 to 9,000 feet. TCAS and a 2.5-NM primary flight reference (PFR) scope may also be used to back up visual assessment. If you are close or wide, then adjust your turn to downwind to either increase or close range. If you are adjusting your downwind turn, orient your downwind leg so that you will arrive over the briefed ground track at your turn to base. If you are Number 2 or Number 3 of a four ship, avoid airspeed deviations as they will affect the aircraft behind you; instead use geometry. Prior to “cutting” any corners, you must be visual or have SA with comm with all of the preceding aircraft. This will prevent an unaware, belly-up pull on the preceding aircraft that can create a midair collision potential in the form of a “coffin corner.”
5.10.6 Downwind.
Lead will establish the downwind leg ground track in the brief. This is not a fixed position and may be varied by individual pilots if required to adjust spacing. Use the time on downwind to prepare for the next pass and analyze errors from the previous pass.
5.10.6.1 Prepare for the Next Pass.
While not all-inclusive, the following checks cover the minimum and highest priority tasks while on downwind. In addition, continue to evaluate pattern spacing and analyze winds; adjusting as necessary to fly the correct ground track for the planned weapons delivery and spacing. The following techniques help the aircrew develop habit patterns that can be applied in future aircraft. The individual checklist items are discussed in this chapter.
5.10.6.1.1 T-A-G. An easy to remember acronym to aid in accomplishing downwind checks is T-A-G:
T – Target/Weapons Program.
A – Attack Numbers.
G – Gas (Complete Ops Check).
5.10.6.1.2 W-A-M-O-E. The W-A-M-O-E check is another common technique. It includes error analysis, which reminds aircrew to think through adjustments for the next pass.
W – Weapons Mode (A, B, C…).
A – Arm.
M – Master Mode (A/G, CCIP).
O – Ops Check.
E – Error Analysis.
5.10.7 Base.
For accurate weapons delivery, base position is crucial. There are three major conditions required to begin a successful roll in: airspeed, altitude, and base distance. As you can see in Figure 5.3, there are nine places you can be, eight of which are not correct for a given set of weapons-delivery parameters. To arrive on the planned wire, base distance and altitude must be accurate. Airspeed deviations on base will cause you to devote excessive time on final to airspeed corrections. Shack your base parameters.
5.10.7.1 Base References.
The proper base distance can be achieved via two sources: ground reference and canopy codes. Using ground references in a commonly used pattern is advantageous for learning the basics of surface attack and establishing canopy codes. In a more tactical environment, you will have to use canopy codes to visually assess your base position. If a ground reference is available, select a lead point to begin the base turn so as to roll out pointing toward the reference (Figure 5.3). Select MIL power, and execute a level turn with G to hold airspeed. While refining parameters on base, acquire the target. Another method used to set base distance is a visual assessment of the planned wire. This involves setting the correct target-to-canopy reference or "sight picture" while wings level on base (Figure 5.3). For no wind, put the target 1 1/2 fist widths above the canopy rail for a 10°, a fist width above for a 20°, on the canopy rail for a 30°, and for a 45°, the target will be a fist width below the canopy rail. These references are only valid when wings level, at the appropriate base altitude, and at a nominal sitting height which can be found in
T.O. 1T-38C-34-1-1. These methods can be combined to help build the base sight picture and refine your base distance. For either method, the target should be your primary reference for planning the roll in.
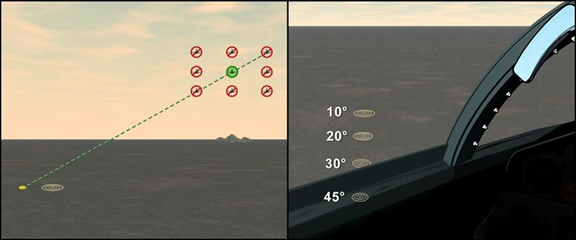
Figure 5.3. Base References.
5.10.7.2 Base Ground Track Corrections.
To make a correction, angle in or out from the target, and then roll out. Once the picture is set, if time allows prior to the roll in, return to the original base ground track that is perpendicular to the planned attack heading. Generally, there is time for one correction on base. While base position may be slightly altered to adjust pattern spacing, it is discouraged as this requires changes to the roll in to get to the planned wire on final. If you are excessively close to the preceding aircraft, consider using a normal base position and go through dry on final. Subsequently, adjust your pattern spacing on downwind.
5.10.8 Wind Corrections in the Conventional Pattern.
When dealing with winds in the pattern, three adjustments need to be made: the lead point for your turn to base, the base position itself, and the heading to hold that ground track. For a headwind (on final), you will need to turn base slightly earlier compared to no wind. In addition, adjust the base distance closer to the target, and roll out with a crab into the wind. The opposite is true for a tailwind (on final). This will also affect the canopy references, so the target should be slightly closer to the canopy rail for a headwind or slightly further away for a tailwind. One finger width correction for each 10 knots of head/tailwind is a good ROT. For crosswinds (on final), adjust your roll in earlier or later, and expect to crab into the wind to achieve proper parameters.
No comments to display
No comments to display