
6.7 Medium-Altitude Tactics.
6.7 Medium-Altitude Tactics.
There are several reasons why one would choose medium altitude tactics. Oftentimes, flight leads are forced into medium-altitude tactics due to constraints from higher headquarters. In these cases, the threat is generally low, and medium-altitude tactics offer a safer margin from error. These tactics can aid the pilot in consistently being able to have eyes on the target area. It also increases LOS capabilities for communication and loiter time due to gas savings. Some drawbacks include not being able to positively identify friendly versus enemy forces, susceptibility to unknown threats, weather issues and, in some cases, weapons effects. All these factors are part of the flight lead’s mission planning and are always being updated once in the battle space.
6.7.1 Medium-Altitude Tactical Administration.
Once the flight is established in the AOR, or in the case of IFF, the range, some tactical administration has to be accomplished. Expect the flight lead to check in with the ranger and call for the FENCE-IN. FENCE-IN according to the brief and fly the briefed formation. The flight may or may not execute a G- exercise. Next, expect the flight lead to establish the flight into some sort of holding pattern from which to attack.
6.7.2 Medium-Altitude Holding.
The most common hold in the daytime medium-altitude arena is the wheel. Although any fighter pilot, if given the option, would prefer a left-hand wheel in order to facilitate left-hand roll ins, you should strive to see both right- and left- hand wheels. In the future, your main sensor will be the targeting pod, and your wheel directions will depend on which side of your jet the pod is mounted. Other holding options are offset figure 8, bone holding, and random holding. Depending on the tactical situation, your flight lead may choose one over another to maximize mutual support. Be attentive in the brief to see what holding is expected, but be ready for whatever the tactical situation requires once in the AOR.
6.7.3 Medium-Altitude Execution.
In the T-38, the most common medium altitude deliveries are 30 dive bomb (DB) and 30 HAS. Typical base altitudes for these deliveries are in the 8,000 to 10,000 AGL regimes. As such, your hold will be in a similar altitude regime. At approximately 3 NM from the target area, a 10,000-foot hold allows a comfortable 30° to 45° of constant bank at 300 KCAS. One formation you may fly is a trail position (Figure 6.2). Using the canopy reference shown here (Figure 6.3), 1.0 to 1.5 NM on the AAT will help you hold a good position. Another good holding formation is wedge (Figure 6.2). This allows the wingman to hold high and outside the flight to provide better mutual support. The wingman may burn more gas being on the outside but by using altitude and geometry, it can be avoided. One technique to avoid getting stripped and falling to trail is to close in the range from 6,000 to 9,000 feet to 3,000 to 6,000 feet. Some flight leads may refer to this as “Combat Trail.”
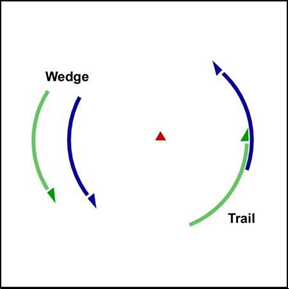
Figure 6.2. Medium-Altitude Holding.
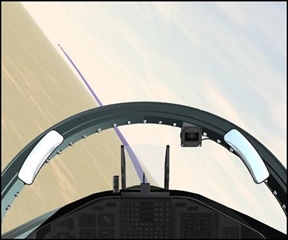
Figure 6.3. Wheel Canopy Reference.
6.7.3.1 Attack Roles.
While established in the AO, you will spend a great deal of time looking outside and listening to the radio to gather all the information you need about the next attack and to find the target. For each attack, you will have a specific role. Your flight lead will brief you on exactly what is expected of you for each of his attacks. As a result, in the air he will pass the Fighter-to-Fighter brief over interflight radio. Typically, it will be in the format: Formation, Role, Ordnance, Timing, In and Off Directions, and a Sort. Your contract/responsibilities for each of these roles will be briefed. Here are some examples of the types of roles you might expect.
Shooter – Employing ordnance
Cover – Guaranteeing mutual support with visual and comm
Suppressor – Employing to suppress enemy defenses (so similar to ‘shooter’ that it’s rarely used)
Recce – Building target area SA with visual lookout (you are always recce)
From medium altitude, you can expect your flight to run either Shooter/Cover or Shooter’s attacks. With this in mind, your job leaving the hold will be to maneuver your jet to a good base position for the delivery or to a mutually supportive formation while your flight lead employs.
6.7.3.1.1 Cover.
If you are tasked to the cover roll, you will stay in the wheel at altitude while providing your flight lead with visual lookout and comm mutual support. Continue to fly the same ground track while lead rolls in. You will be almost looking down your flight lead’s tail pipes as he pickles. This position will build your SA on the target, as well as give you a great view of the section of earth he can’t see, behind and underneath his jet. Your lookout priorities are 1) underneath flight lead, 2) the area around the target, 3) the immediate target area, and 4) your flight lead (Figure 6.4). Your flight lead will recover from the attack with the following priorities: SEM, clearing his six with 3D maneuvers, and then finding you. Typically, lead is assumed to be blind off target, while you are assumed to be visual in the cover role. The attacker, in this case the flight lead, should call visual after the 3D maneuvering and prior to establishing himself in the hold. Even prior to lead regaining the visual, you may see the need to maneuver to regain your position. Always strive to use geometry to fix your spacing verses just power.
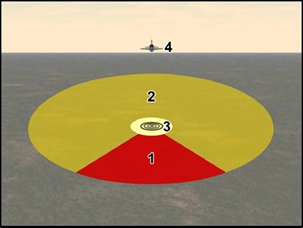
Figure 6.4. Lookout Priorities.
6.7.3.1.2 Shooter. When you are directed to drop, lead will assume the mutual support and deconfliction contracts that are normally your responsibility. You should, however, strive to stay close to the briefed formation position until you start maneuvering to a good base.
6.7.3.1.2.1 Finding Base. While accelerating to base airspeed, you should maneuver to the correct base altitude and distance. Your primary reference for base distance is the canopy references that you learned on your conventional range sorties. This canopy reference is only valid from a wings level attitude and heading 90° to the desired attack heading, no wind. The tendency to ‘mothball’ or fly closer to the target in order to see it better will often lead you to be in a banked turn while establishing your known canopy reference. This results in being too steep to employ due to the 5° steep TR stop. In an effort to combat this problem, most pilots will ‘square off’ the last portion of their base turn in order to be both 90° out to the desired run-in heading, as well as allow a wings level canopy reference assessment (Figure 6.5).
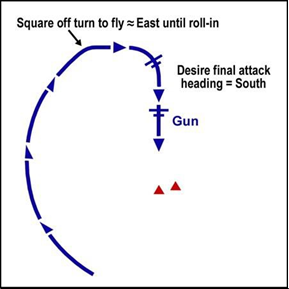
Figure 6.5. Medium-Altitude Attack Pattern.
6.7.3.1.2.2 Finding the Attack Heading. A common error when executing wheel attacks is overshooting the desired final attack heading. A common technique for finding the right heading on final involves the use of your horizontal situation indicator (HSI). You should be in the blue EGI mode during these sorties with the target coordinates plugged into the current steer point. Cross-check your blue bearing needle and start your roll-in when the bearing pointer is about 15° from getting to the desired heading. Some pilots choose to mark their desired attack heading with the heading bug or CDI. Remember that flying a base position approximately 90° to your desired attack heading will make it easier to visualize the proper point at which to roll-in.
6.7.3.1.2.3 Finding the Wire. Realize that you will probably not be perfect when trying to find the right base position on your first few attempts. Don’t be afraid to ‘BFM the wire’ when you realize you are close or wide of the planned base distance just as you learned in the SA phase (see paragraph 5.13.2.4).
6.7.3.1.2.4 The Roll-In and On Final. In the medium-altitude regime, target ID should be taken care of prior to rolling in. During roll-in, if your target is small or difficult to break out based on surrounding features, using the EGI target designator container (TDC) is a viable target acquisition aid. With these types of targets, it is common to pull directly to the target since you are padlocked on it, putting you on a low wire. Remember to pull your FPM long and upwind of the target initially. Your best guess for an approximate AOD will get you in the right ballpark, and using ITP halfway through roll-in can help, then you can refine your AOP on final with IAA or %BFL. It is also common for the basics like power control and pipper placement to fall out when task saturated finding the wire. Be methodical about pull, center, set, your throttle technique, and get the BFL through the target.
6.7.3.1.2.5 Wind Corrections. If you have no attack heading restrictions, and there is a significant wind aloft, consider rolling in based on the wind direction. As a general rule, tail winds are best because they push your bombing solution up in the HUD making for an easier pass. Headwinds have the opposite effect, but can be easier to handle than a crosswind. Remember that the basic canopy references must be corrected for wind. A good ROT is one finger width for the first 20 knots of headwind or tailwind (on final) and an additional finger for every 10 knots above that. An example, if planning a west to east final attack heading and the winds are 30 knots out of the west, you should fly your target two finger widths above the no-wind reference. Crosswinds should be avoided if possible but can be combated by centering the target in the pitch ladders at rollout and keeping the BFL on the target.
6.7.3.2 Medium-Altitude Tactics:
6.7.3.2.1 Shooter/Cover. The most basic of medium-altitude two-ship tactics is the shooter/cover role. This tactic maximizes mutual support but can sacrifice firepower. Fly your jet into a position that gives you a good view of the ground underneath lead. Continue to fly in the same wheel and altitude while lead rolls in. As he completes his SEM, adjust your wheel to end up in a mutually supportive formation on him once again. Be ready to build his SA about your position if he asks for you posit. (Figure 6.6). Notice that you will use dry, JCAS comm to build good habit patterns.
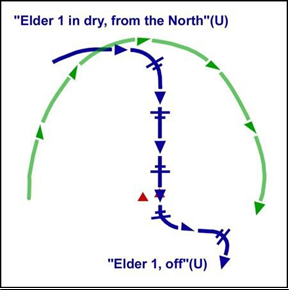
Figure 6.6. Medium-Altitude Shooter/Cover.
6.7.3.2.2 Cover/Shooter. Role swap, Number 2 is the shooter and lead is cover. The key to success is getting yourself into a good base position. Stay in position in the wheel until you are about 90° out from your desired run-in heading. Square off the last 90° before you roll in to make your base canopy references familiar and valid. Adjust your base distance as appropriate with your wings level when you check your canopy reference. Remember the technique that you are assumed to be blind off target. A visual call will be required, if visual and once the attack and 3D maneuvering is complete. You can expect your flight lead to be between your 10 and 2 o’clock once off target (Figure 6.7).
6.7.3.2.3 Shooters. Another common medium-altitude two-ship tactic is the shooter/shooter roles—both aircraft expend ordinance. This attack maximizes firepower but can sacrifice mutual support. This is most often used for multiple targets, hasty attacks and Troops-In-Contact (Figure 6.8).
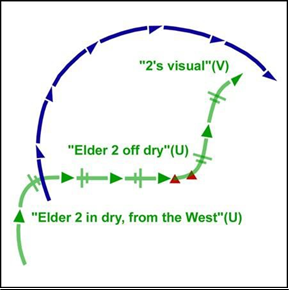
Figure 6.7. Medium-Altitude Cover/Shooter.
Figure 6.8. Medium-Altitude Shooters.
6.7.3.3 Off-Target Priorities.
There are several tasks to accomplish once you have pickled. Be sure to prioritize flying the jet first as always.
6.7.3.3.1. Valid Climbing SEM. Your first priority after weapon release is a valid SEM. The mechanics and parameters of the climbing SEM remains the same as the BSA pattern. Realize that the purpose of this maneuver is to keep you safe from the ground, the frag of your own weapon, and to get you away from threats in the area as quickly as possible. In the IFF SAT environment, there are no simulated threat reactions, but you should start practicing clearing your six, maneuvering three dimensionally, and flying the briefed geometry to help regain the visual and get back to a mutually supportive formation.
6.7.3.3.2 Clear Your Six. Use preemptive CMD to decoy IR and radar threats. In all cases, your primary defense against anti-aircraft artillery (AAA) is three-dimensional maneuvers. In a medium-altitude (low-threat) environment, your climbing SEM will already have you moving in two dimensions; some minor check turns left and right while you climb back to hold altitude will suffice. Be sure not to bleed too much airspeed and get yourself to a low-energy state so that if a threat does become a factor, you have some energy to react to it.
6.7.3.3.3 Find Your Flight Lead. Expect lead to be between your 10 and 2 once you have turned 60° to 90° off of the attack heading. You will be assumed blind off target. Your lead will typically give you a few seconds following your SEM to move your jet IAW the contracts and to find him. If you don’t find him (or don’t call it) in a timely manner, he will talk your eyes back on. He should also give you a basic altitude deconfliction plan in the brief if you are blind for an extended period of time. Remember to continue flying the geometry briefed even if you don’t see lead and maintain the altitude deconfliction. In other words, turn back into the wheel around 3 miles vice extending several miles outside the fight.
6.7.3.3.4 Get Back into Position. Even with an 8,000-foot hold, you will find yourself low on energy when trying to get back into formation on lead. Remember that a good SEM will increase your energy. Beyond that, the best you can do is keep the power in MIL and use geometry/cutoff to regain correct distance from Number 1.
No comments to display
No comments to display